Return Merchandise Authorization (RMA)
The Return Merchandise Authorization (RMA) feature in Bagisto allows customers and admins to manage post-purchase requests such as returns, item cancellations, and exchanges within a defined return period. It provides a structured workflow with status tracking, messaging, and optional refund processing.
Admin Configuration
Before using RMA, the admin must configure the feature from the Admin panel.
Configure RMA Settings
Step 1: Navigate to Configure > Sales > RMA in the Admin panel.
Step 2: Configure the following settings:
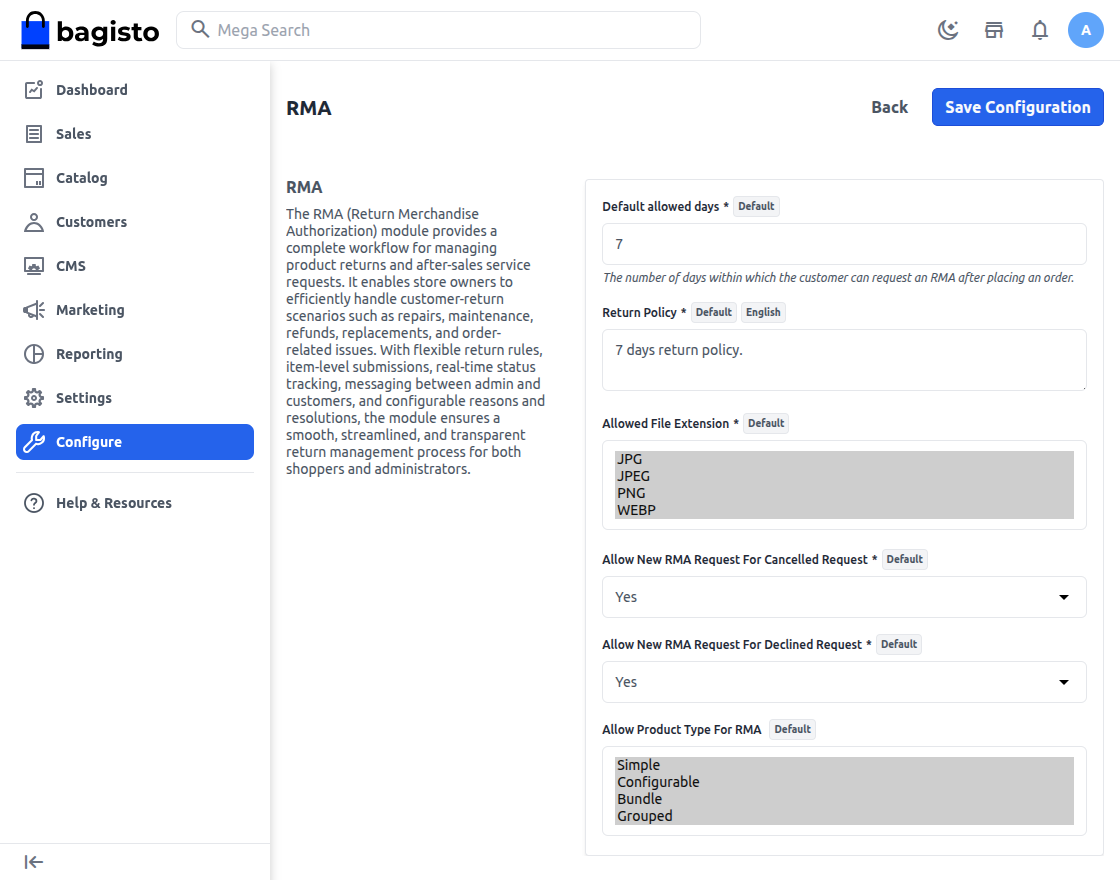
- Default Allowed Days — The number of days after order delivery during which a customer can initiate an RMA request.
- Return Policy — A text description of your return policy displayed to customers when they create an RMA request. This is locale-based.
- Allowed File Extension — Specifies the allowed MIME types for file uploads (e.g.,
image/jpg, image/jpeg, image/png, image/webp). Customers can attach images as evidence. - Allow New RMA for Cancelled Request — When enabled, customers can submit a new RMA request for an order that had a previously cancelled RMA.
- Allow New RMA for Declined Request — When enabled, customers can submit a new RMA request for an order that had a previously declined RMA.
- Select Allowed Product Type — Specifies which product types (simple, configurable, bundle, grouped) are eligible for RMA.
RMA Reasons
Reasons are predefined options that customers select when submitting an RMA request. Each reason can be linked to one or more resolution types.
Step 1: Go to Sales > RMA > Reasons.
Step 2: Click Create Reason.
Step 3: Fill in the following fields:
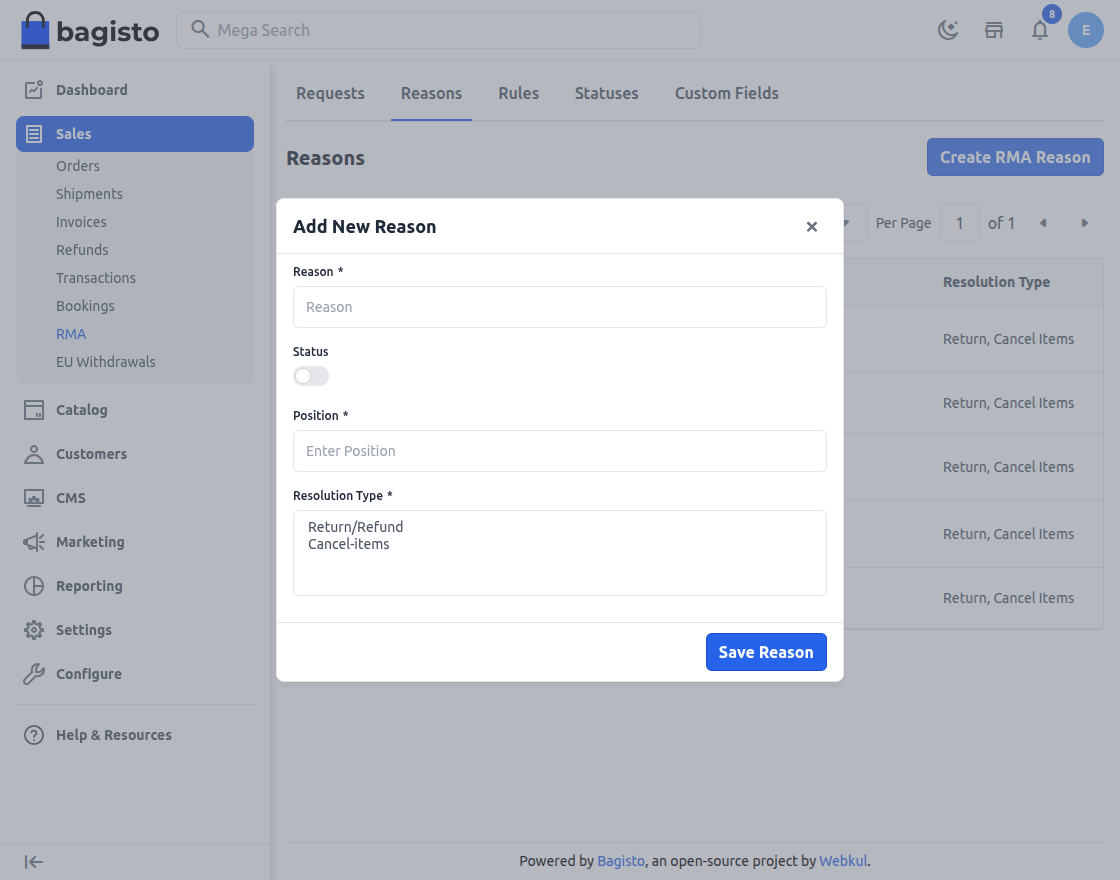
- Reason — The display name for the reason (e.g., "Defective Product", "Wrong Item Shipped").
- Status — Enable or disable the reason. Only active reasons are shown to customers.
- Position — The display order of the reason in the dropdown.
- Resolution Types — Select one or more resolution types that this reason supports:
- Return/Refund — Customer wants to return the item for a refund.
- Cancel Items — Customer wants to cancel specific items from the order (only for non-invoiced items).
Step 4: Click Save Reason.
RMA Rules
Rules allow admins to define the policies and timeframes for returns and exchanges.
Step 1: Go to Sales > RMA > Rules.
Step 2: Click Create Rule.
Step 3: Configure the following:
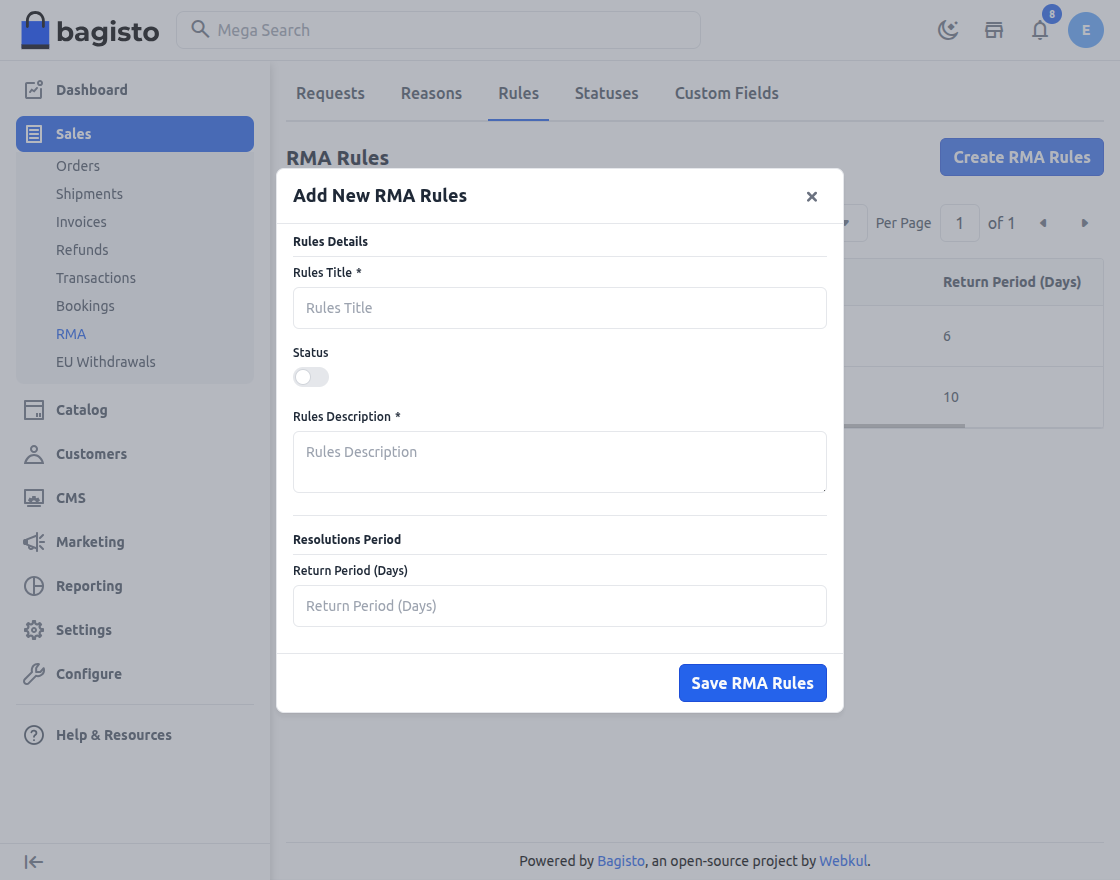
- Rules Title — The rule name.
- Rules Description — A detailed description of the rule.
- Status — Enable or disable the rule.
- Return Period — The number of days allowed for the return resolution type.
Step 4: Click Save Rule.
RMA Statuses
Statuses represent the stages an RMA request passes through. Bagisto ships with nine default statuses: Pending, Accept, Awaiting, Dispatched Package, Received Package, Solved, Declined, Item Canceled, and Canceled.
Step 1: Go to Sales > RMA > Statuses.
Step 2: Click Create Status.
Step 3: Configure the following:

- Title — The status name.
- Color — A color code for visual identification in the RMA grid.
- Status — Enable or disable the status.
Step 4: Click Save Status.
RMA Custom Fields
Custom fields allow admins to collect additional information from customers during RMA submission (e.g., "Bank Account Details for Refund", "Preferred Replacement Size").
Step 1: Go to Sales > RMA > Custom Fields.
Step 2: Click Create Custom Field.
Step 3: Configure the following:
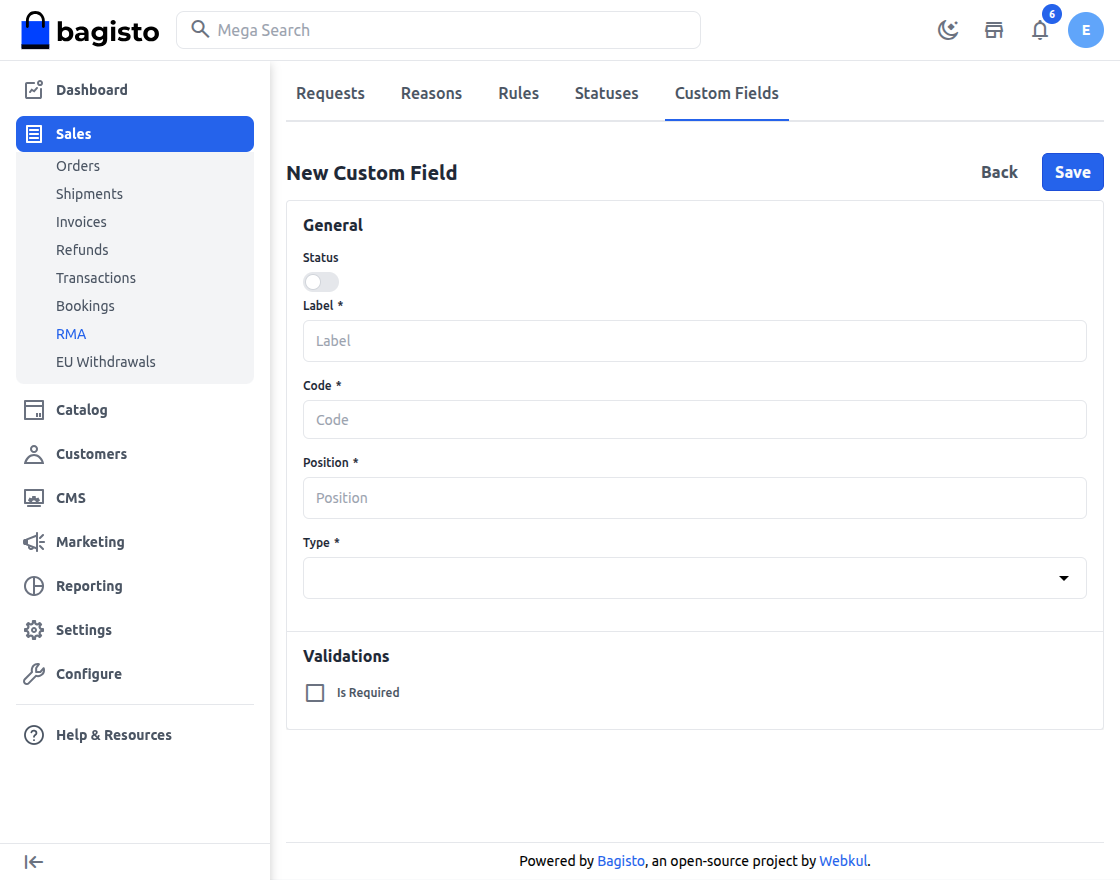
- Code — A unique system identifier for the field.
- Label — The display label shown to customers.
- Type — The input type: Text, Textarea, Select, Multiselect, Checkbox, Radio, or Date.
- Status — Enable or disable the field.
- Is Required — Whether this field must be filled before submission.
- Position — Sort order for display.
Step 4: Click Save Custom Field.
Admin — Managing RMA Requests
Viewing All RMA Requests
Navigate to Sales > RMA > Requests. The DataGrid displays:
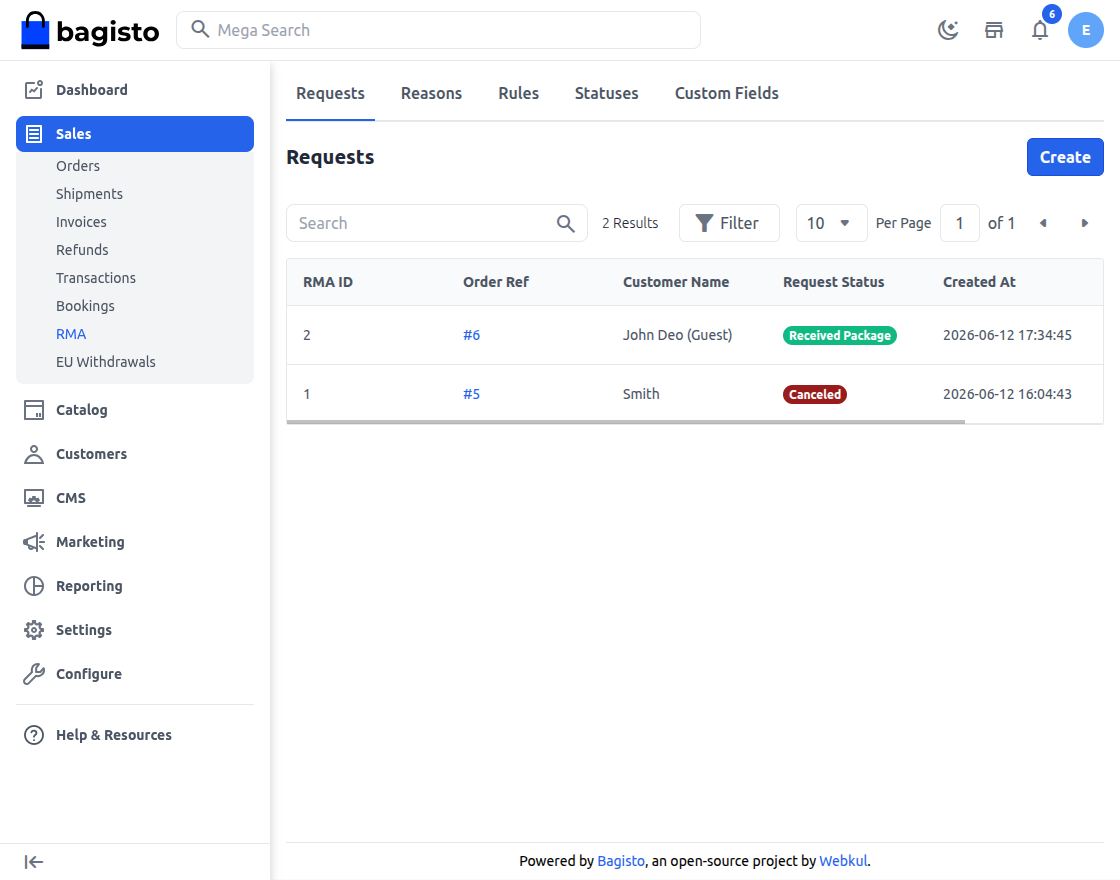
- RMA ID
- Order Ref (linked to the order)
- Customer Name (with a guest indicator for guest checkouts)
- Request Status (color-coded)
- Created Date
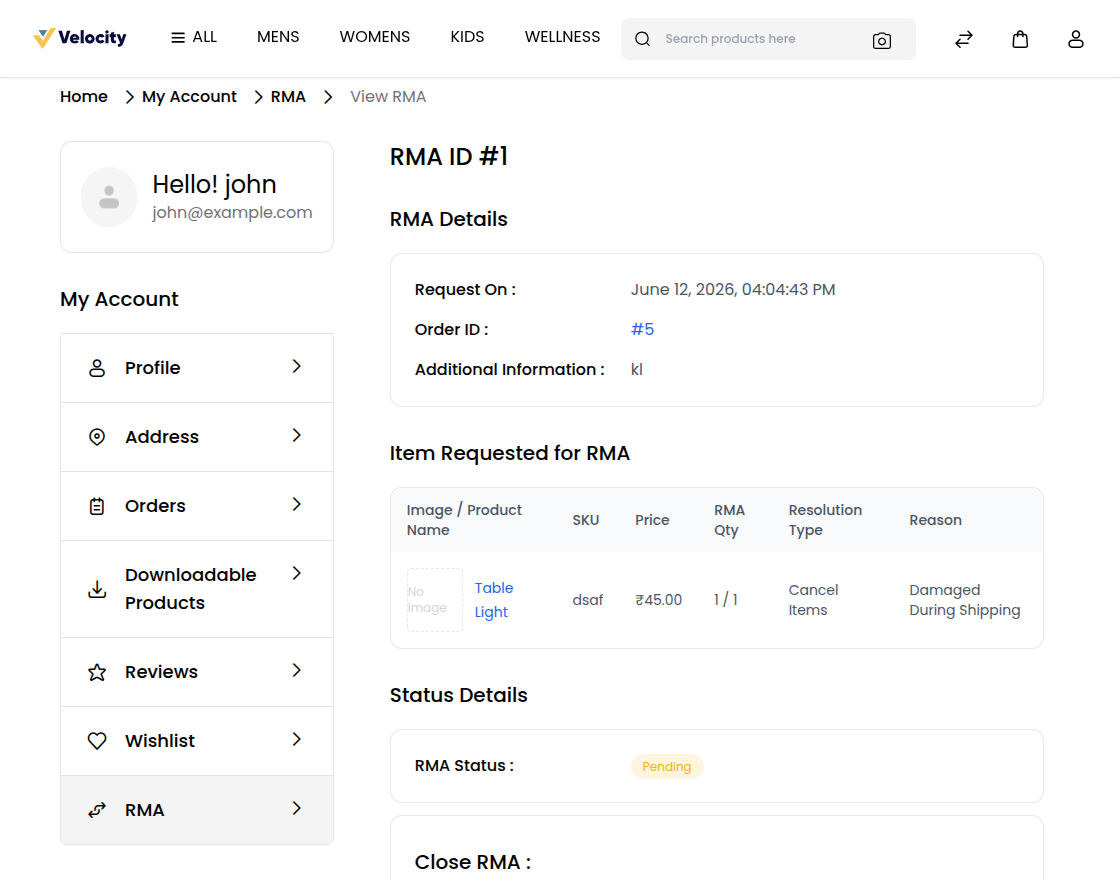
RMA Request Detail Page
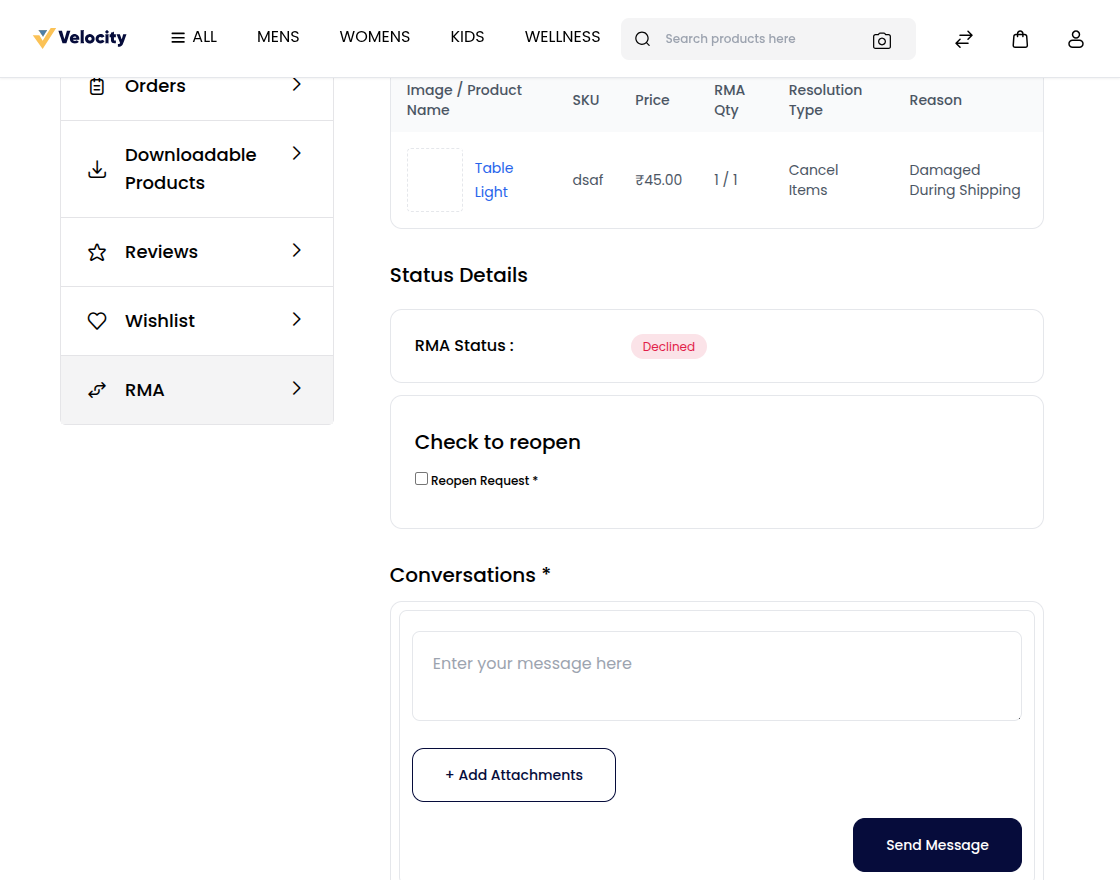
Click View on any request to see its full details. The detail page shows information such as:
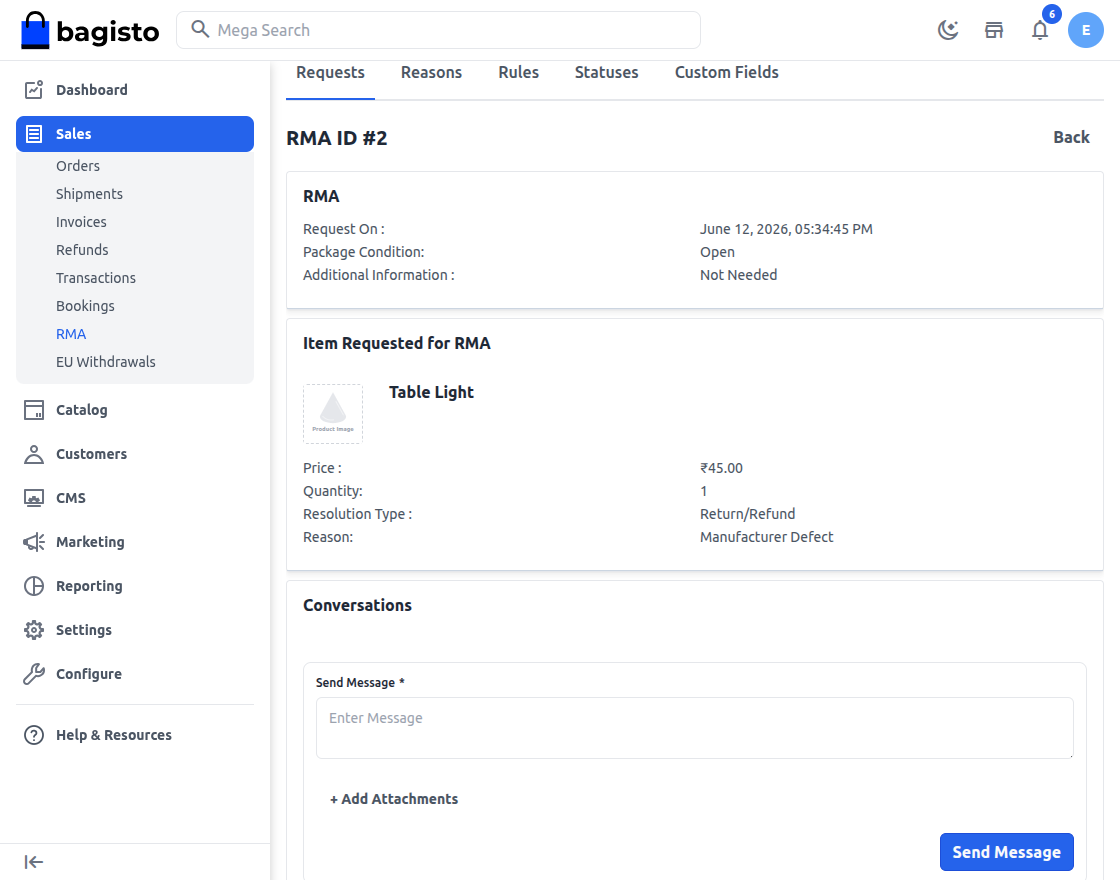
- Order Information — Order ID, customer name, email, order date, grand total, payment meathod.
- RMA Items — Each item in the request with quantity, resolution type, reason, and price .
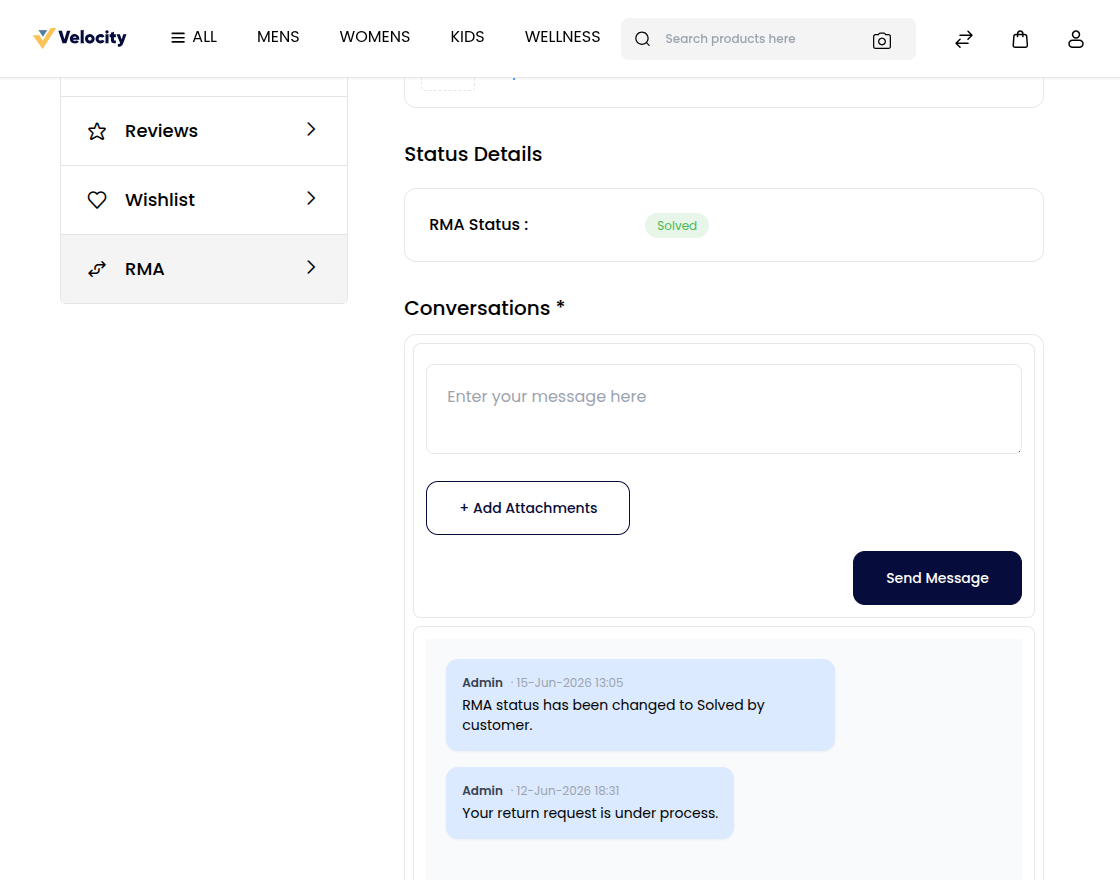
- Status — The current RMA status with a color badge.
- Conversation Thread — A message history between the admin and customer, with file attachments.
- Timeline — Status change history with timestamps.
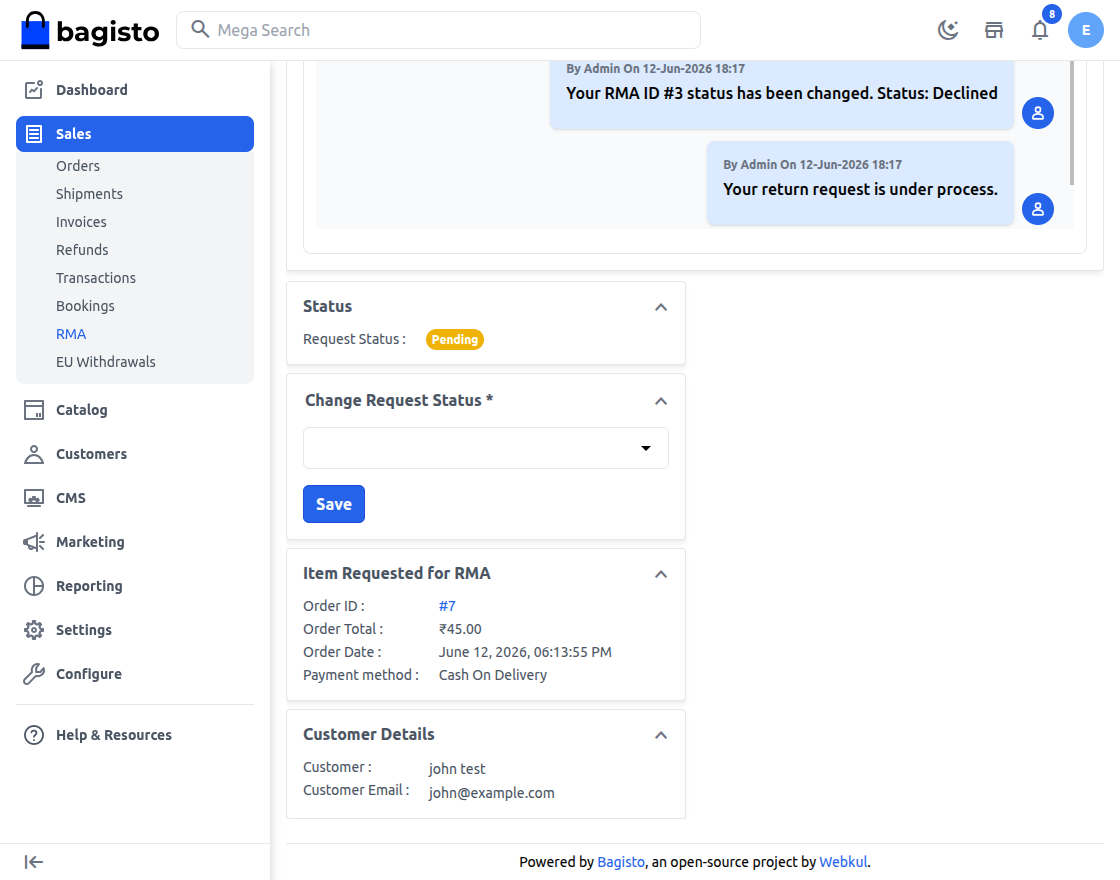
Updating RMA Status
The admin can move the RMA through its lifecycle. The available next statuses depend on the current state:
- Click Change Request Status on the RMA detail page.
- Select the next status from the available transitions.
- The system enforces a logical flow:
- Pending → Accept or Declined
- Accept → Awaiting or Canclled or Item Canclled
- Awaiting → A Nutral State
- Dispatched Package → Received Package or Declined
- Received Package → Solved (Now Admin can proceed to refund)
- Item Canceled → (terminal state, cancels and restores inventory)
- Canceled → RMA Request Canclled
Communicating with the Customer
The admin and customer can exchange messages within the RMA request:
Step 1: On the RMA detail page, scroll to the message section.
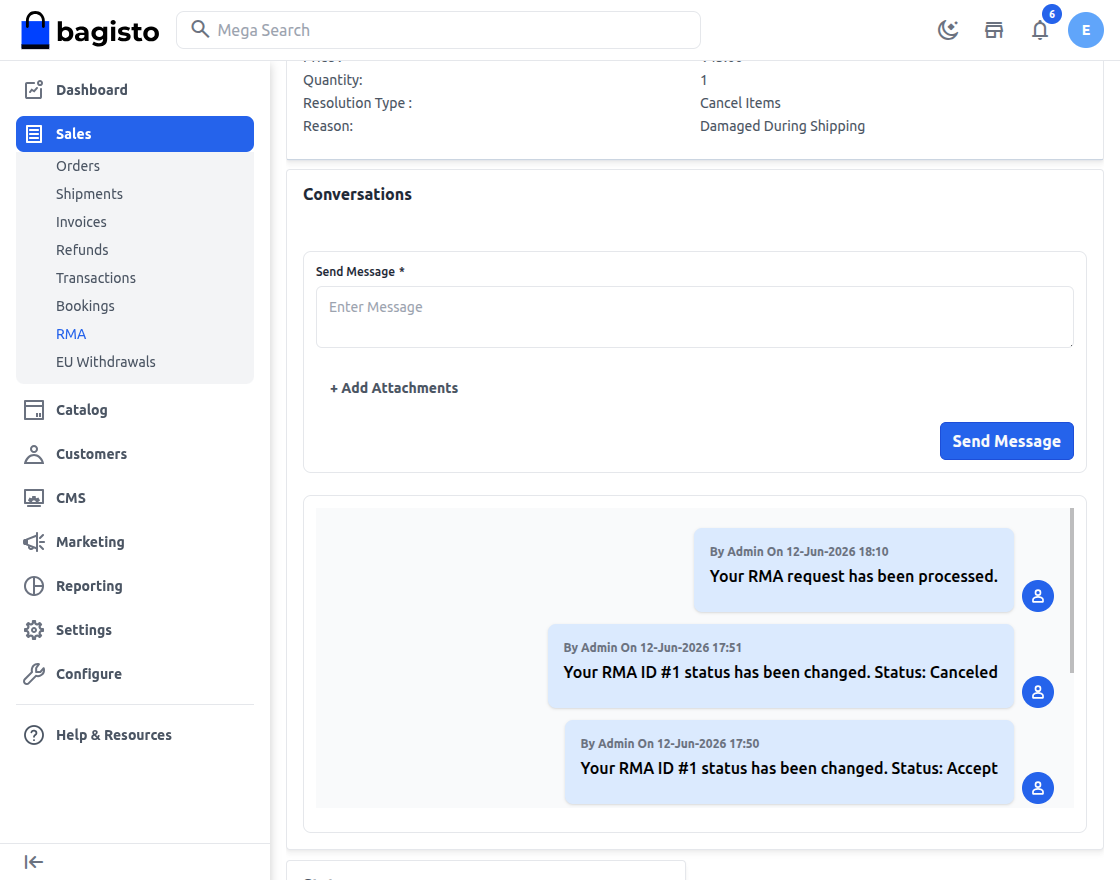
Step 2: Type your message and optionally attach a file.
Step 3: Click Send.
Creating an RMA on Behalf of a Customer
Admins can create an RMA request for any order:
Step 1: On the RMA Requests page, click Create RMA.
Step 2: Select an order from the order DataGrid. The grid only shows eligible orders.
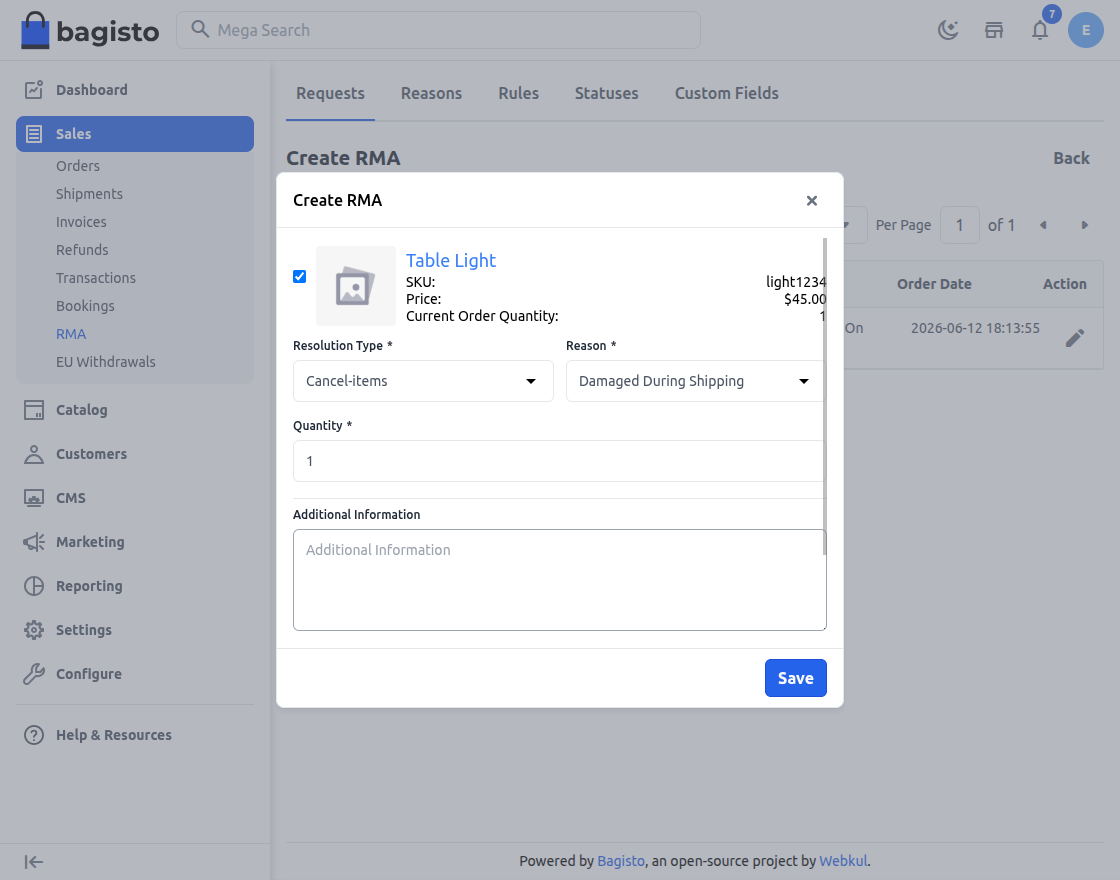
Step 3: Select the items to include, specify quantities, choose a reason and resolution type.
Step 4: Add any additional information, upload images if needed, and fill in custom fields.
Step 5: Click Save. The customer receives an RMA confirmation email.
Re-opening a Closed or Declined RMA
If the configuration allows re-RMA for cancelled/declined requests, the admin can re-open a previously closed RMA:
Step 1: On the RMA detail page, click Re-open Request.
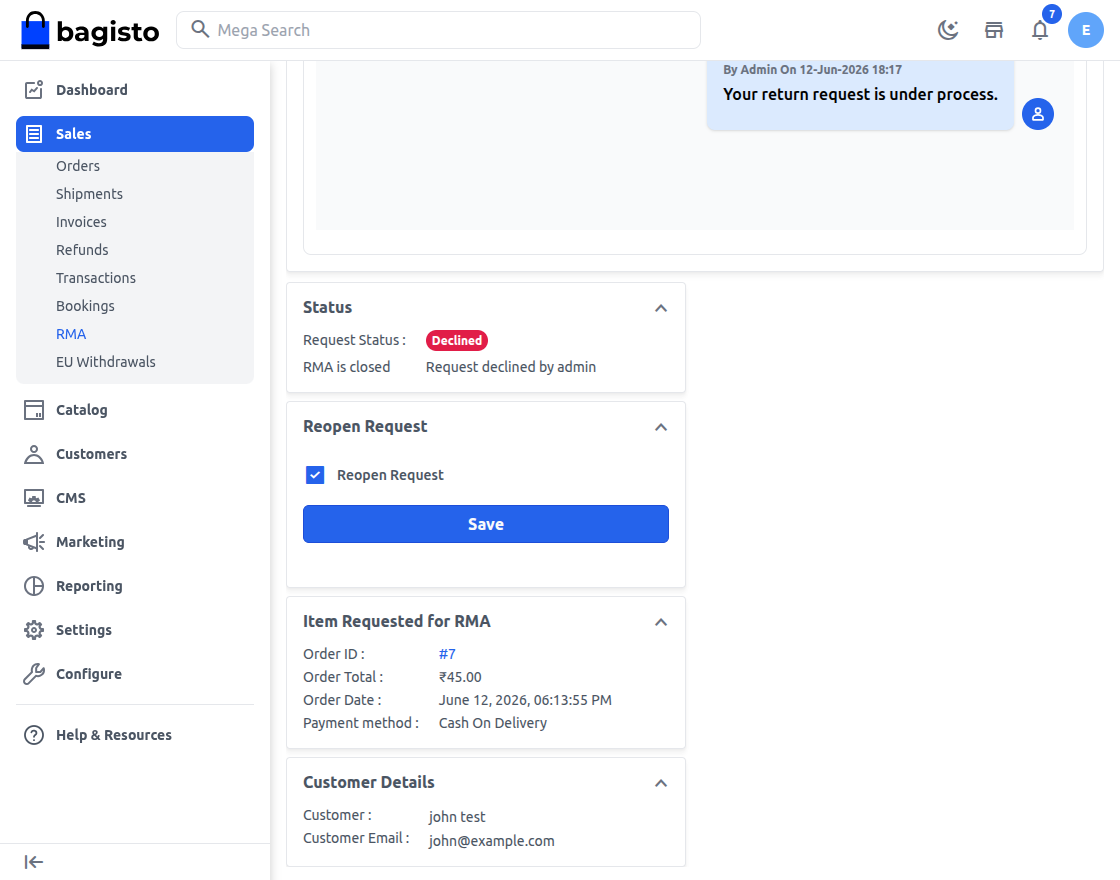
Step 2: The RMA status resets to Pending and the customer is notified.
Customer — Managing RMA Requests
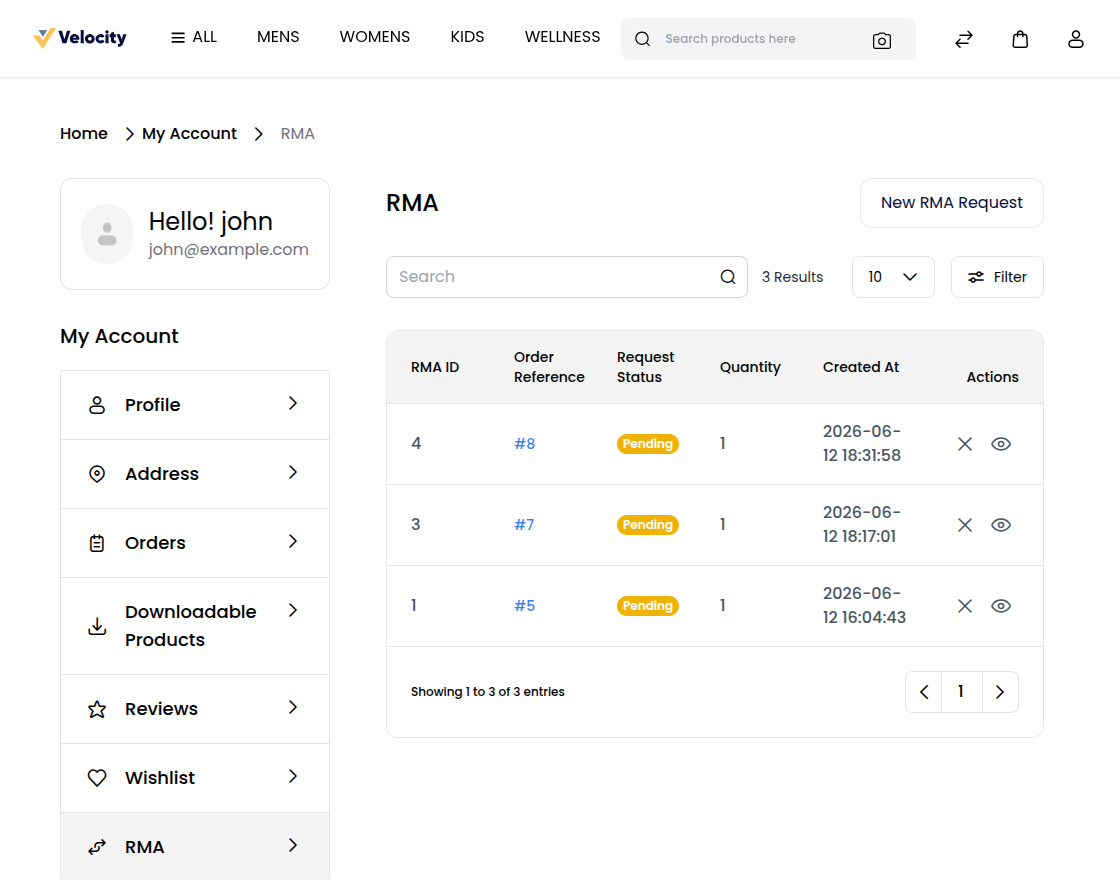
Viewing RMA Requests
Step 1: Log in to the customer account.
Step 2: Navigate to Profile > RMA.
Step 3: The RMA list shows all requests with their information.
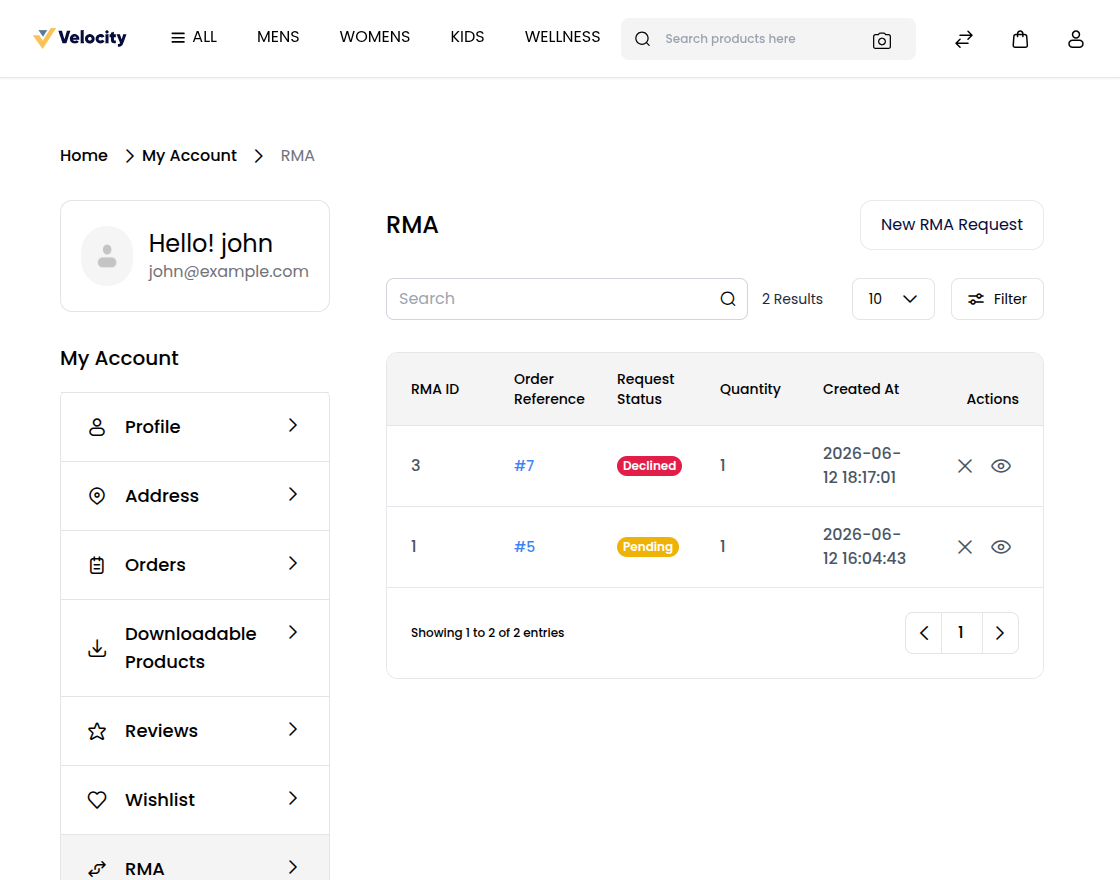
Step 4: Click View on any request to see full details.
Creating an RMA Request
Step 1: From the RMA page, click Create Return Request.
Step 2: Select an Order from the list of eligible orders. Only orders within the return window and with applicable product types are shown.
Step 3: For each item, specify:
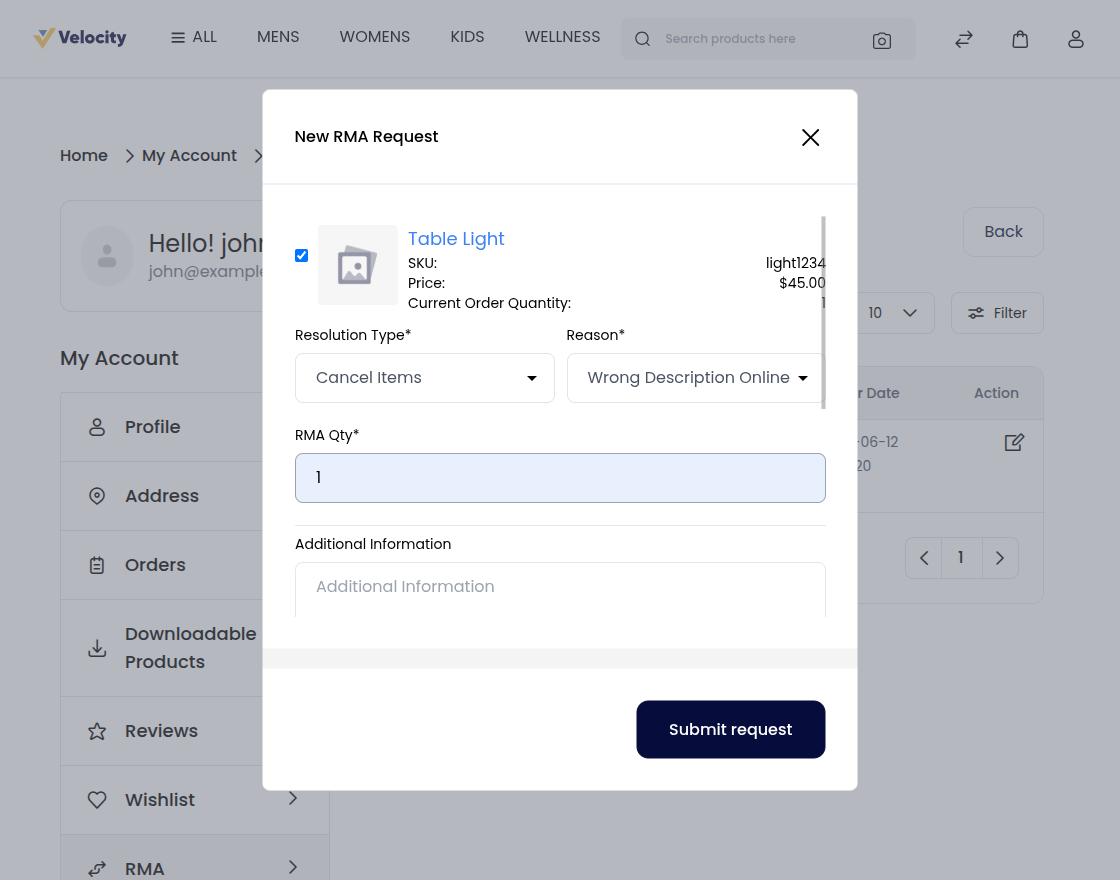
- Quantity — The number of units to return/cancel.
- Reason — Select from the predefined reasons.
- Resolution Type — Choose Return (for a refund) or Cancel Items (to cancel non-invoiced items).
Step 4: Add Additional Information in the text field.
Step 5: Upload Images as supporting evidence.
Step 6: Fill in any Custom Fields configured by the admin.
Step 7: Agree to the return policy by checking the agreement checkbox.
Step 8: Click Submit. The RMA is created with Pending status, and the admin is notified via email.
Communicating with the Admin
Customers can send messages regarding their RMA request:
Step 1: On the RMA detail page, scroll to the message area.
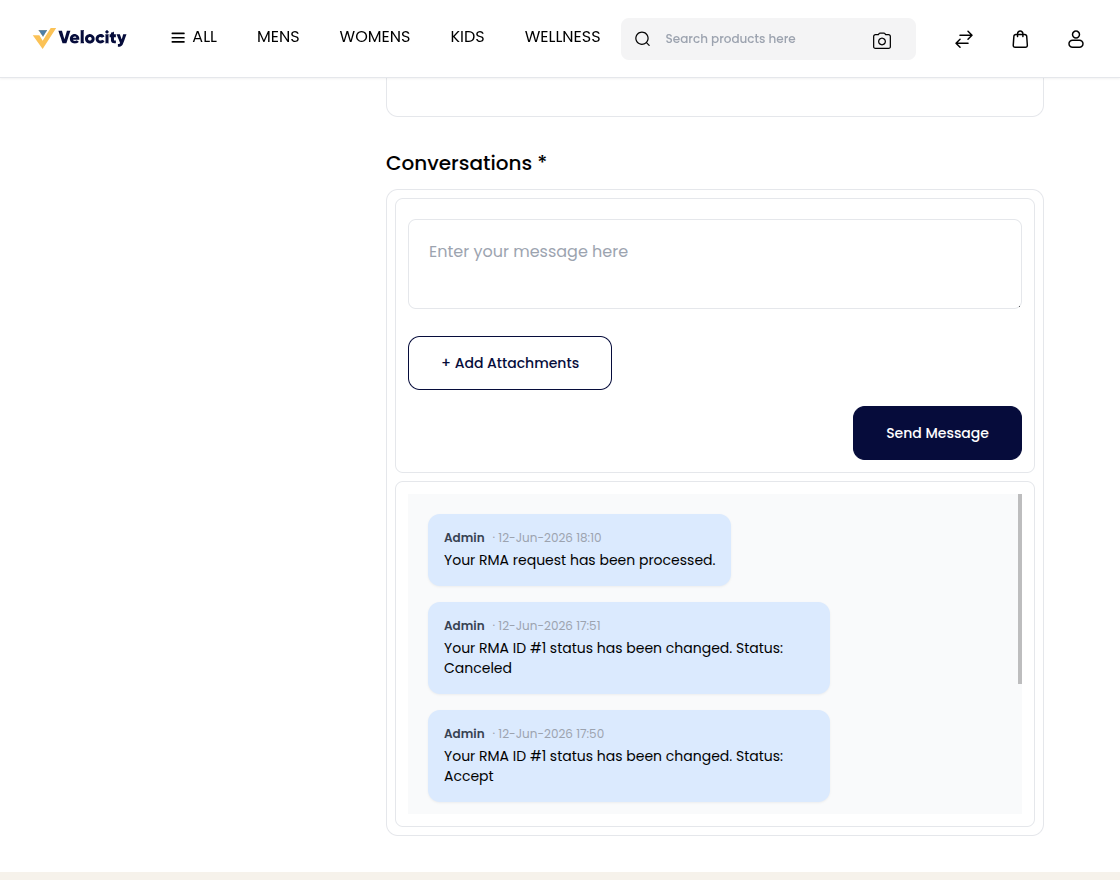
Step 2: Type a message and optionally attach a file.
Step 3: Click Send.
Closing an RMA Request
Once the customer is satisfied with the resolution, they can close the request:
Step 1: On the RMA detail page, click Close Request.

Step 2: The status changes to Solved.
Re-opening a Cancelled or Declined RMA
If the admin has enabled "Allow New RMA for Cancelled Request" or "Allow New RMA for Declined Request" in the configuration, customers can re-open a cancelled or declined RMA:
Step 1: On the RMA detail page, click Re-open Request.
Step 2: The status resets to Pending.
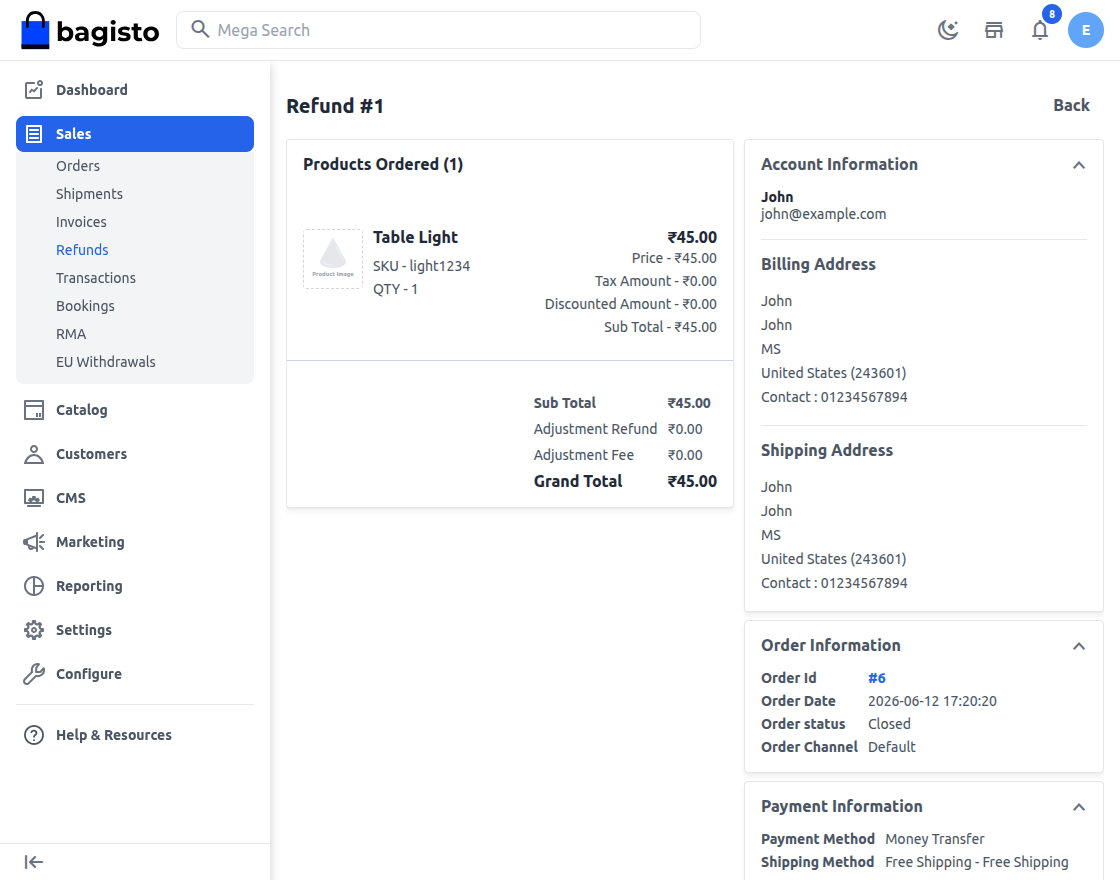
Refund Processing
When the admin sets the RMA status to Received Package for items with the Return resolution type and provide return shipping ammount, the system:
- Prepares refund data from the RMA item
- Creates a refund entry in the sales refund system.
- Returns the items to their respective order item records.
- Sends a notification email to the customer.
Email Notifications
The RMA system sends email notifications for the following events:
| Event | Recipient | Content |
|---|---|---|
| New RMA Request Created | Admin | RMA details, items, customer info |
| New RMA Request Created | Customer | Confirmation of submission |
| Admin sends a message | Customer | The message content |
| Customer sends a message | Admin | The message content |
| Status Update | Customer | New status and any relevant notes |
| RMA Re-opened | Admin | Notification of re-opened request |