
Customers
Customers are shoppers with an account in your store. Most sign up on the storefront, but you can also create an account for someone in the admin panel, for example when they order by phone. From Customers >> Customers you can find any customer, open their page to see their orders, invoices, reviews, notes and addresses, and change their account.
The customers list
Go to Customers >> Customers.
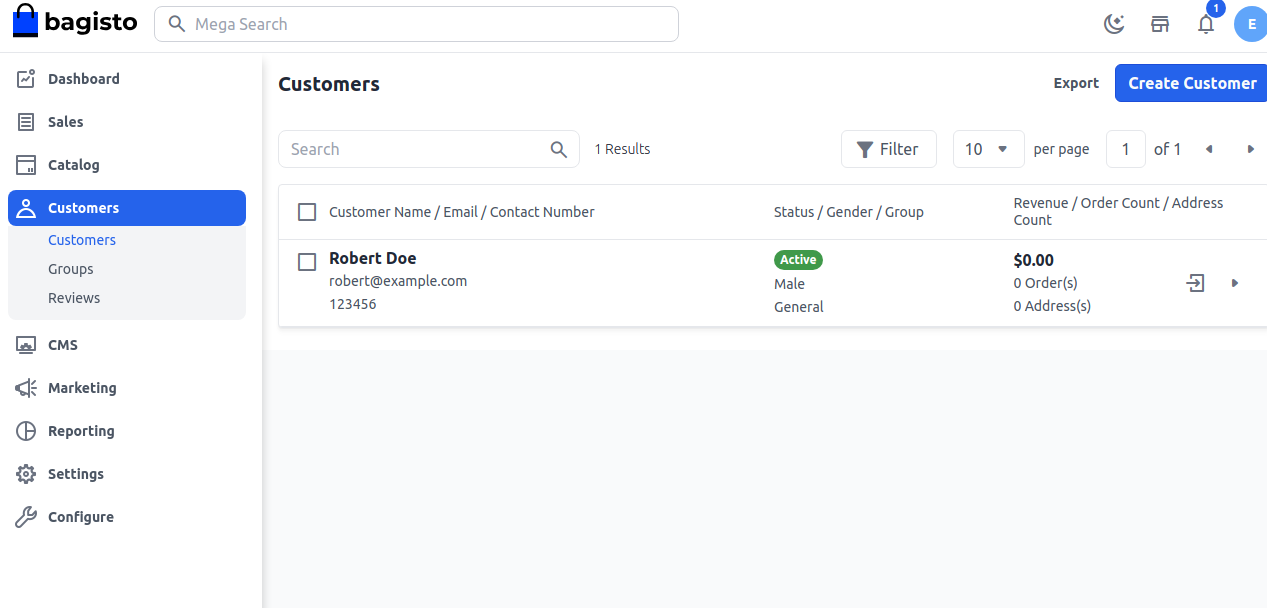
Each row shows three columns:
- Customer Name / Email / Contact Number: N/A when the customer has no phone number.
- Status / Gender / Group / Customer ID / Channel: an Active or Inactive badge, with a Suspended badge when the account is suspended, then the gender, the customer group, the channel the account belongs to and the customer's ID.
- Revenue / Order Count / Address Count: the invoiced total of the customer's orders, not counting canceled and closed orders, then the number of orders and of saved addresses.
Find customers
- Search: type in the search box to find customers by name or email.
- Filter: click Filter and filter by Channel, Customer ID, Customer Name, Email, Contact Number, Status or Group.
- Sort: click Customer Name, Email, Status, Gender, Channel, Order Count or Address Count in the header row.
Row actions
- Login as customer (the sign-in icon) opens the storefront in a new tab, signed in as the customer. See Sign in as the customer.
- View (the arrow) opens the customer's page.
Change several customers at once
- Go to Customers >> Customers.
- Tick the customers.
- Open Select Action.
- Choose Delete, or point to Update Status and choose Active or Inactive.
A customer with an order that's still Pending or Processing can't be deleted. If any of the ticked customers has one, none of them is deleted. Deleting a customer can't be undone.
Export the list
- Go to Customers >> Customers.
- Click Export.
- Choose CSV, XLS or XLSX.
- Click Export.
The file lists the customers with their details, without the Revenue column.
Create a customer
Go to Customers >> Customers.
Click Create Customer. The Create New Customer dialog opens.
Fill in the fields described in the table below.
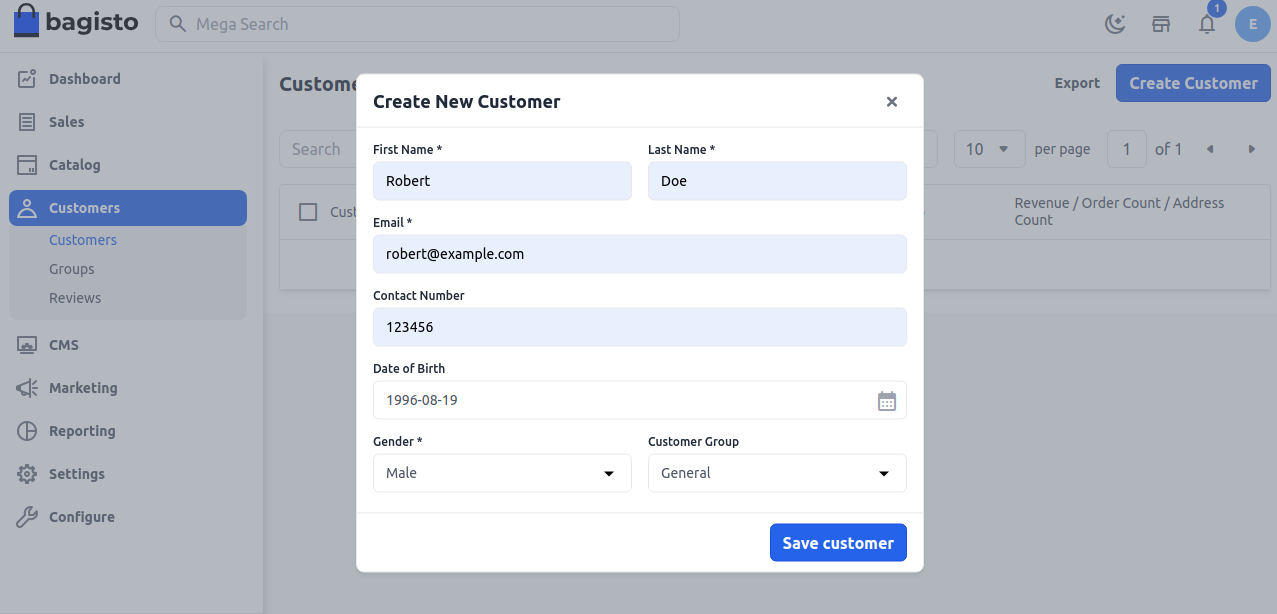
Click Save customer. The customer is added to the list.
| Field | What it does |
|---|---|
| First Name and Last Name | The customer's name. Both are required. |
| Required. The customer signs in with it, and it can belong to only one account in a channel. | |
| Contact Number | Optional. A phone number can belong to only one customer. |
| Date of Birth | Optional. It must be before today. |
| Gender | Required: Male, Female or Other. |
| Channel | Required. The channel the account belongs to. The customer signs in on that channel's storefront, and you can't change the channel later. |
| Customer Group | The group, which decides the group prices and promotions the customer gets. See Customer Groups. |
To add many customers at once, see Data Transfer.
The account password
The dialog has no password field. Bagisto gives the account a random password and marks its email address as verified, so the customer doesn't have to verify it.
- When Send the customer account credentials after registration is on in Notifications, the customer receives an email with their sign-in details.
- When it's off, ask the customer to click Forgot Password? on the sign-in page to set their own password.
When Send a confirmation e-mail to admin after customer registration is on, the admin also receives an email about the new account.
The customer page
Click the arrow on a customer's row to open their page. The title shows the customer's name with an Active or Inactive badge, and a Suspended badge when the account is suspended. Back returns to the customers list.
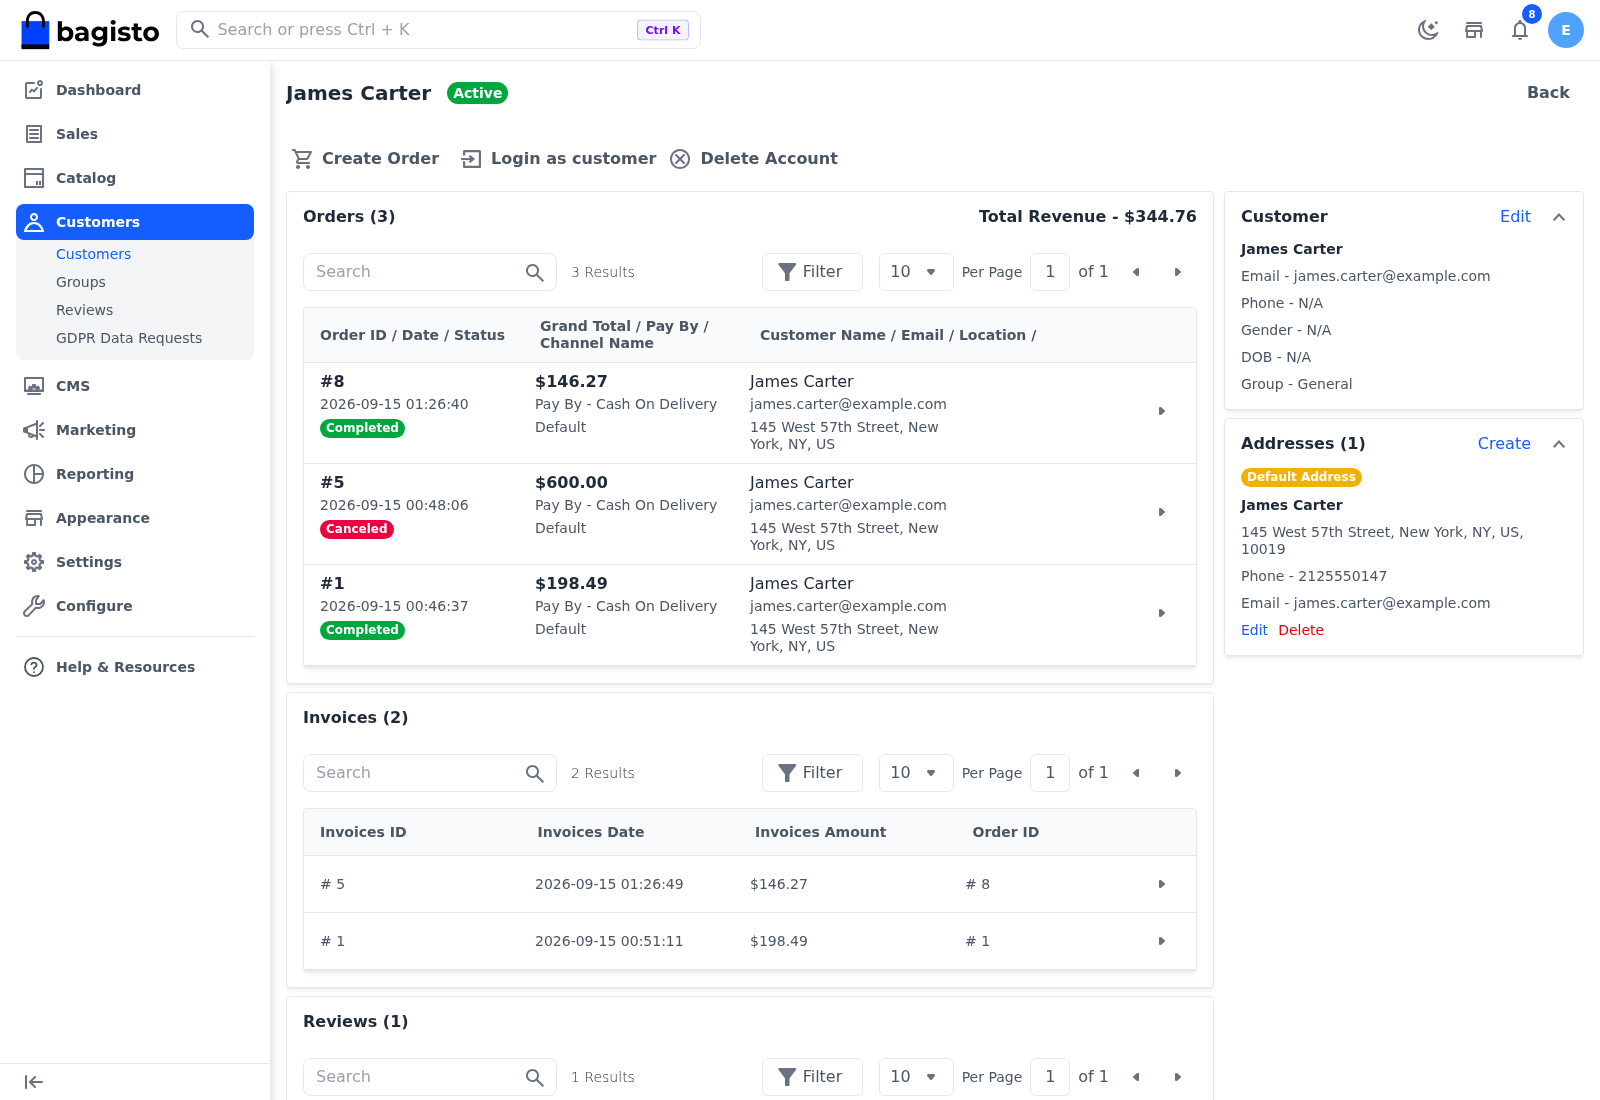
Below the title are three actions. Under them, the Orders, Invoices, Reviews and Add Note cards are on the left, and the Customer and Addresses cards are on the right.
Create an order for the customer
- Click Create Order.
- Click Agree to confirm. The Create Order for page opens for the customer.
- Add the products and complete the order as described in Create Order.
Create Order appears only when your role is allowed to create orders.
Sign in as the customer
Login as customer opens the storefront in a new tab, signed in as the customer, on their Profile page. Use it to see the account the way the customer does, for example to help them find an order.
You act as the customer
While you're signed in this way, anything you do on the storefront, such as placing an order or changing the profile, is done in the customer's name. Sign out on the storefront when you've finished.
The action appears only when your role has the Login As Customer permission.
Delete the account
- Click Delete Account.
- Click Agree to confirm.
An account with an order that's still Pending or Processing can't be deleted: the page shows This customer has pending orders and cannot be deleted. Complete or cancel those orders first. The customer's orders stay under Sales >> Orders after the account is deleted. Deleting an account can't be undone.
Orders, invoices and reviews
- Orders shows how many orders the customer has placed and the Total Revenue, the invoiced total without canceled and closed orders. Each row shows the order number, date and status, the grand total, payment method and channel, and the billing name, email and location. The arrow opens the order.
- Invoices lists the customer's invoices with the Invoices ID, Invoices Date, Invoices Amount and Order ID. The arrow opens the invoice.
- Reviews lists the customer's product reviews with the product, status, title, comment, rating and date. The arrow opens the product's edit screen in a new tab. To approve a review, see Customer Reviews.
Each card has its own search box, filters and pages, like the main lists.
Add a note
Notes record what your team knows about a customer, such as a delivery preference or a phone call.
- In Add Note, write the note.
- Tick Notify Customer to send the note to the customer by email. Leave it unticked to keep the note for your team.
- Click Submit Note.
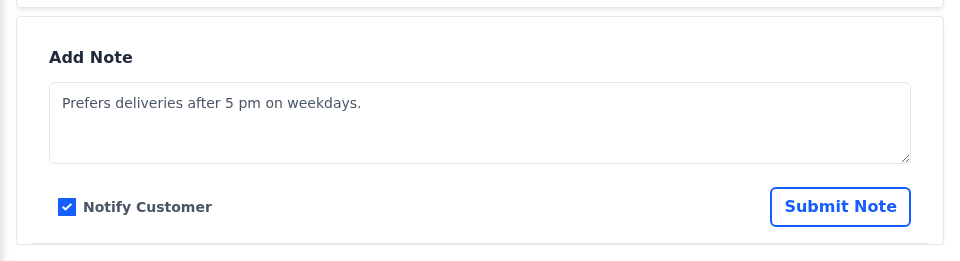
The notes are listed under the form, each with its date and whether the customer was notified. A note can't be edited or deleted after you submit it, and customers don't see notes in their account.
Edit customer details
The Customer card shows the customer's name, Email, Phone, Gender, date of birth (DOB) and Group.
- Click Edit on the Customer card. The Edit Customer dialog opens.
- Change the details.
- Click Save customer.
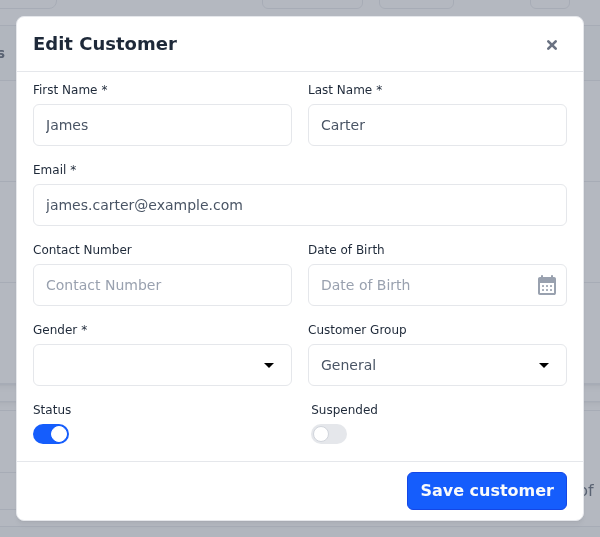
The dialog has the fields of Create New Customer except Channel, and two switches:
| Switch | What it does |
|---|---|
| Status | While it's on, the customer can sign in. While it's off, signing in shows Your activation seeks admin approval. |
| Suspended | While it's on, the customer can still sign in and browse, but can't check out: going to checkout returns them to the cart with Your account has been suspended. |
Gender is required. Customers who signed up on the storefront haven't chosen one, so pick one before you save.
Addresses
The Addresses card lists the customer's saved addresses. The default one is marked Default Address.
To add an address:
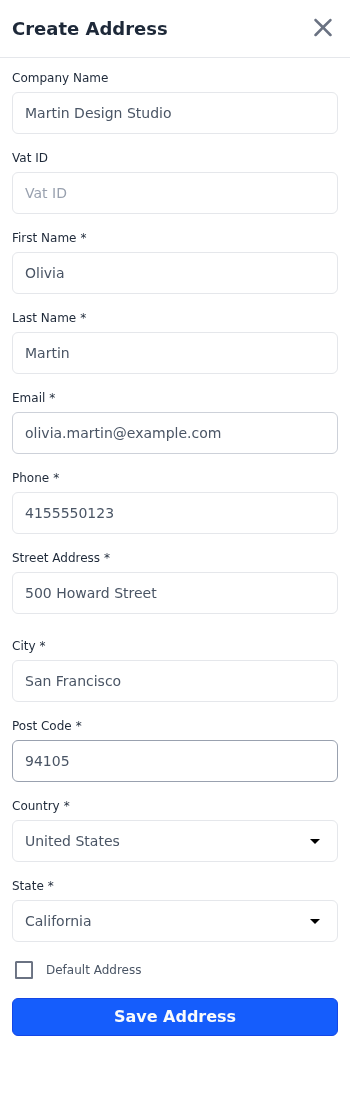
- Click Create on the Addresses card. The Create Address panel opens.
- Enter the Company Name and Vat ID, if the address has them.
- Enter the First Name, Last Name, Email, Phone and Street Address.
- Enter the City and Post Code.
- Choose the Country, then the State. The state is a list when the country has states, and a text field otherwise.
- Tick Default Address to make it the customer's default address.
- Click Save Address.
Each address also has:
- Edit: change the address in the Edit Address panel.
- Delete: remove the address after you confirm.
- Set as Default: make it the default address. It appears on addresses that aren't the default.
The number of Street Address lines is set in Address. Customers manage their own details and addresses on the storefront; see Customer Account.