
Data Transfer | Bulk Upload
Bulk import is a feature that allows users to import large quantities of data into a system quickly and efficiently.
It simplifies the process and saves time by not having to add each piece of information one by one. The feature works differently for each system and has a vast variety of use cases across many industries as well as Bagisto.
You can easily Bulk Upload Products, Customers & Tax Rates.
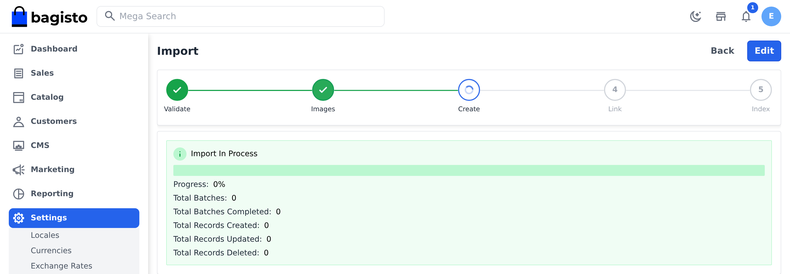
From Bagisto v2.4.9, saving an import runs it through to the end on its own. Validation, image fetching, record creation, linking, and indexing follow one another automatically, and a stepper at the top of the page shows the live progress of each phase. You no longer have to click through the phases one at a time.
Steps to add Bulk Import in Bagisto
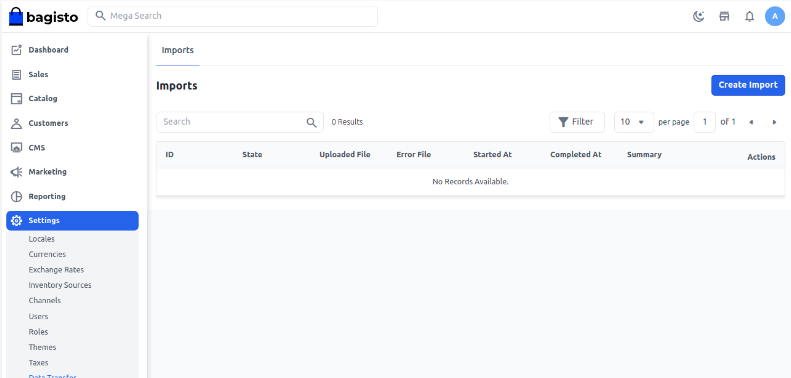
Step 1: Go to the Admin panel of Bagisto click on Settings >> Data Transfer >> Imports and click on Create Import button.
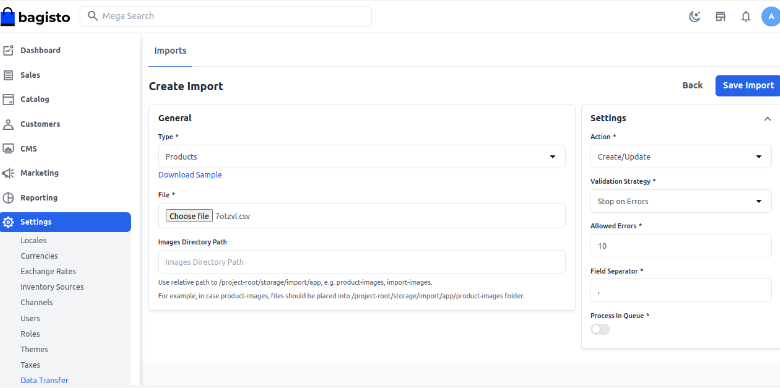
Step 2: Under general configurations select the below fields:
1) Type – Kindly select the type i.e. (Products, Customers, Tax rates) which you want to import.
2) File – Choose the file in your desired format (CSV, XLS, XLSX, XML) and kindly make sure you have all the required fields in the file.
Note – While Import the product data Simple, Configurable, Virtual, Bundled & Grouped product types can be imported except Downloadable products.
3) Download Sample – You can also download the sample files of types (Products, Customers, Tax Rates). Kindly make sure the file you are uploading is similar to this sample file.
4) Product Images – Choose where the images named in your file should be found. This panel is described in detail in the next section, and it appears only for the types that carry images.
5) Action – Kindly select from the settings configuration that you want to Create/Update or Delete the records.
6) Validation Strategy – This unique feature allows you to Skip the Errors or to Stop on Errors while Importing the data.
7) Allowed Errors – This feature allows you how much quantity of errors will get neglected while importing the data.
8) Field Separator – This feature allows you to set the fields.
9) Process in Queue – This feature allows you to run your import process in a queue. When it is enabled, validation and the image download are dispatched across your queue workers and run in parallel, so a large file is not validated in a single request. Your queue driver has to be set to database or redis for this, otherwise Bagisto asks you to change it before the import can start. When it is disabled, the import runs in short browser-driven windows instead, so no single request runs long enough to time out. Closing the page pauses such a run at the phase it had reached, and reopening the import picks it up from there rather than starting again.
So now click on the Import Button and confirm the message "The import will start as soon as this is saved. Do you want to continue?".
Product Images
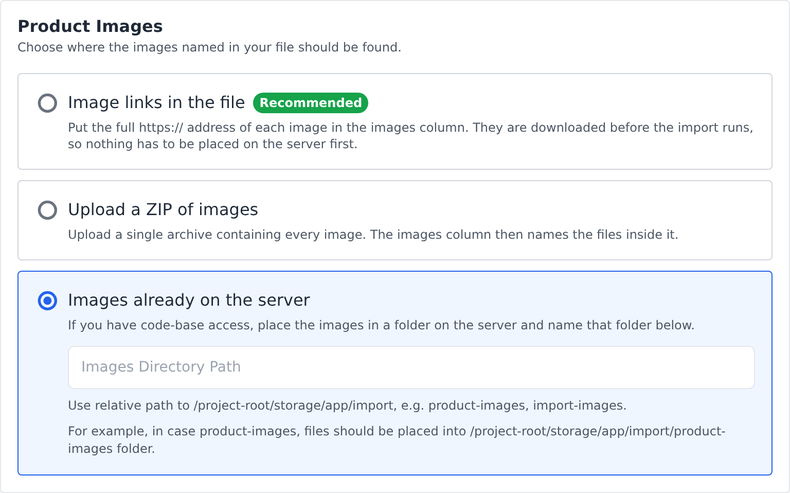
While importing products, the images named in your file can come from three different places. Pick the one that matches your file, because the choice is checked against the file during validation — a mismatch is reported as an error instead of silently importing every product without its images.
1) Image links in the file (Recommended) – Put the full https:// address of each image in the images column. Bagisto fetches every link once, in a phase of its own, before any row is written, so nothing has to be placed on the server first.
2) Upload a ZIP of images – Upload a single archive containing every image. The images column then names the files inside it. You can download a sample archive that matches the sample sheet using the Download sample images link, so the two can be tried together. When you reopen an import that already has an archive, the page shows the archive name and how many images are ready; choosing a new archive replaces them.
3) Images already on the server – If you have code-base access, place the images in a folder on the server and name that folder in the Images Directory Path field. Use a relative path to /project-root/storage/app/import, e.g. product-images. In that case the files should be placed into the /project-root/storage/app/import/product-images folder.
The method you pick is saved on the import, so reopening it restores the choice along with the value that went with it.
Step 3: The import now runs on its own and the stepper shows which phase it is in.
- Validate – The file is read and checked row by row, with a progress bar showing how many rows have been validated.
- Images – Every image link is fetched before any record is written. This step appears only when you chose Image links in the file; an uploaded archive and a server directory are read directly while the rows are written, so they need no separate phase.
- Create / Delete – The records are written, or removed if the action is Delete.
- Link – The relationships between the imported rows are resolved: configurable variants, grouped product associations, bundle options, booking data, and the related, cross-sell and up-sell links.
- Index – Price, inventory and Elasticsearch data are rebuilt.
A delete run has no images to fetch and nothing to link, so those steps are not shown for it.
If the file has errors, the run stops after validation and shows the total rows processed, the invalid rows, and the error count, with a Download Full Report button for the complete list. When the validation strategy is Skip Errors and only some rows are at fault, the import can still proceed and the faulty rows are skipped.
Step 4: Once every phase is complete, the summary confirms the result.
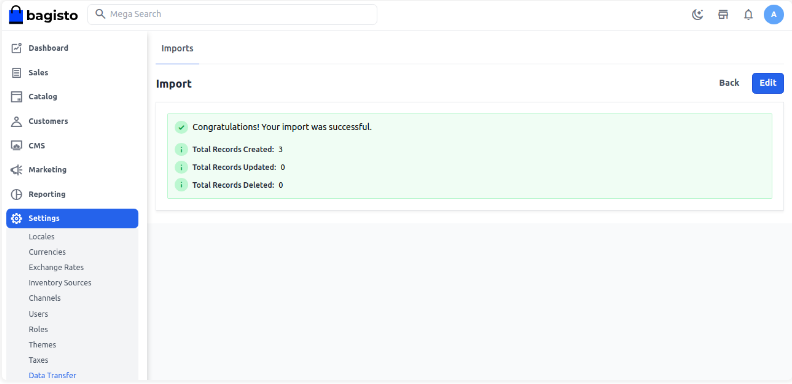
If any batch does not complete, the import finishes the batches it can and reports how many did not, so you can check the error log and run the import again for those rows.
Step 5: Now you will able see to all the products under the Catalog >> Products section as shown in the given image.
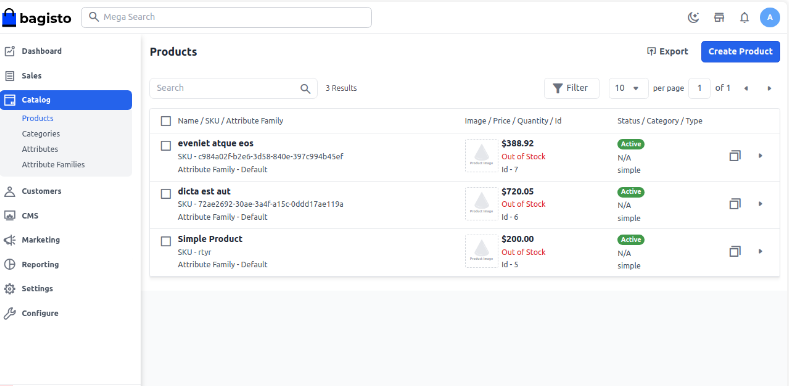
By the above steps, you can easily create a Bulk Import in Bagisto.