Return Merchandise Authorization (RMA)
RMA lets customers ask to return or cancel an item from an order, and lets you approve the request, refund or cancel the item, and message the customer, all in one place. Each request covers one item and moves through statuses such as Pending Review, Approved and Refunded.
The return window, return policy, attachments and reopening are set in RMA settings.
How a return works
- You allow returns on your products and give them a return period.
- A customer requests a return or cancellation for an item, or you create the request for them. It starts as Pending Review.
- You approve or decline the request.
- While the item comes back, you move the request to Awaiting Return and Return In Transit.
- You refund or cancel the item from the request. The request closes as Refunded or Item Canceled.
The customer can also cancel the request, or mark it as solved.
Allow returns on a product
A product can be returned only when Allow RMA is on for it.
- Go to Catalog >> Products.
- Open the product.
- In RMA, switch on Allow RMA.
- Choose a rule in RMA Rules.
- Click Save Product.
- The RMA section shows on simple products, on variants, and on the product types chosen in Allow Product Type For RMA in RMA settings. Returns are allowed only if the product's type is chosen there when the order is placed. Virtual, downloadable and booking products don't have the section.
- For a grouped product, set Allow RMA on its simple products. For a configurable product, set it on the main product.
- The return period comes from the product's rule, if the rule is active. Otherwise Default allowed days from the settings is used.
- The return period is saved on the order when it's placed, and is counted from the order date. Changing a rule or a setting later doesn't change orders already placed.
- The period applies to both returns and cancellations.
Reasons
Reasons are the choices customers pick from when they make a request. Bagisto comes with five: Manufacturer Defect, Damaged During Shipping, Wrong Description Online, Dead On Arrival and Product Not Received Yet.
Go to Sales >> RMA >> Reasons to see each reason with its ID, Reason, Status, Resolution Type, Position and Created At.
Create a reason
Go to Sales >> RMA >> Reasons.
Click Create RMA Reason. The Add New Reason form opens.
Enter the Reason, such as "Wrong size delivered".
Switch Status on. A new reason starts switched off, and only active reasons are offered.
Enter the Position, a number of 1 or more.
In Resolution Type, choose Return/Refund, Cancel-items or both. The reason is offered for the types you choose.
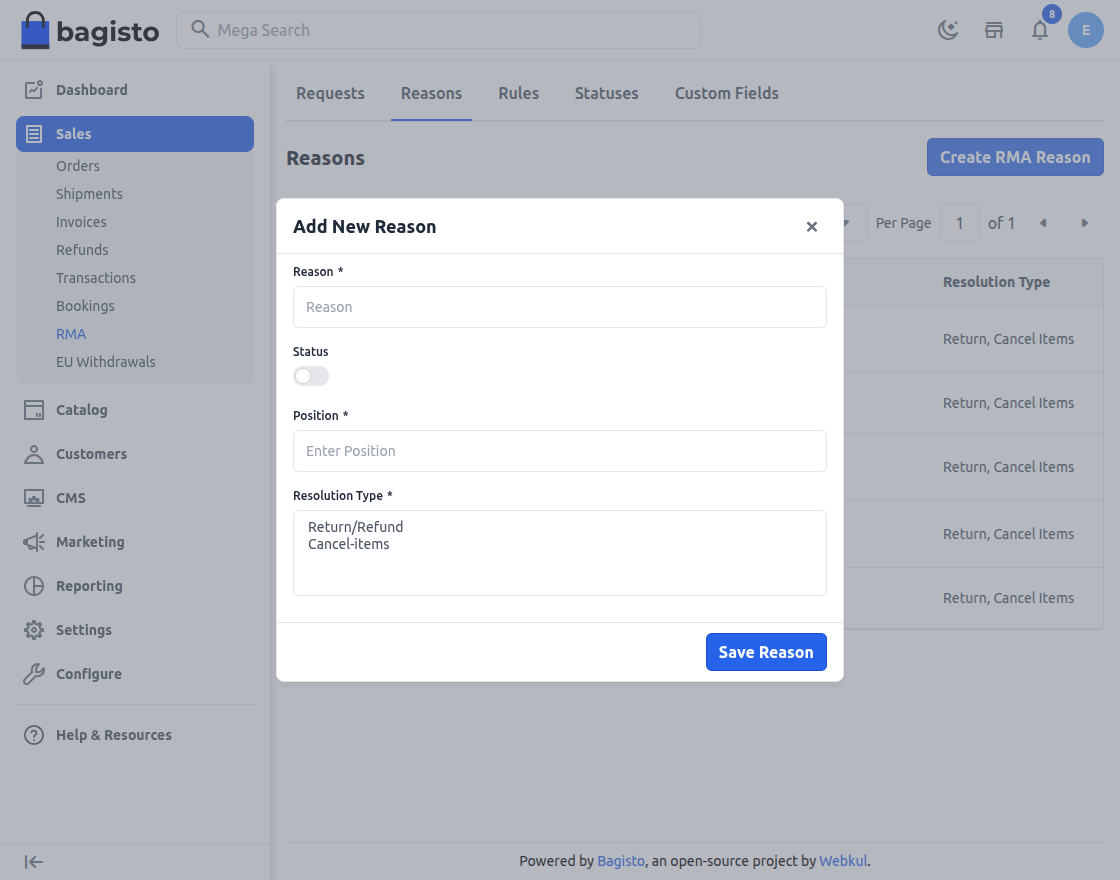
Click Save Reason.
To change a reason, click its edit icon. To switch several reasons on or off, select them and use Update.
Rules
A rule sets how many days customers have to request a return or cancellation for the products it's assigned to. Bagisto comes with the rule Basic, with 10 days.
Go to Sales >> RMA >> Rules to see each rule with its ID, Name, Status and Return Period (Days).
Create a rule
Go to Sales >> RMA >> Rules.
Click Create RMA Rules. The Add New RMA Rules form opens.
Enter the Rules Title.
Switch Status on. Only active rules can be chosen on a product.
Enter the Rules Description, which is required, up to 70 characters.
Enter the Return Period (Days), 1 or more. If you leave it empty, Default allowed days is used.
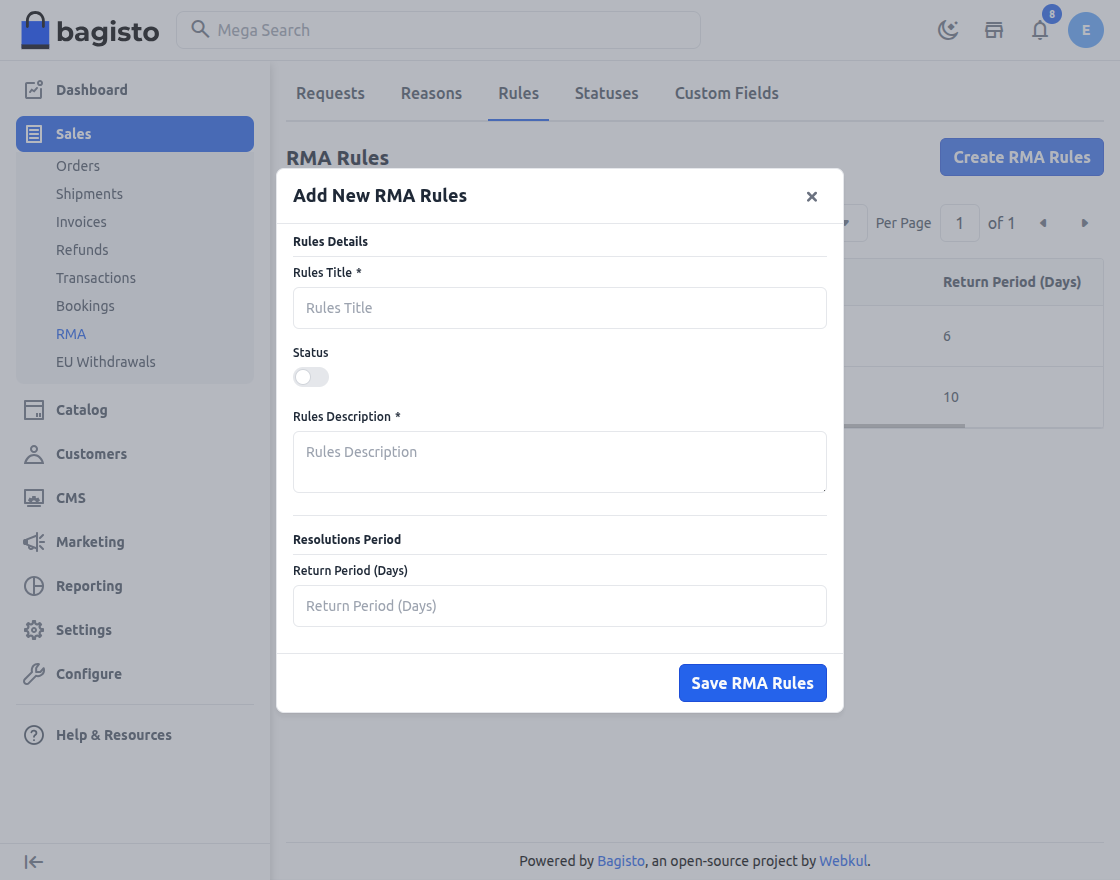
Click Save RMA Rules.
Then assign the rule to products. If you delete a rule, new orders for its products use Default allowed days instead.
Statuses
A request's status shows where it stands. Bagisto comes with nine statuses:
| Status | What it means | How it's set |
|---|---|---|
| Pending Review | A new or reopened request waiting for your review. | When a request is created or reopened. |
| Approved | You accepted the request. | You choose it. |
| Awaiting Return | You're waiting for the customer to send the item back. | You choose it. |
| Return In Transit | The item is on its way back. Return requests only. | You choose it. |
| Refunded | The item has been refunded. | Refund Item on the request. |
| Solved | The customer marked the request as solved. | The customer, on the storefront. |
| Request Declined | You declined the request. | You choose it, while the request is Pending Review. |
| Item Canceled | The item has been canceled on the order. | Cancel Item on the request. |
| Request Canceled | The request was canceled. | The customer, or you once the request is past Pending Review. |
Refunded, Solved, Request Declined, Item Canceled and Request Canceled close the request. A declined or canceled request can be reopened when the settings allow it.
Go to Sales >> RMA >> Statuses to see each status with its ID, Title, Color and Status.
Create a status
Add your own statuses for steps in your process, such as "Replacement Shipped".
Go to Sales >> RMA >> Statuses.
Click Create RMA Status. The Add New RMA Status form opens.
Enter the Title. It must be different from every other status.
Switch Status on.
Choose the Color used for the status in the lists and on the request.
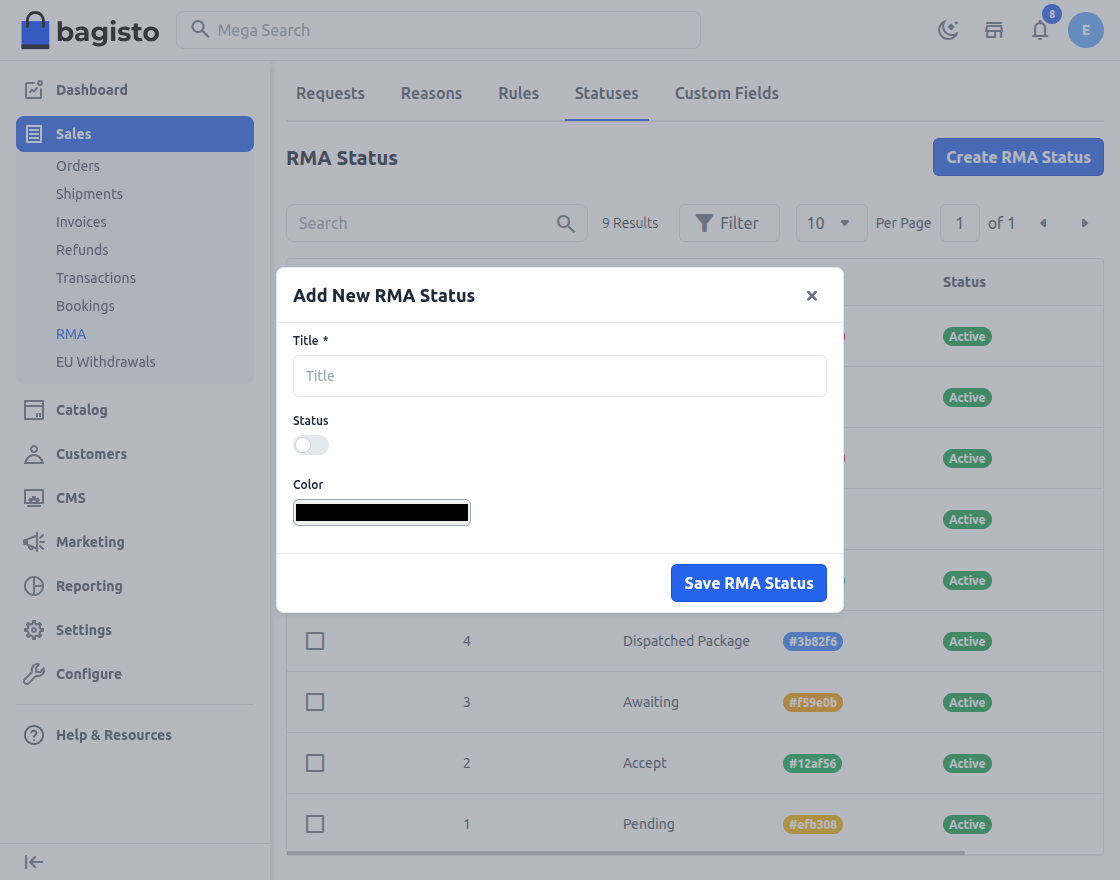
Click Save RMA Status.
- Active statuses you create are offered in Change Request Status once a request is past Pending Review. Choosing one doesn't change the order, but the customer is emailed and Order Actions are hidden. To refund or cancel the item later, move the request back to Awaiting Return or Return In Transit.
- For the nine default statuses, the edit form changes only the Color, and saving it switches the status on. Default statuses can't be deleted. Keep them switched on, because the request workflow depends on them.
Custom fields
Custom fields ask customers for extra details when they make a request, such as their preferred replacement size.
Go to Sales >> RMA >> Custom Fields to see each field with its ID, Code, Label, Type, Required and Status.
Add a custom field
Go to Sales >> RMA >> Custom Fields.
Click Add New Field. The New Custom Field page opens.
Switch Status on. A new field starts switched off.
Enter the Label customers see.
Enter a Code, which must be unique.
Enter the Position.
Choose the Type: Text, Textarea, Date, Select, Multiselect, Checkbox or Radio.
For Select, Multiselect, Checkbox or Radio, enter the first choice in Options and Value.
Click Add Option for each further choice.
To make customers fill in the field, tick Is Required.
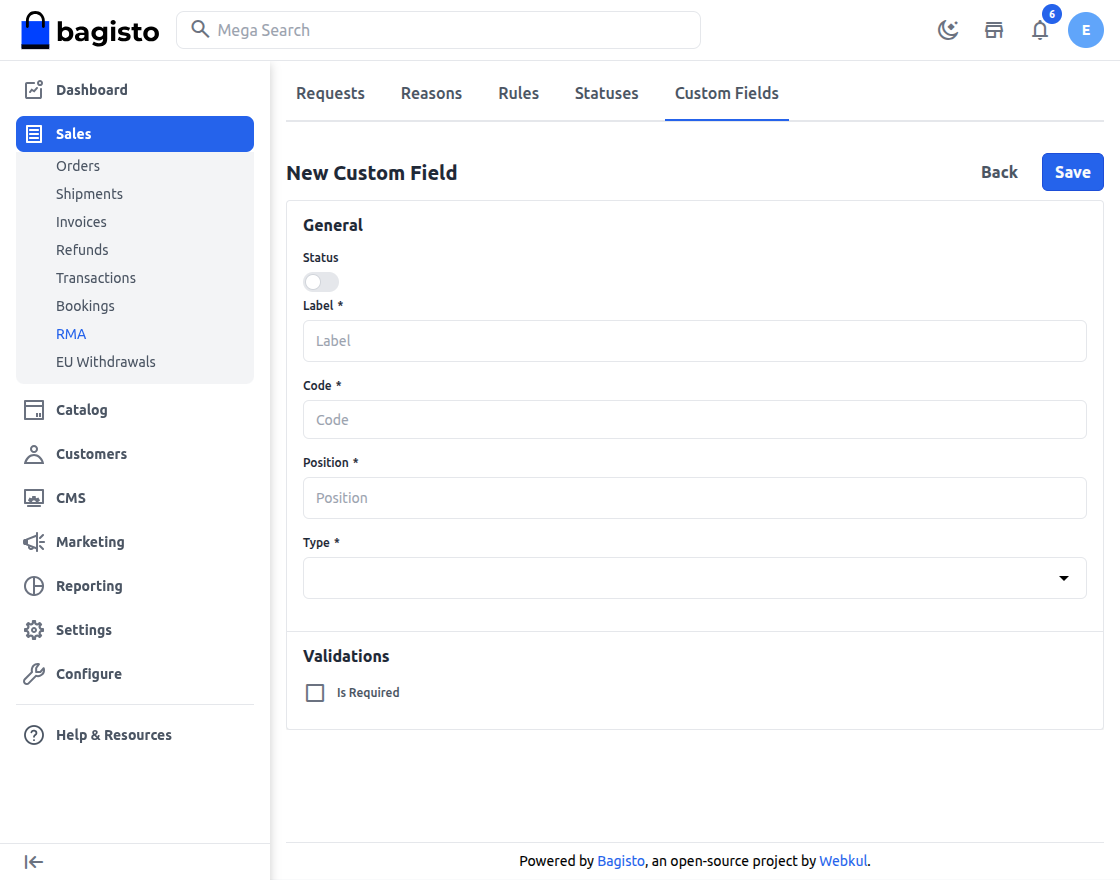
Click Save.
Active fields appear on the request form for customers and admins, and the answers are shown on the request. The storefront form won't submit without a required field; in the admin form, a required Checkbox field isn't enforced. For a Text field, Input Validation offers Number, Email, Decimal and URL, and a new field is saved with Number. Bagisto doesn't check answers against it, so say in the Label what format you need.
Before you delete a reason, status or field
Switch a reason, status or custom field off rather than deleting it once requests have used it. Don't delete custom statuses; switch them off instead. Requests that used a deleted reason or status can no longer be opened, and deleting a custom field removes the answers stored on past requests.
Handle return requests
The Requests screen
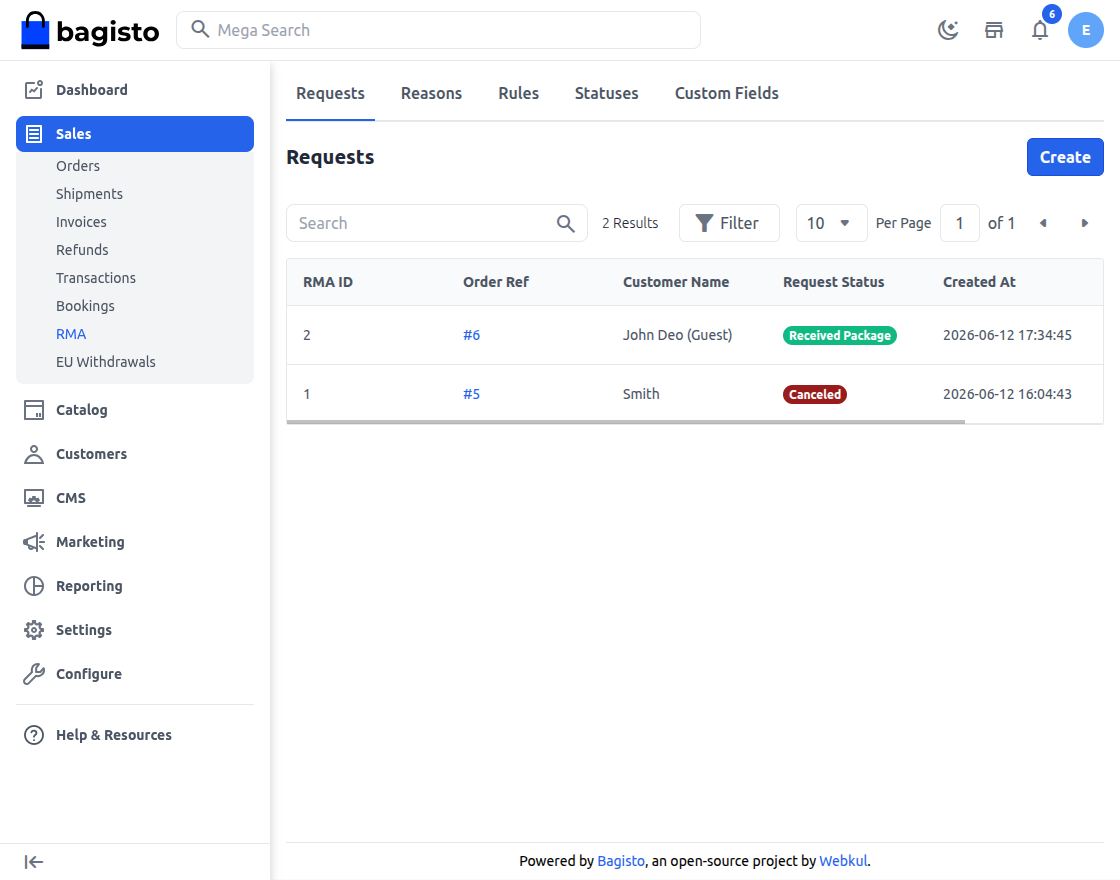
Go to Sales >> RMA >> Requests to see every request with its RMA ID, Order Ref, Customer Name, Request Status and Created At. A guest order shows (Guest) after the name. Click View to open a request.
Create a request for a customer
You can create a request for any customer's order, including guest orders.
- Go to Sales >> RMA >> Requests.
- Click Create. The Create RMA page lists the orders that can have a request.
- Click the edit icon in the order's Action column. The Create RMA form opens.
- Tick the item. A request covers one item.
- Choose the Resolution Type: Return/Refund or Cancel-items.
- Choose the Reason.
- Enter the Quantity.
- For a return, choose the Package Condition, Open or Packed, if you know it.
- Fill in the custom fields.
- Enter any Additional Information, up to 250 characters.
- Add Images, if the customer sent any.
- Click Save.
The request opens with the status Pending Review.
- An order is listed when it isn't Canceled, Closed, Fraud or Pending Payment, and it has an item within its return period with a quantity that isn't already in a request.
- An order can still be listed after its items were refunded or canceled on the order; the form then says Item not available for RMA.
- Return/Refund is offered when part of the item is invoiced and not refunded, up to that quantity.
- Cancel-items is offered when part of the item isn't invoiced or canceled, up to that quantity.
- In the admin panel, the quantity limit doesn't subtract quantity already in other requests, so check the item's requests first.
The request page
The title shows the request number, such as RMA ID #4.
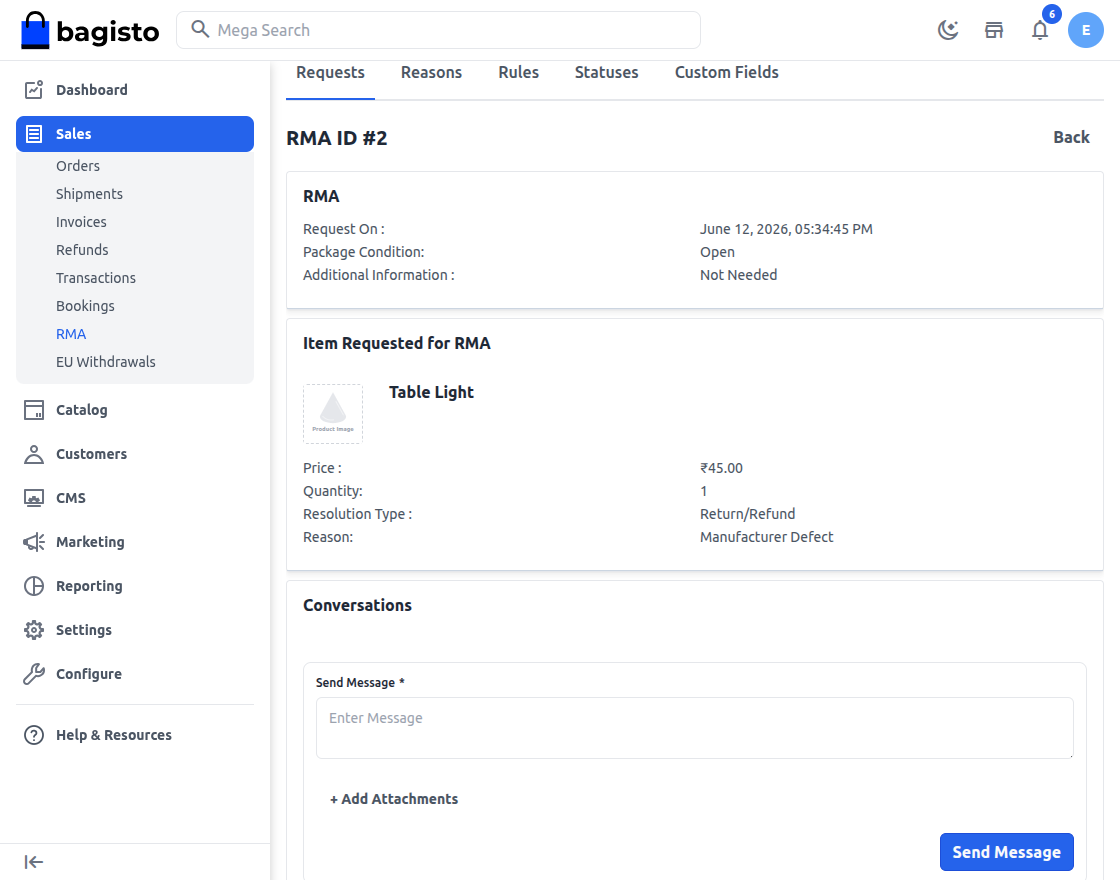
- RMA: the date of the request, the Package Condition, the custom field answers, the Additional Information and the images.
- Item Requested for RMA: the item with its price, quantity, Resolution Type and Reason, and the Order Actions described below.
- Conversations: the messages between you and the customer.
- Status: the current status. A Request Declined or Item Canceled request also says RMA is closed.
- Change Request Status and Reopen Request, when they apply.
- A second panel, also headed Item Requested for RMA, shows the order's ID, total, date and payment method, and Customer Details shows the customer's name and email.
Approve or decline a request
- Go to Sales >> RMA >> Requests.
- Open the request.
- In Change Request Status, choose Approved or Request Declined.
- Click Save.
- Click Agree.
The customer is emailed the new status. After approval, Change Request Status offers Awaiting Return, Return In Transit for returns, Request Canceled and your own active statuses. Change them the same way. Once a request is closed, Change Request Status is hidden.
Refund the item
Order Actions appear while a request is Approved, Awaiting Return or Return In Transit. These actions change the order and can't be undone.
- Go to Sales >> RMA >> Requests.
- Open the request.
- In Order Actions, click Refund Item. The Refund Item form opens.
- Check the Refund Shipping amount. It starts at the shipping that can still be refunded.
- Click Refund Item.
The refund is created as soon as you click: a refund for the request's quantity plus the shipping amount, with no adjustment refund or fee. The item's refunded quantity and the order's totals and status are updated, the request becomes Refunded, and the customer is emailed. The refund is listed on the order, as described in Create Refund.
Cancel the item
For a Cancel-items request, Order Actions shows Cancel Item.
- Go to Sales >> RMA >> Requests.
- Open the request.
- In Order Actions, click Cancel Item.
- Click Agree.
The item's quantity is canceled on the order and the order's status is updated. The request becomes Item Canceled, and the customer is emailed.
Send a message
- Go to Sales >> RMA >> Requests.
- Open the request.
- In Conversations, type your message in Send Message. A message is required, even when you attach a file.
- To attach a file, click Add Attachments and choose the file.
- Click Send Message.
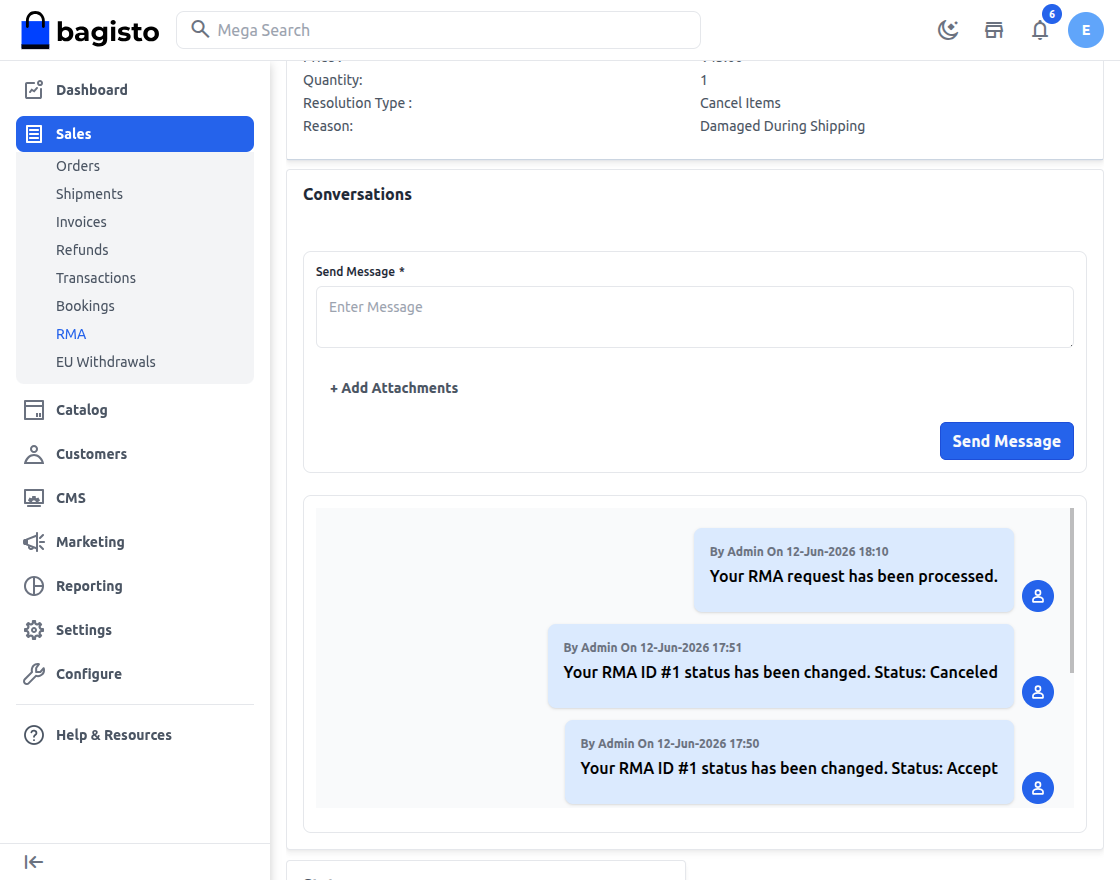
The customer is emailed the message. Messages load five at a time; scroll in the list to see older ones. Click an attachment to open it. Images such as JPG and PNG, PDF files and MP4 videos preview in a window; other files, such as WEBP images, show only Download. The file types allowed are set in Allowed File Extension in RMA settings.
Reopen a request
Reopen Request appears on a declined request when Allow Reopening Declined Returns is Yes, and on a canceled request when Allow Reopening Cancelled Returns is Yes.
- Go to Sales >> RMA >> Requests.
- Open the request.
- In Reopen Request, tick Reopen Request.
- Click Save.
The request goes back to Pending Review, and the customer is emailed.
Customers: request a return
Customers with an account request returns from their account on the storefront. Guests can't; create the request for them in the admin panel.
Create a request
- Sign in to the storefront account and open RMA.
- Click New RMA Request. The orders that can have a request are listed.
- Click the edit icon in the order's Action column. The New RMA Request form opens.
- Tick the item.
- Choose the Resolution Type: Return/Refund or Cancel Items. For a return, the item shows its Return Window.
- Choose the Reason.
- Enter the RMA Qty.
- For a return, choose the Package Condition, if wanted.
- Fill in any custom fields.
- Enter any Additional Information, up to 250 characters.
- Add Images, if wanted.
- Tick I agree to the Terms and Conditions. Read Terms and Conditions shows the store's return policy.
- Click Submit request.
The customer sees Request created successfully. and the request opens with Pending Review. You aren't emailed about new requests, so check the Requests screen regularly.
The customer's requests
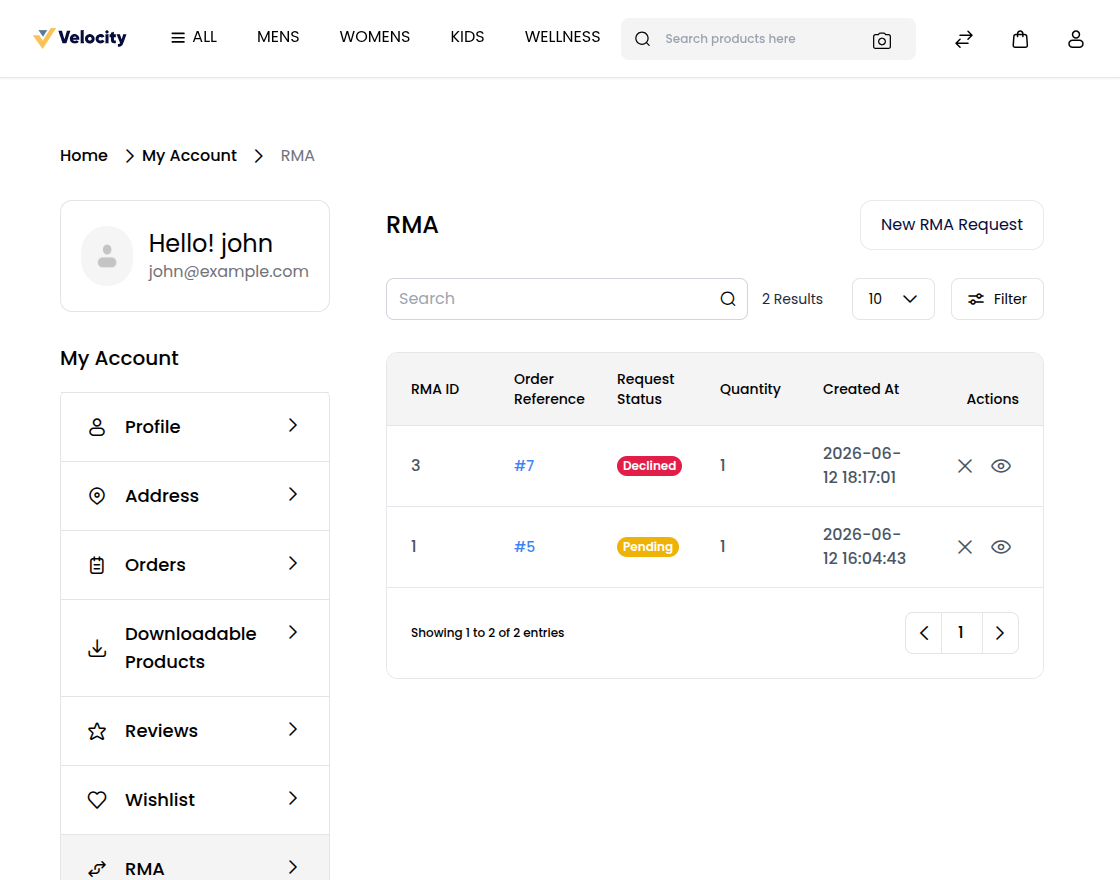
RMA in the account lists each request with its RMA ID, Order Reference, Request Status, Quantity and Created At, with View and, while the request is open, Cancel.
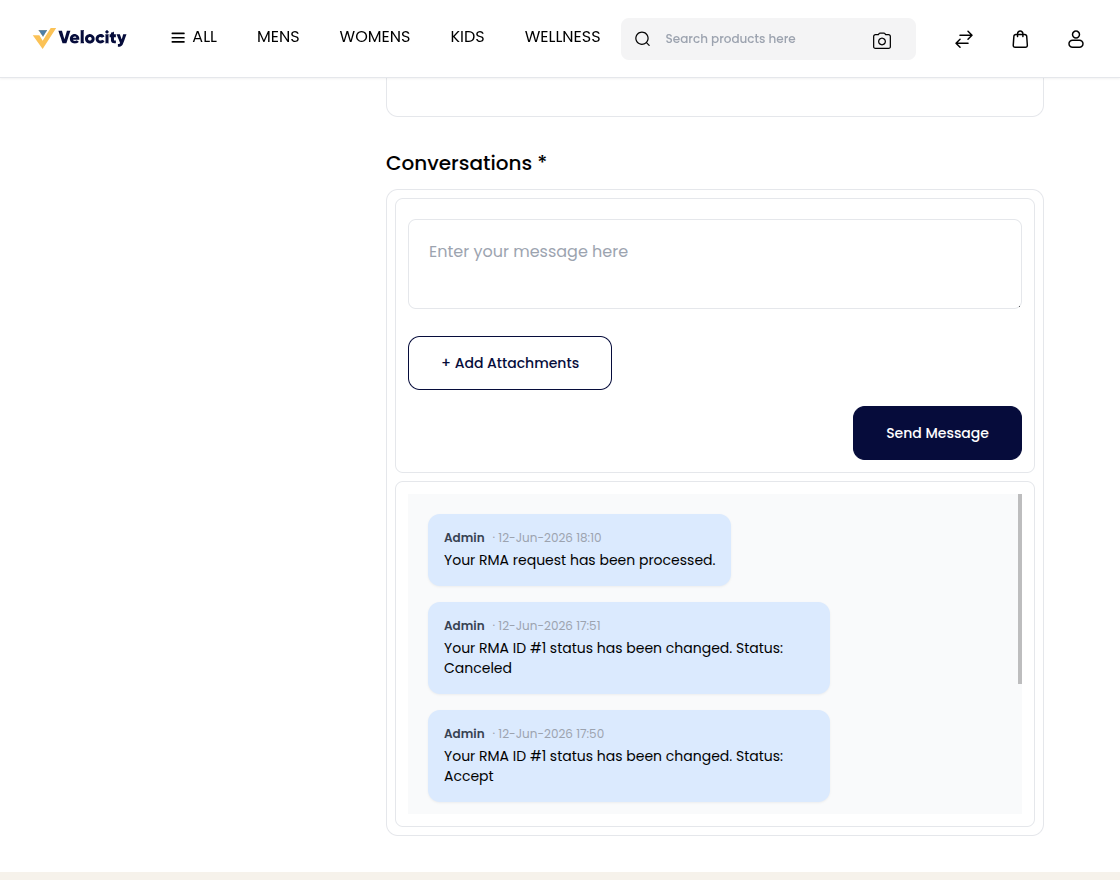
The request page shows RMA Details, the Item Requested for RMA, and Conversations, where the customer can send you a message of up to 250 characters with an attachment. You're emailed each message.
Cancel a request
- In the account, open RMA.
- Click Cancel on the request.
- Click Agree.
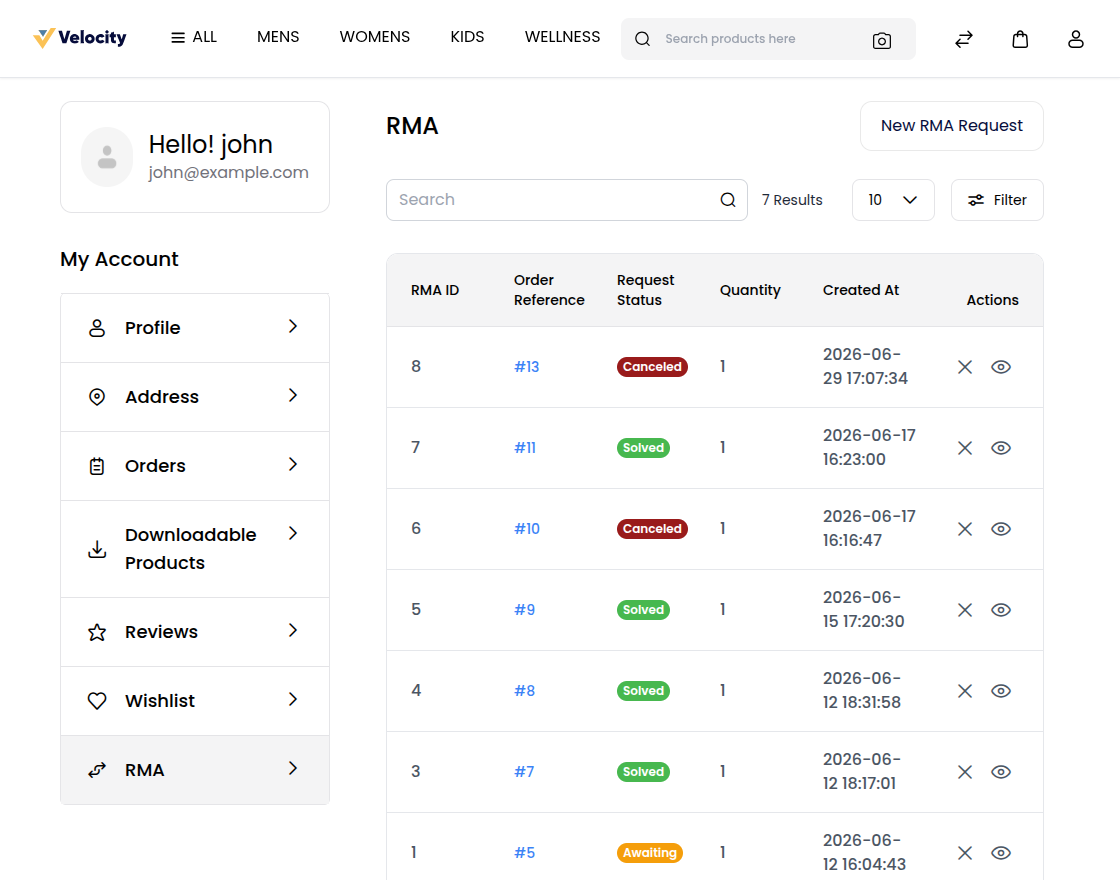
The request becomes Request Canceled.
Mark a request as solved
- In the account, open RMA.
- Click View on the request.
- Tick Please agree to mark it as solved.
- Click Save.
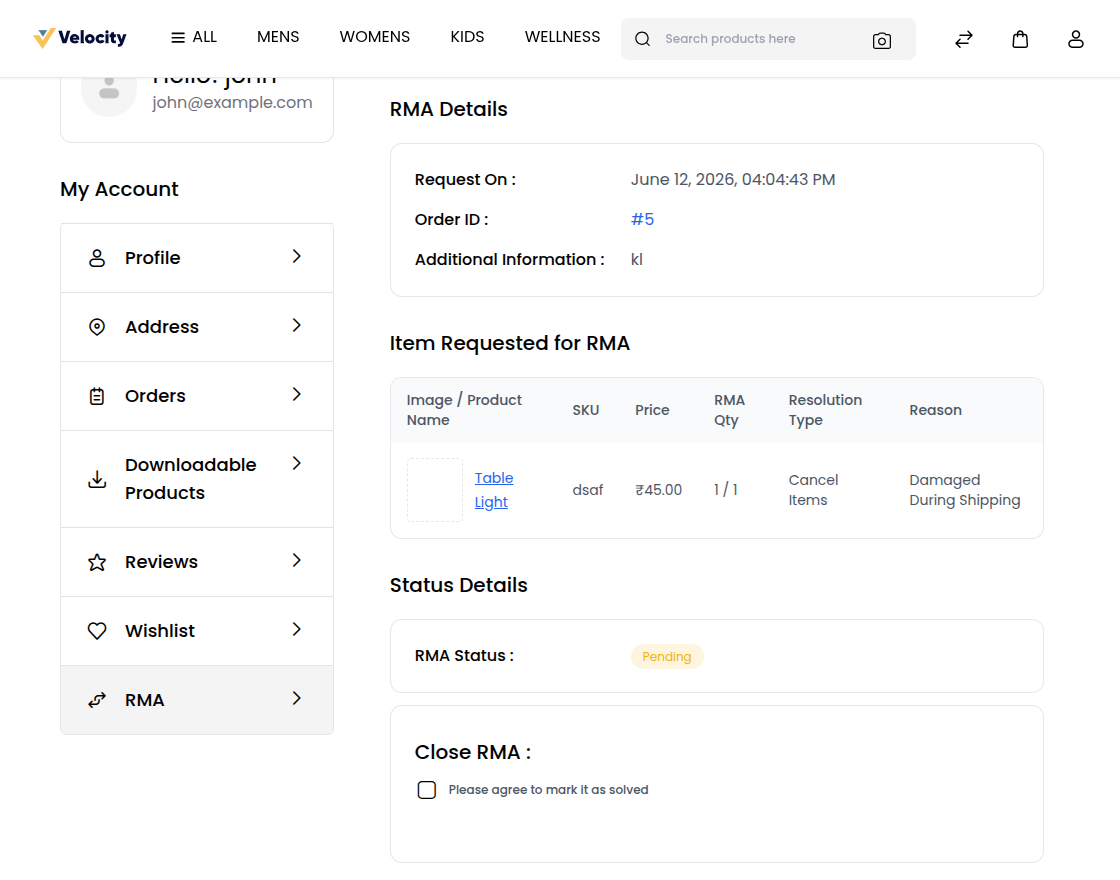
The request becomes Solved and a note is added to the conversation. The option appears while the request is open, the return window hasn't passed, and the order isn't canceled or closed.
Reopen a request
When the settings allow it, a customer can reopen a declined or canceled request within the return window.
- In the account, open RMA.
- Click View on the request.
- Tick Reopen Request.
- Click Save.
The request goes back to Pending Review.
Emails
| When | Who is emailed |
|---|---|
| A request is created | The customer. |
| You send a message | The customer. |
| The customer sends a message | The store's admin email address. |
| You change the status, refund or cancel the item, or reopen the request | The customer, with the new status. |
| Refund Item or Cancel Item creates a refund or cancellation | The customer and the admin also get the usual refund emails, or the usual order-canceled emails, which describe the whole order, when those are on in Notifications. |
No email is sent when a customer cancels, solves or reopens a request. Customers who checked out as guests aren't emailed about their requests; contact them yourself.
Permissions
A role needs RMA under Sales, with:
- RMA Requests to see and handle requests, and Create to create them. Opening a request from the Requests screen also needs Create;
- RMA Reasons, RMA Rules, RMA Statuses and Custom Fields, each with Create, Edit and Delete as needed.