
Themes & Sections
Choose the theme each channel uses, then build its storefront from sections such as banners, product carousels, content blocks and footer links, with a live preview beside you. Most changes wait until you publish.
The appearance of your storefront defines its look and feel, and it shapes the first impression a visitor gets. It has its own area in the admin panel, Appearance. A theme decides how the whole storefront looks. Sections are the blocks a theme's pages are built from, and you manage them for each channel.
Themes
Go to Appearance >> Themes to see the themes for your storefront, in two groups:
- My Themes: themes installed on your store.
- Buy Themes: themes from the Bagisto theme store that aren't installed yet. View & Buy appears when a theme has a store page, and Preview opens its demo. Both open in a new tab.
Each card shows a picture, the theme's name and a short description, plus the author and version when they're known. An installed theme also shows where it's used: Active on every channel, Active on: followed by the channel names, or Not in use. A theme in use carries an Active badge.
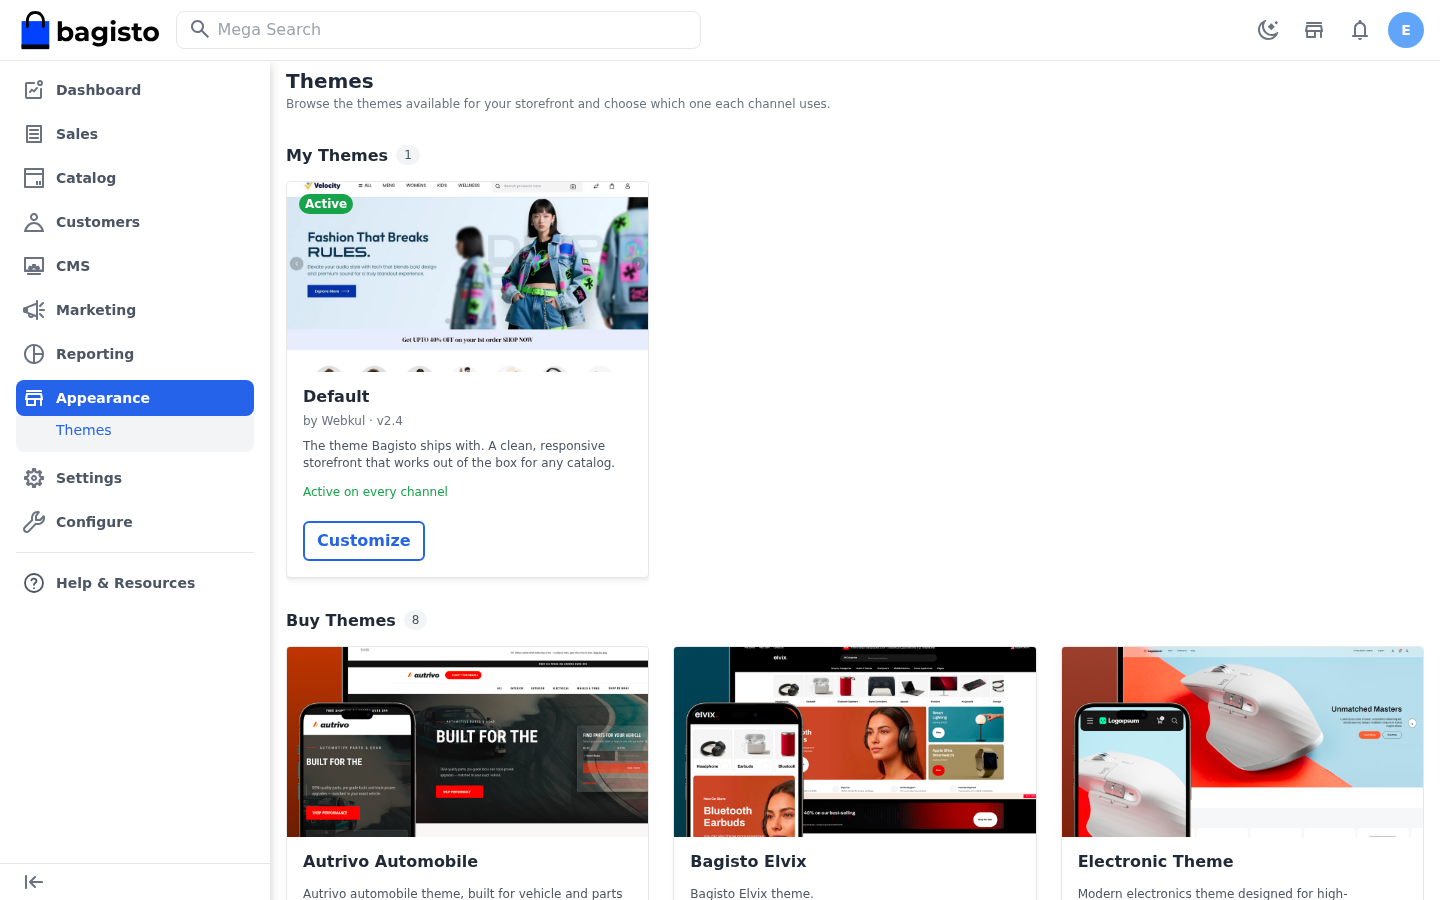
An installed theme has these buttons:
- Customize: opens the section editor. Shown on a theme that's active on at least one channel.
- Activate: applies the theme to more channels. Shown until the theme is active on every channel.
A theme under Buy Themes has to be installed on your store before you can activate it. Your developer or hosting partner installs it. Buttons your role has no permission for are hidden. Each channel uses one theme at a time; to set up channels, see Channels.
Activate a theme
- Go to Appearance >> Themes.
- On a theme under My Themes, click Activate. The Activate Theme dialog opens.
- In Channels, choose the channels that should use the theme. Hold Ctrl (Cmd on Mac) to pick more than one.
- Read the warning, if one appears.
- Click Activate.
The Channels list shows only the channels that don't use the theme yet, and when only one is left, it's already selected. The theme goes live on the chosen channels straight away, and you see a message such as "Default is now active on Default."
Sections stay with their theme
A channel's sections belong to the theme they were built for. When you switch a channel to another theme, the dialog warns that the channel has customizations built for its current theme: "They stay saved, but will not appear while the new theme is active." Switch the channel back to show them again.
The section editor
- Go to Appearance >> Themes.
- On an active theme, click Customize. The Sections page opens.
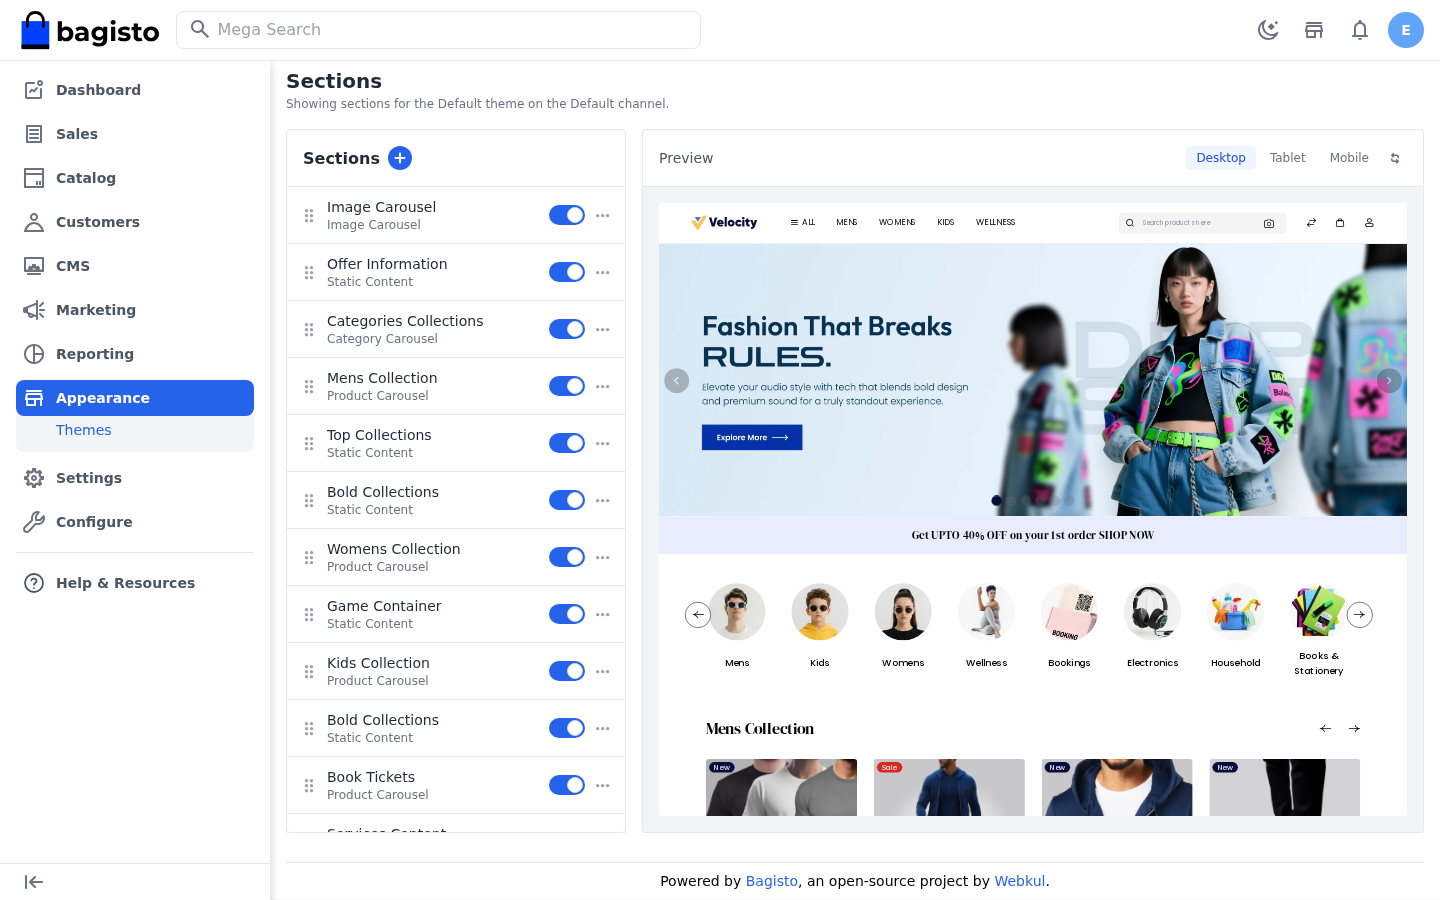
The line under the title says what you're editing, for example "Showing sections for the Default theme on the Default channel." The page has two parts:
- The Sections list on the left shows the theme's sections in the order the storefront shows them, each with its name and type.
- The Preview on the right shows the channel's home page with your unpublished changes. Switch between Desktop, Tablet and Mobile, or click the reload icon to refresh it.
When the channel has more than one language, choose the language at the top right. When your store has more than one channel, a channel selector appears beside it.
What you can do in the list
- Edit: click a section's name. See Edit a section.
- Reorder: drag a section by its handle.
- Switch on or off: use the switch on the row. The name of a section that's off is struck through.
- Duplicate: open the ⋯ menu and click Duplicate. The copy is placed below the original, with Copy added to its name. It shows switched on with an unsaved change, so it goes live when you publish.
- Delete: open the ⋯ menu, click Delete and confirm.
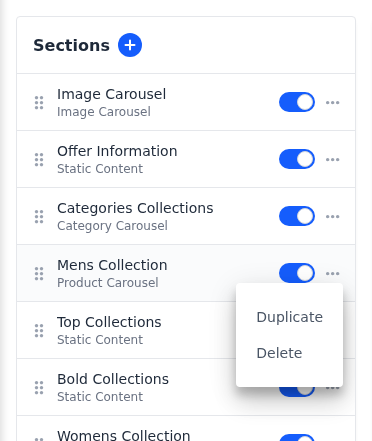
Services Content and Footer Links are pinned to the bottom of the page, so they have no drag handle and can't be duplicated.
Deleting can't be undone
A deleted section disappears from the storefront straight away. Deleting isn't held for publishing. To take a section off the storefront and keep it, switch it off instead.
Edit a section
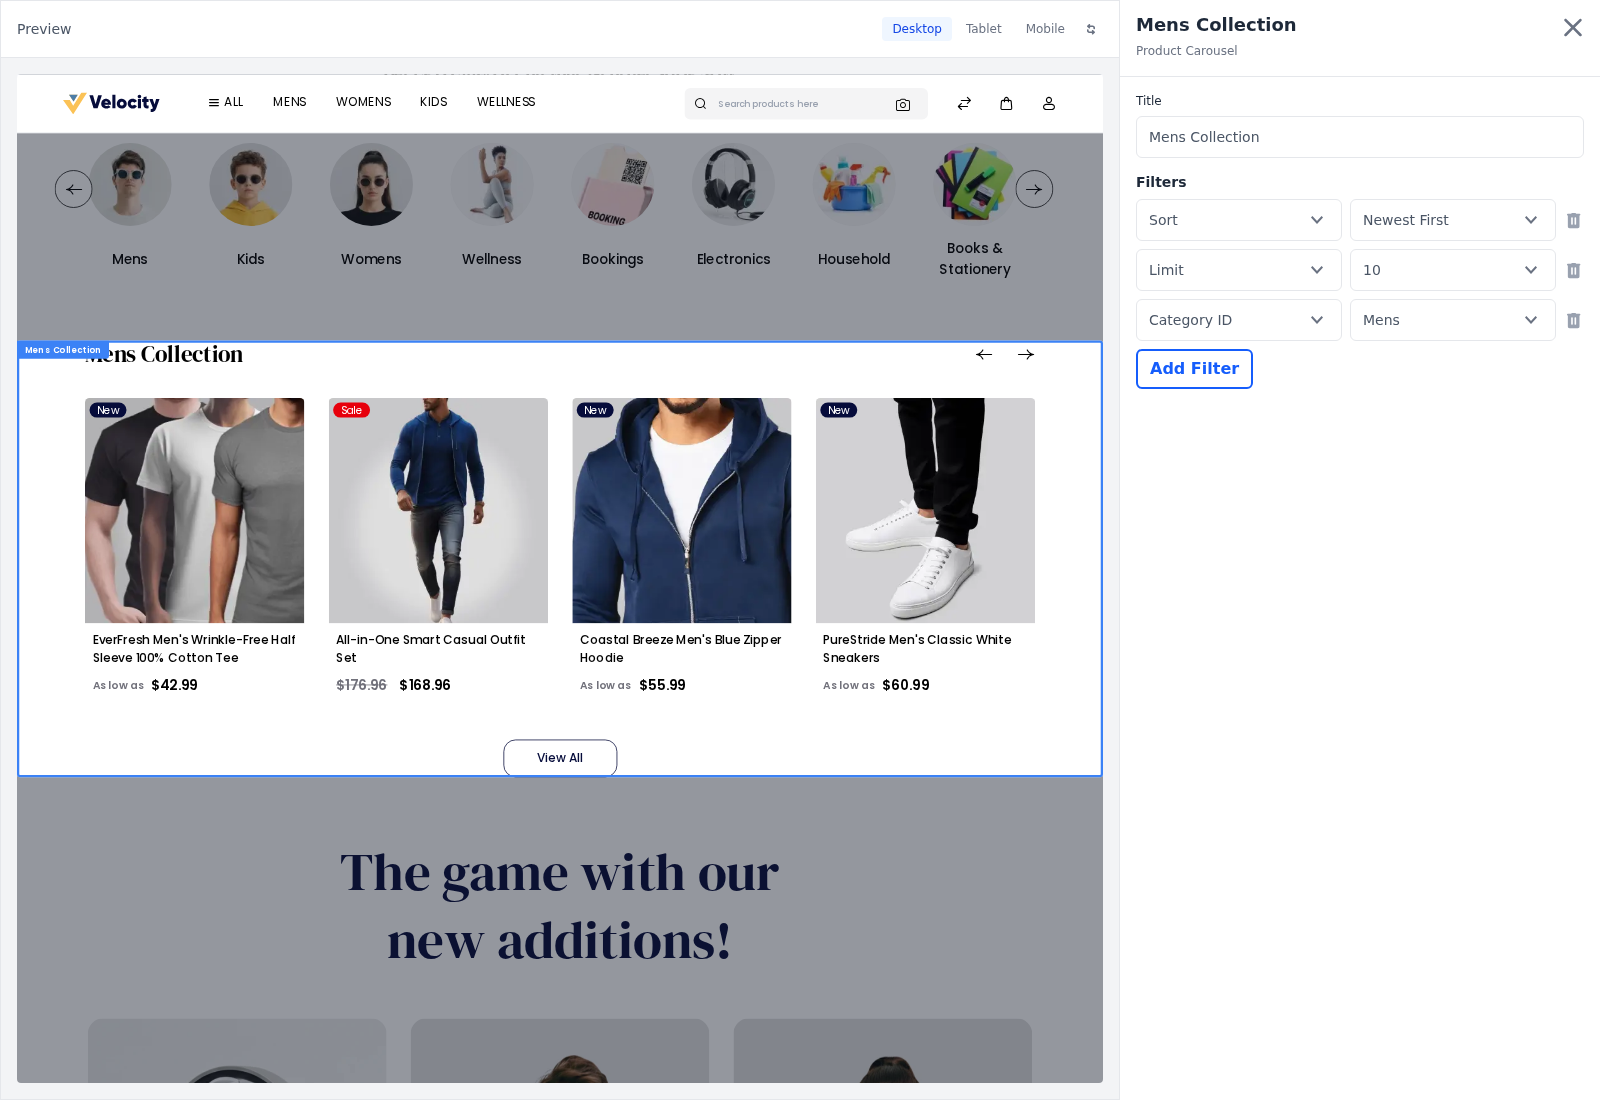
In the Sections list, click the section's name. A panel opens with the section's fields, and the preview moves beside it and highlights the section.
Change the fields. Each type's fields are described in Section types.
Check the preview. Your changes are saved as a draft while you type, and the preview reloads to show them.
Close the panel.
Click Publish when you're ready for shoppers to see the changes.
Most changes wait until you publish
These changes are held as unsaved changes until you publish them:
- Changes to a section's fields, in any language.
- Switching a section on or off.
- A new order of sections.
While changes are waiting, the Sections list shows how many there are, such as "2 Unsaved changes", and each changed row is marked with a dot. Discard and Publish appear at the top of the page, with the count on Publish:
- Publish: sends every unsaved change for this theme and channel, in every language, to the storefront.
- Discard: throws away every unsaved change, without asking you to confirm. The list and the preview go back to what's live.
With more than one channel
After you publish or discard, check the storefront of the channel you edited.
Published changes show on the storefront straight away: on most pages for Footer Links and Services Content, and on the home page for the other types.
New and duplicated sections
Creating or duplicating a section saves it straight away, still hidden from shoppers. In the list it shows switched on with an unsaved change, so Publish puts it live. To keep it hidden, switch it off before you publish. Discard doesn't delete a new section; it leaves it switched off.
Languages and channels
- Each language has its own content. Choose the language at the top before you edit a section's fields. Switching a section on or off, and the order of sections, apply to every language.
- Each channel has its own sections. Choose another channel at the top to edit its sections, which belong to the theme that channel uses.
Create a section
In the section editor, click + beside Sections. The Create Section panel opens.
Under Type, click the type of section.
Enter a Name. It's shown in the Sections list, not to shoppers.
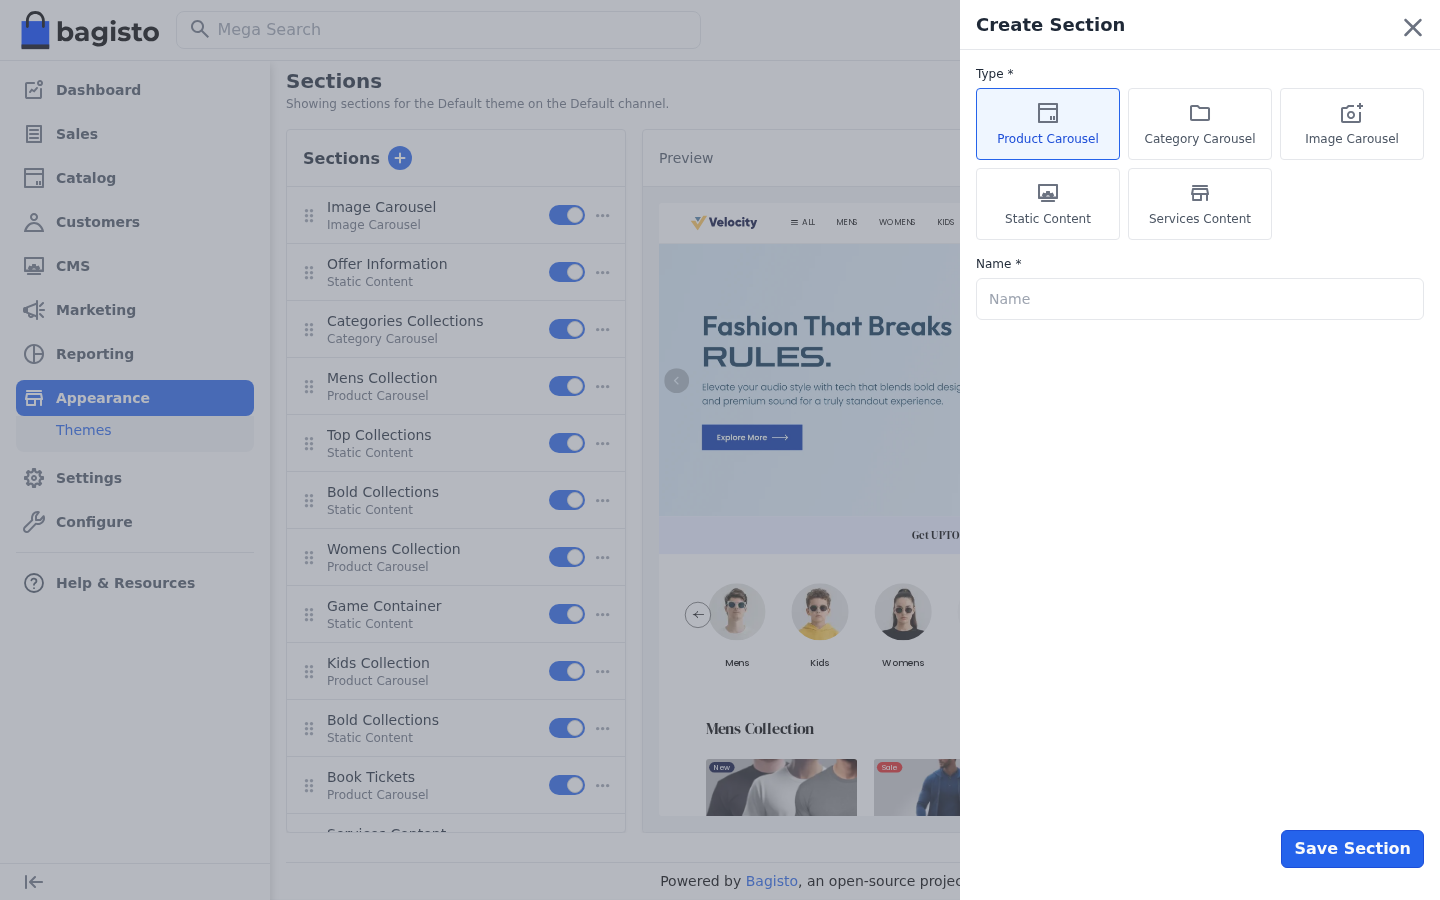
Click Save Section. The section is added at the bottom of the list, above the pinned Services Content and Footer Links, shown switched on with an unsaved change, and its fields open.
Fill in the fields.
Click Publish.
A channel can have only one Services Content and one Footer Links section, so those types aren't offered once the channel has one.
Section types
The default theme offers six built-in types: Image Carousel, Product Carousel, Category Carousel, Static Content, Services Content and Footer Links. A theme you install can add types of its own, or offer only some of them. The fields of each type are described in Section types.
Upgrading from an earlier version
If you used Settings >> Themes before, that screen has moved. Theme customizations are now sections, and they live under Appearance. Existing customizations are carried over, so you don't need to recreate them.