# Configure
Generally, a configuration is the arrangement - or the process of making the arrangement - of the parts that make up a whole.
How the parts of something, or a group of things, are arranged.
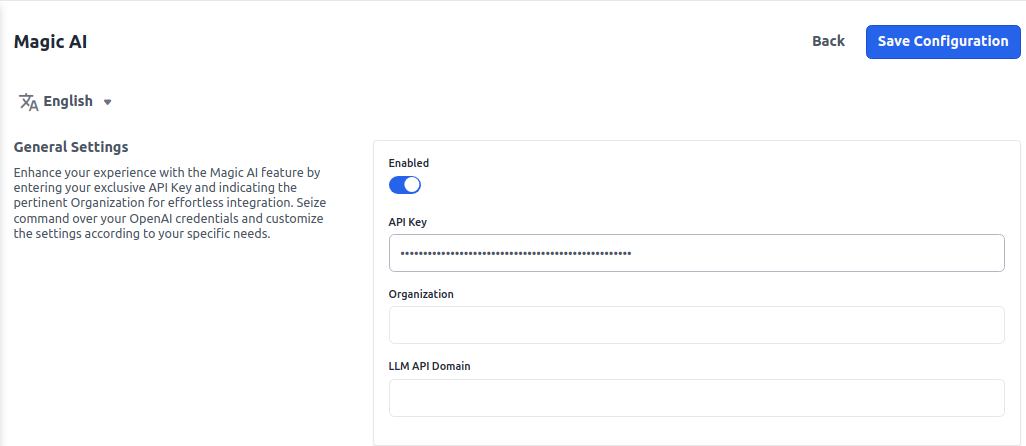
# Magic AI
To add Magic AI go to Admin Panel and go to Configure >> General >> Magic AI as shown in the below image.
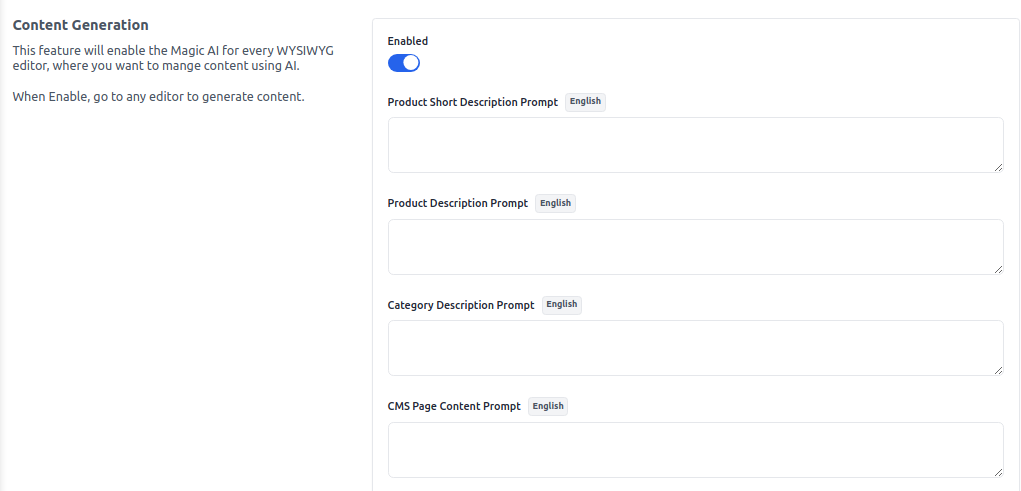
- If you want to enable it for the Content Generation kindly allow it from here.
- Kindly Enable it for the Image Generation from here.

- For Review Translation add your model and Enable it as shown in the below image.

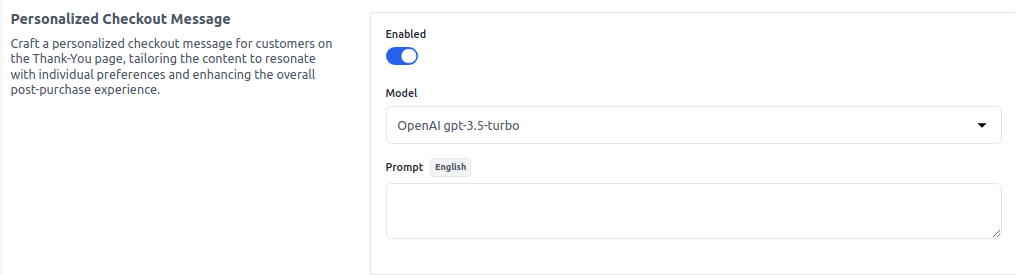
- For the Personalized Checkout Message Enable it and add the model.
# Weight Unit
1) To add Weight Unit go to the Admin panel and go to Configure >> General.Next, select the Weight Unit from dropdown lbs or kgs according to your requirement and click on the Save Configuration button as shown in the image below

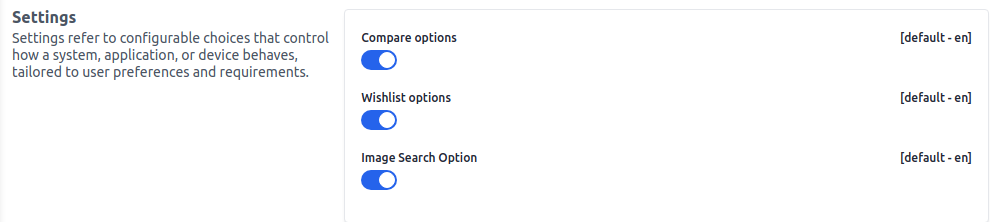
# Configurable Choices.
Settings refer to configurable choices that control how a system, application, or device behaves, tailored to user preferences and requirements.
1) Now to add Weight Unit go to the Admin panel and go to Configure >> Content.Next, you will able to see the below options.
Compare Options - By this, you can easily compare your products.
Wishlist Option - This helps to add the functionality of Wishlist.
Image Search Option - This option helps to search your image.
After clicking on the Save Configuration button.
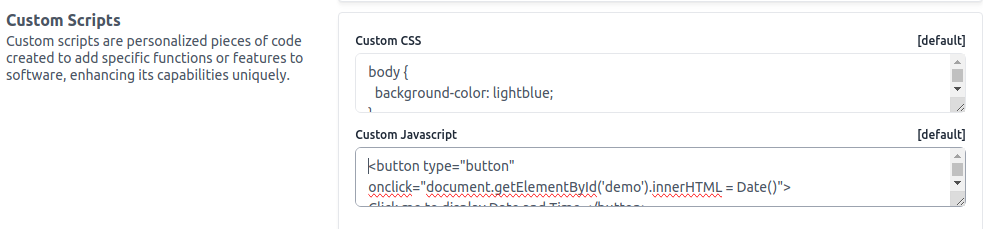
# Custom Scripts
Custom scripts are personalized pieces of code created to add specific functions or features to the software, enhancing its capabilities uniquely.
Here, in this specified section CSS and JS Admin can write the code. And in last, it will automatically append the code to the master file.
1) Now to add Custom Scripts go to the Admin panel go to Configure >> Content.Next you will able to see the below options.
# Custom CSS
We have used a background color by Light Blue and saved the Configurations.

Now the storefront background color has changed as shown below image.
# Custom JS
You can apply javascript also according to your requirement and click on the Save Configuration button.
After then click on the Save Configuration button.
# Design
Admin logo is the distinctive image or emblem representing the administration interface of a system or website, often customizable.
To add Designs like Admin logo, Favicon go to the Admin Panel and click on Configure >> Design and you can easily update a new logo image and favicon from here. Click on the Choose Files option to select an image last click on the Save Configuration button.
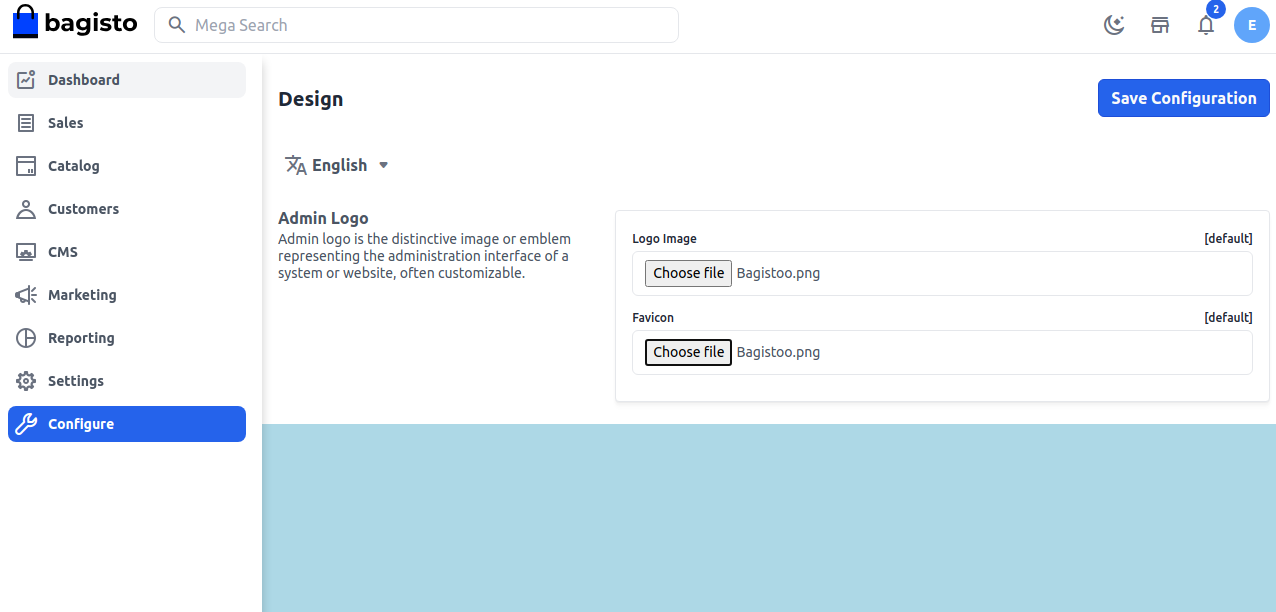
The new Admin Logo and Favicon images are updated.

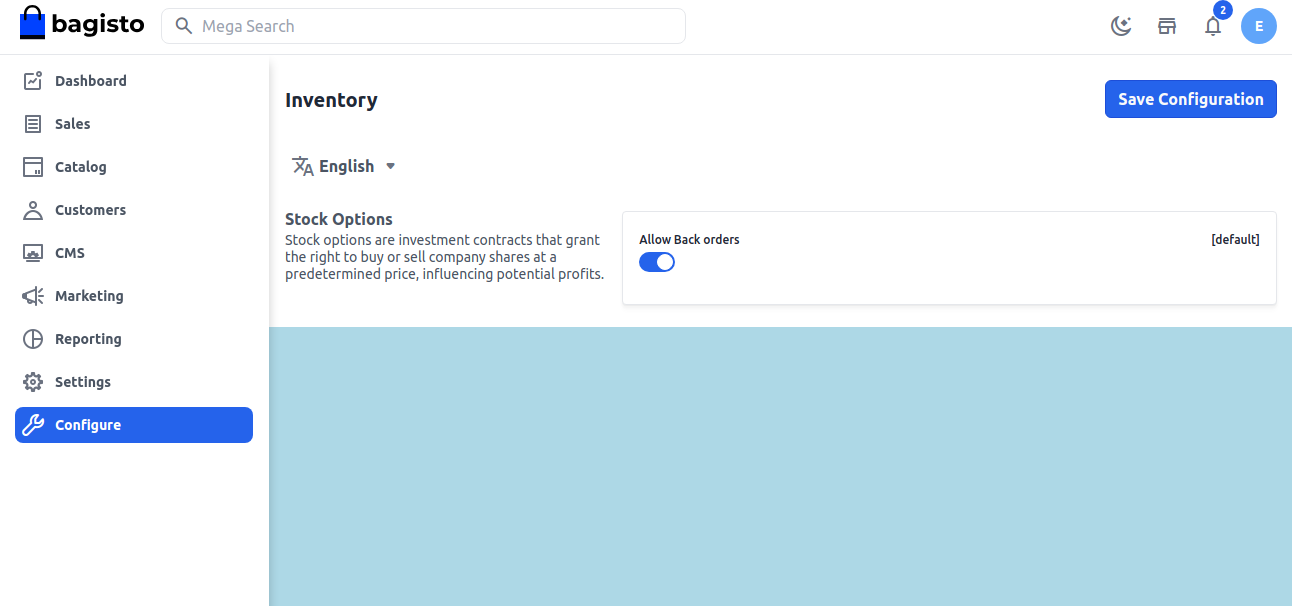
# Back Orders
A backorder is an order for a good or service that cannot be filled immediately because of a lack of available supply. Backorders give insight into a company's inventory management.
A manageable backorder with a short turnaround is a net positive, but a large backorder with longer wait times can be problematic.
You can easily manage Backorders by going to the Admin Panel and clicking on Configure >> Inventory.
There is an option present to Enable or Disable a Backorder and then click on Save Configuration as shown below.
Note:- If the product is Out of Stock then also the customer is able to Place an Order after Enabling the Backorder Option
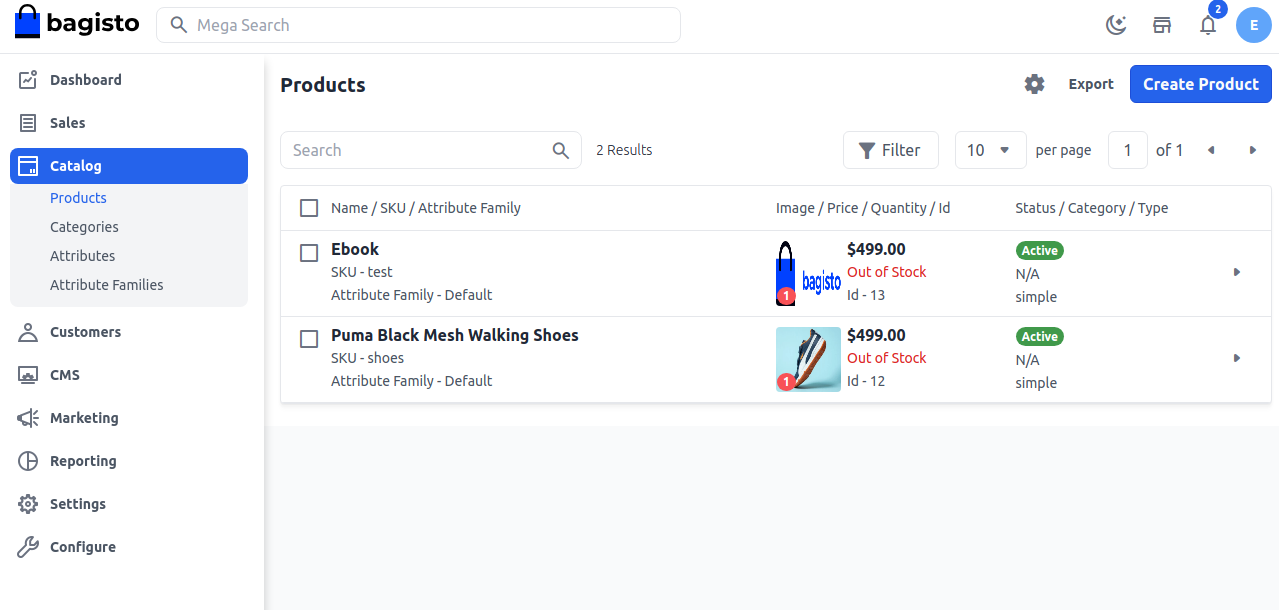
In the above image these products are Out of Stock but you can still able to Add the product to the Cart and Place an Order.
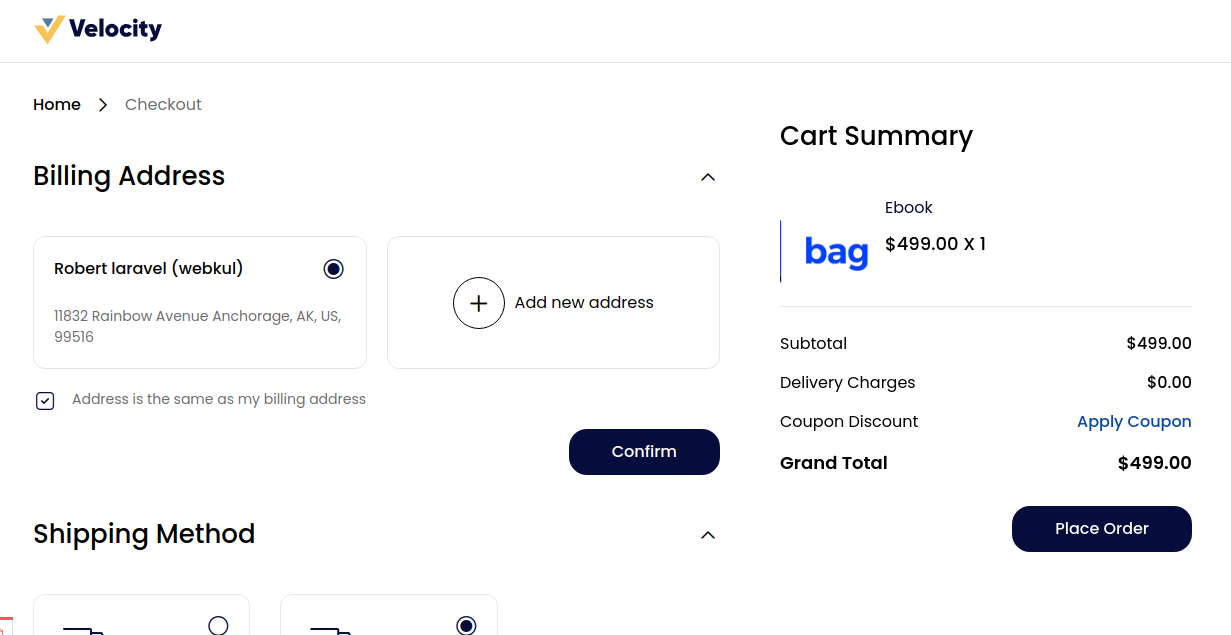
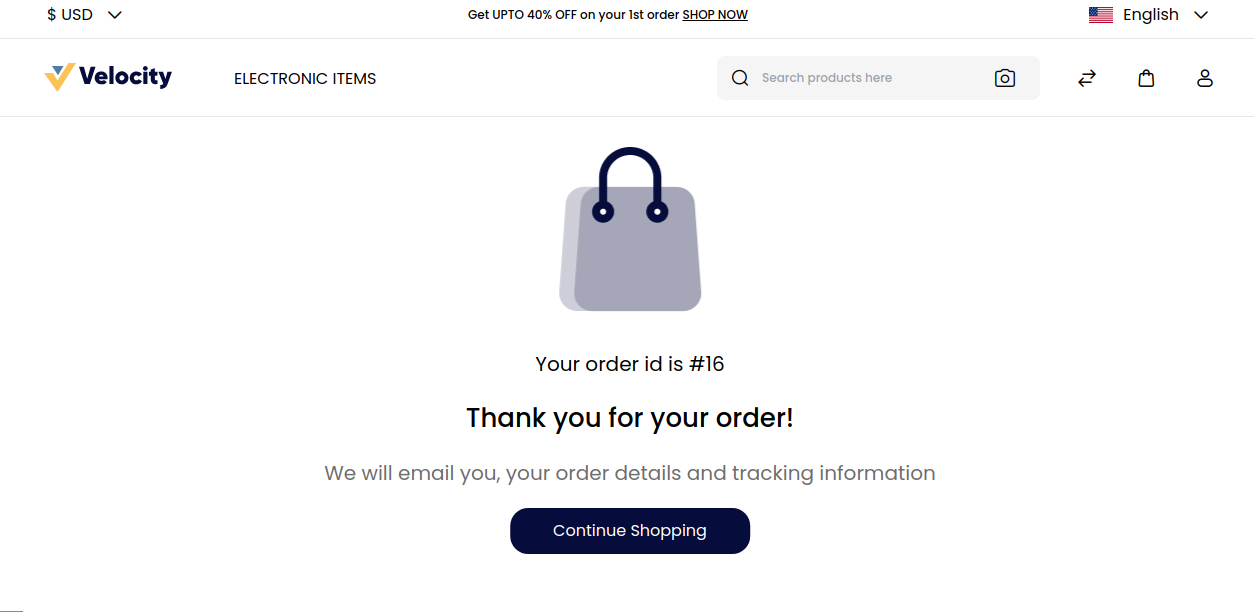
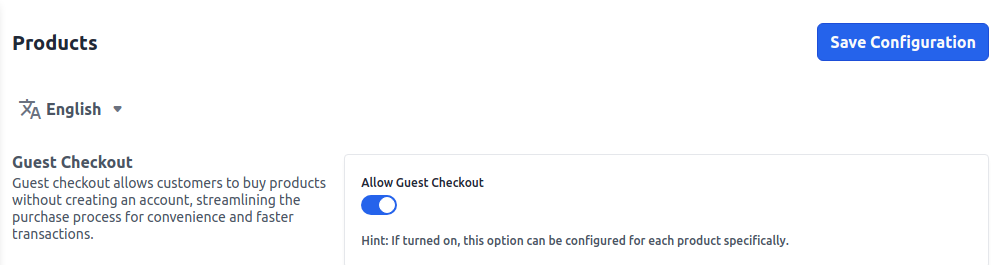
# Guest Checkout
Guest checkout allows customers to buy products without creating an account, streamlining the purchase process for convenience and faster transactions.
To manage Guest checkout go to Admin Panel and click on Configure >> Products.You can see an option of Enable or Disable of Guest Checkout and then click the Save Configuration button.
# Product View Page
A Product View Page is a dedicated web page or interface within an online store or catalog where detailed information about a specific product is displayed.
This page provides customers with comprehensive insights and details to help them make purchasing decisions.
To add go to Admin Panel and click on Configure >> Products
Here you can able to manage a number of Related Products & Up Sell Products will be visible on the front end.

After clicking on the Save Configuration button.
# Cart View Page
Cart view page configuration involves arranging items, details, and options on the shopping cart page, improving user interaction and purchase flow.
To add go to Admin Panel and click on Configure >> Products
Here you can able to manage several cross-selling products that will be visible on the front end.

After then click on the Save Configuration button.
# Frontend
The storefront serves as the customer-facing component of an online store, featuring product displays, category listings, and intuitive navigation to ensure a smooth and enjoyable shopping experience.
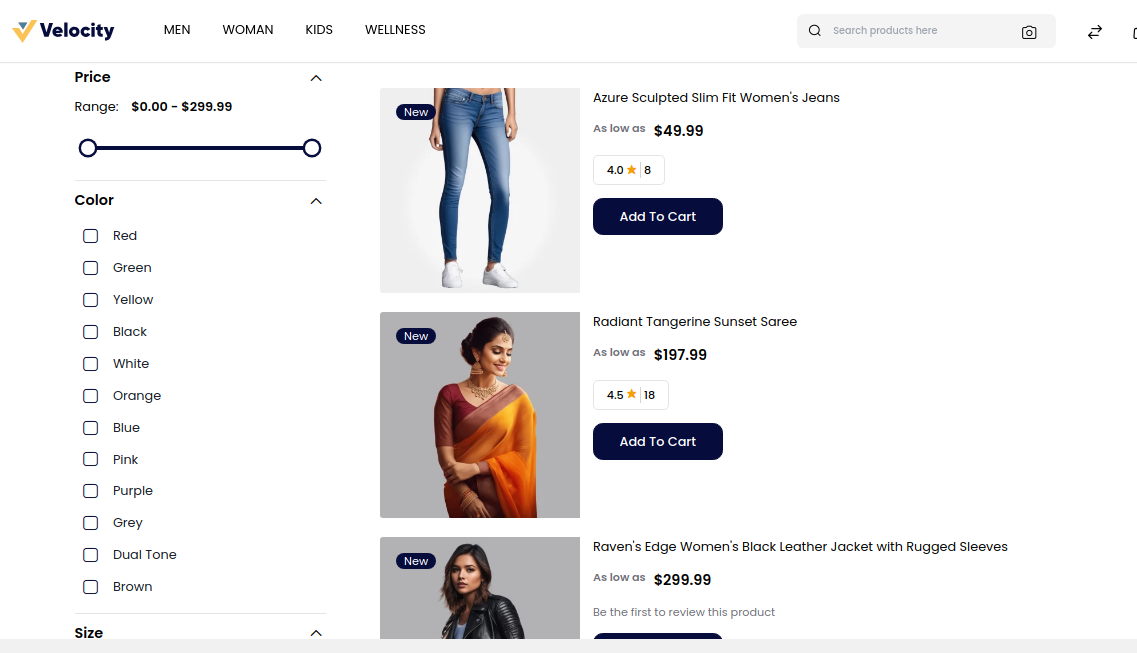
To add go to Admin Panel and click on Configure >> Products >> Storefront
1.Search Mode: Select the search mode by Database or Elasticsearch as per your requirements.
A) Elastic Search- When you have a large number of products on your website it is quite difficult to search the product. Elastic Search mode helps for fast search mode of products.
B) Database- It is recommended when you have a small number of products on your website choose the database option for search mode.
2.Default List Mode: You manage in which format your products will be visible on the storefront select from the dropdown Grid or List.
# List Mode
# Grid Mode
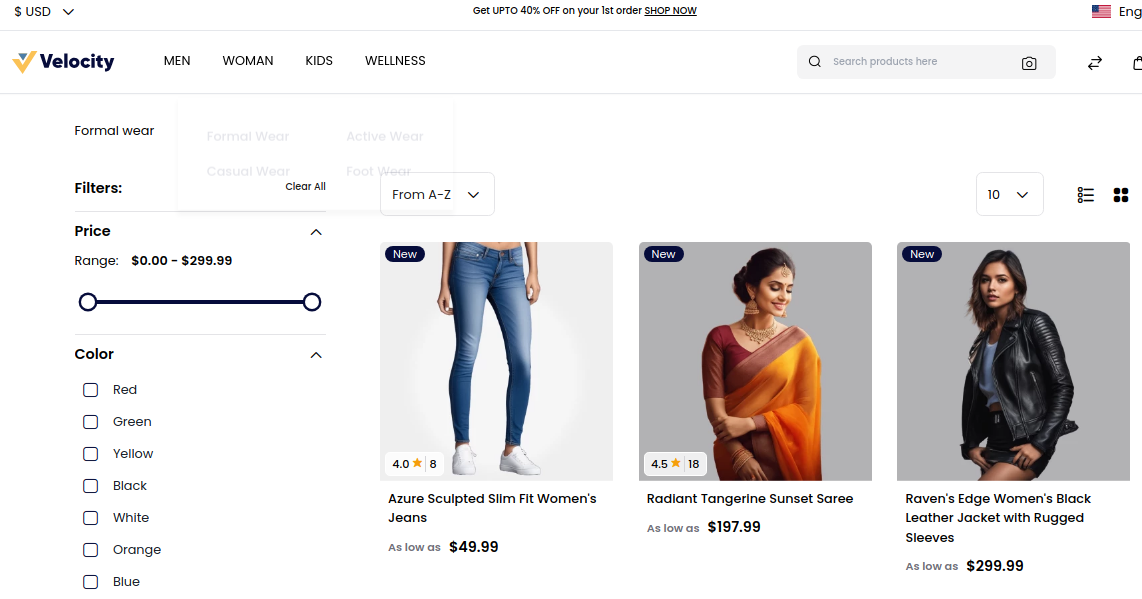
3.Products Per Page: You can enter the quantity that how many products that will be visible per page on the Storefront.
4. Sort By Select a sort-by option from the dropdown according to your requirements.
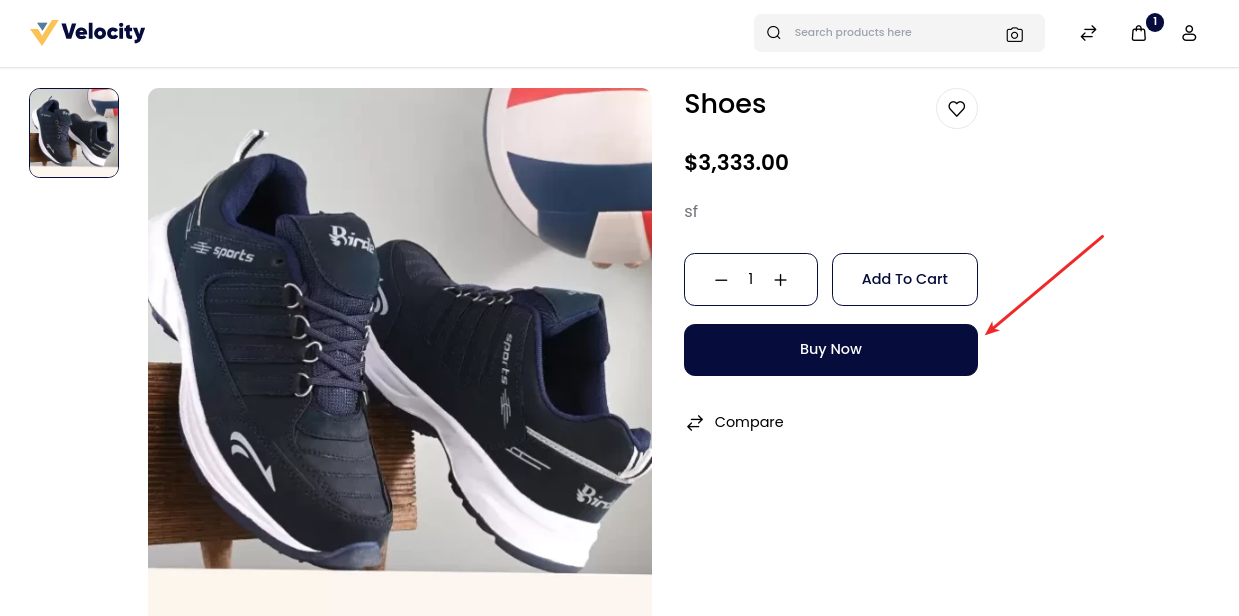
5. Buy Now Products Select from the Enable/Disable option as per requirement. After enabling it will be visible on the product detail page as shown in the below image.
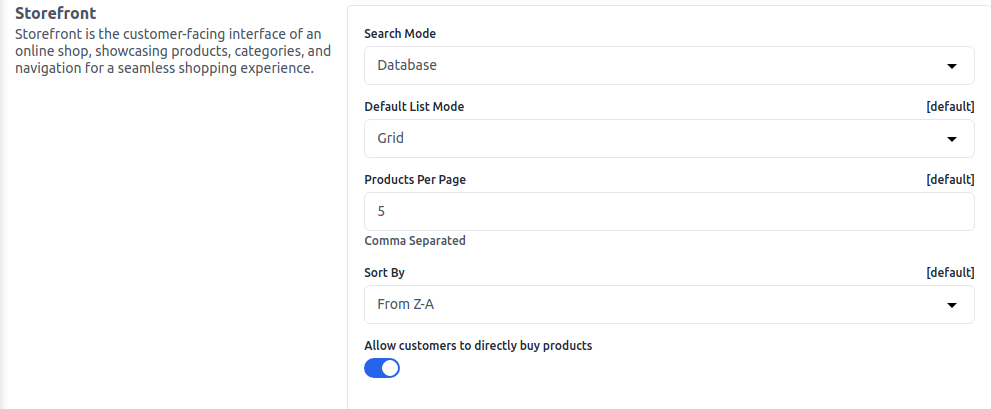
After then click on the Save Configuration button.
# Image Size
Storefront is the customer-facing interface of an online shop, showcasing products, categories, and navigation for a seamless shopping experience.
To add go to Admin Panel and click on Configure >> Products
# Small Image
Select Height and Width for the small images.
# Medium Image
Select Height and Width for the medium images.
# Large Image
Select Height and Width for the Large images.
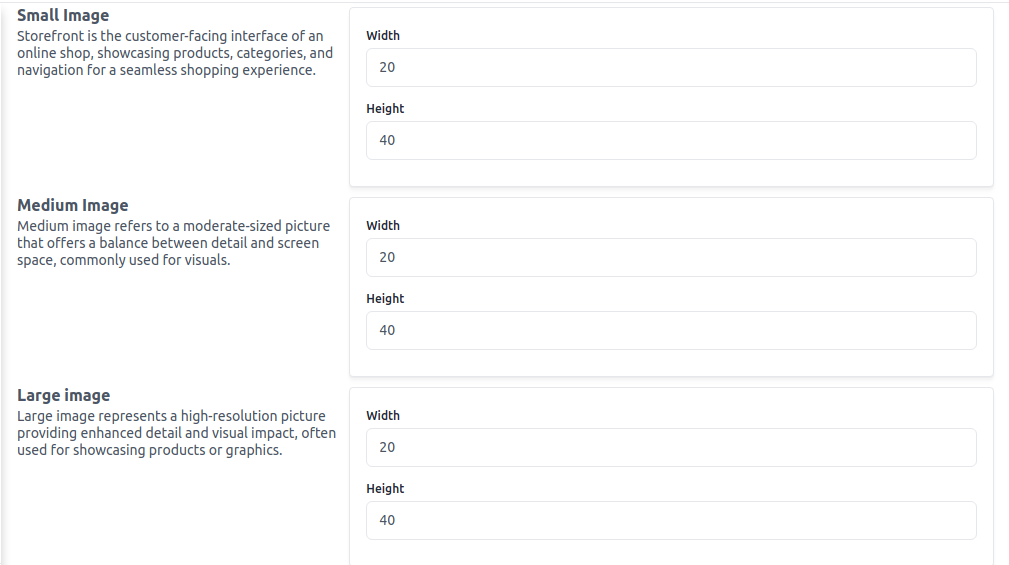
After then click on the Save Configuration button.
# Review
Here are the configurations where you can manage the review for Guest Users.
To add go to Admin Panel and click on Configure >> Products >> Review
By enabling, this option Guest Users are also able to write a review for the product.

After then click on the Save Configuration button.
# Attribute
In this option, you can easily add the size of an Image and File upload size (in KB) from here to improve the behavior, appearance, or function.
To add go to Admin Panel and click on Configure >> Products >> Attribute

After then click on the Save Configuration button.
# Social Share
Sharing things from a website with friends on social media platforms like Facebook, Twitter, or Instagram.
To add go to Admin Panel and click on Configure >> Products >> Social Share
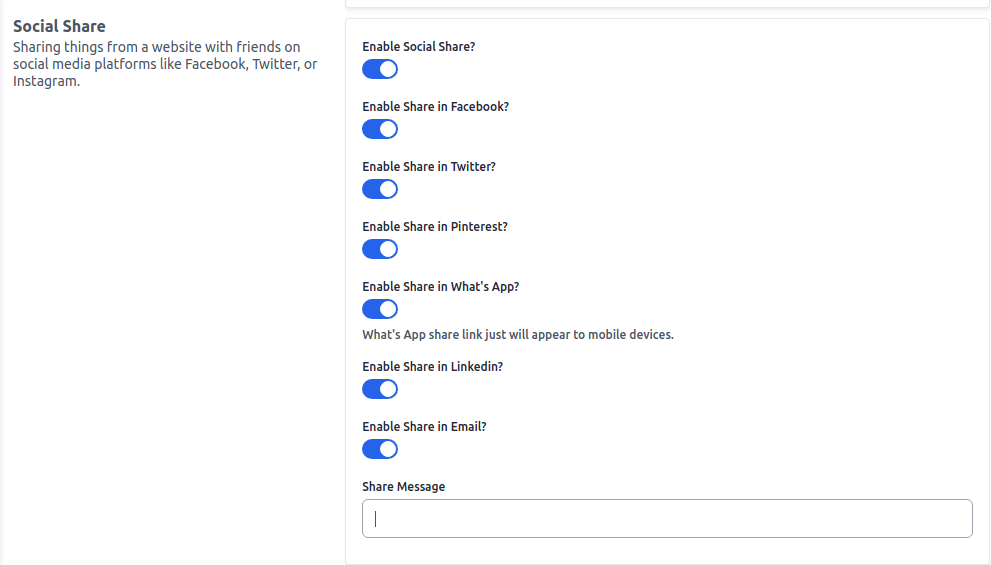
After then click on the Save Configuration button.
# Frontend:-
All the icons that you just enabled from the Admin Panel are created as shown in the below image.

# Rich Snippets
Rich Snippets (also known as “Rich Results”) are normal Google search results with additional data displayed. This extra data is usually pulled from Structured Data found in a page's HTML.
Set products and category configurations. To add to the Admin Panel click on Configure >> Rich Snippets
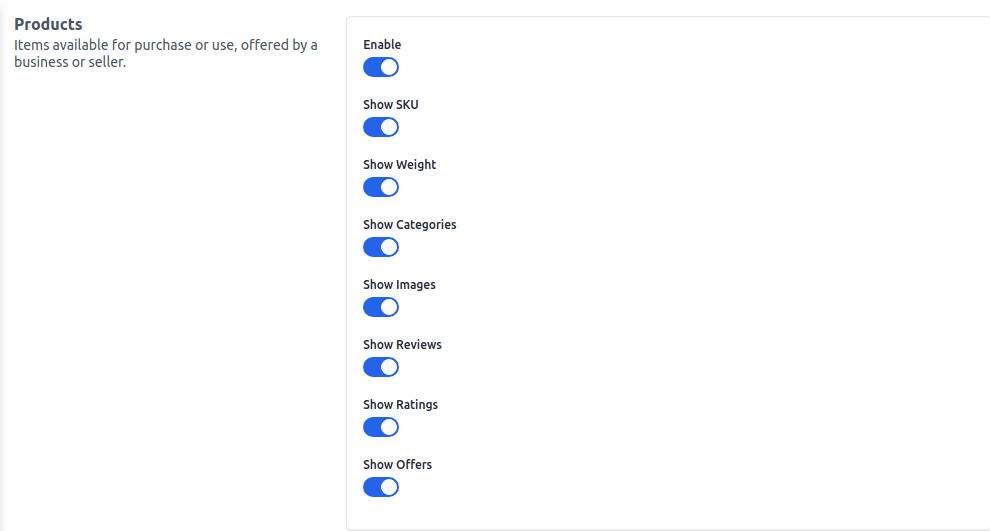
# Products
Items available for purchase or use, offered by a business or seller. Select the option of Enable/Disable and click on Save Configuration Button.
# Categories
"Categories" refer to groups or classifications that help organize and group similar products or items for easier browsing and navigation.
Select the option of Enable/Disable and click on Save Configuration Button.

# Address
To add an address on the Admin Panel go to Configure >> Address and manage your Requirements & Information and then click on Save Configuration button.

# Captcha
"Sitemap: Website layout map for search engines. Secret key: Secure code for data encryption, authentication, or API access protection."
On the Admin Panel go to Configure >> Captcha add the Site Key & Secret Key and enable/disable the Status according to your requirement.
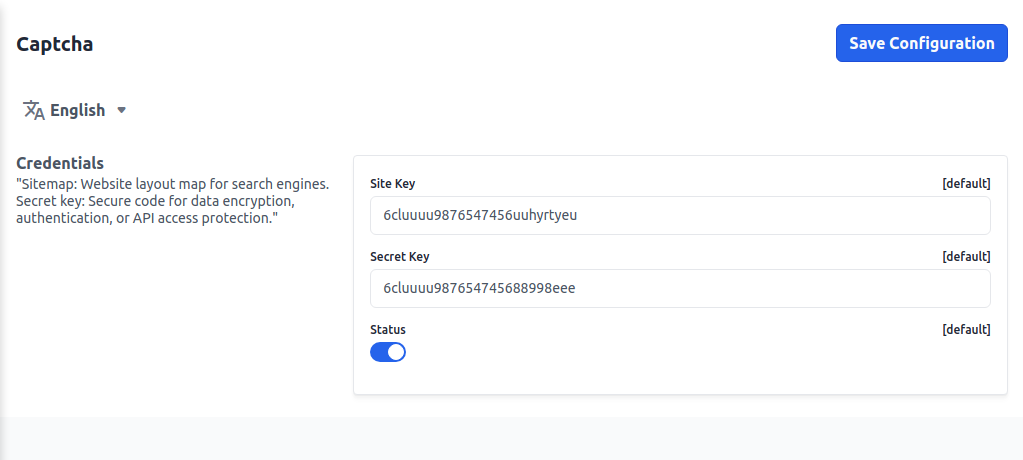
After then click on the Save Configuration button.
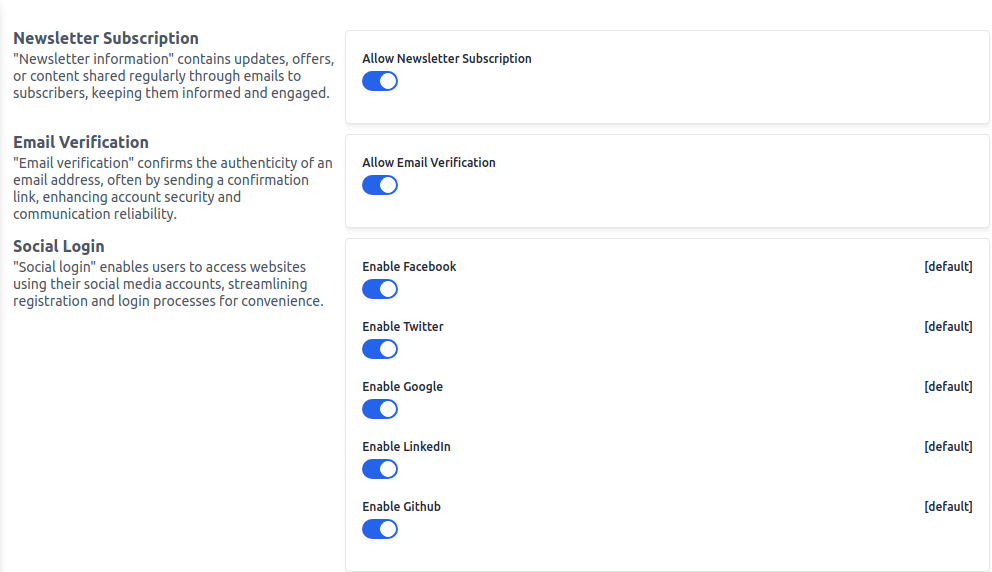
# Settings
Set newsletter subscriptions, email verifications, and social login. To add go to the Admin Panel and click on Configure >> Settings
# Newsletter Subscription
"Newsletter information" contains updates, offers, or content shared regularly through emails to subscribers, keeping them informed and engaged.
# Email Verification
"Email verification" confirms the authenticity of an email address, often by sending a confirmation link, enhancing account security and communication reliability.
# Social Login
"Social login" enables users to access websites using their social media accounts, streamlining registration and login processes for convenience.
After clicking on the Save Configuration button.
# E-mail Settings
Set email sender name, shop email address, admin name, and admin email address.
To add go to the Admin Panel and click on Configure >> Email Settings
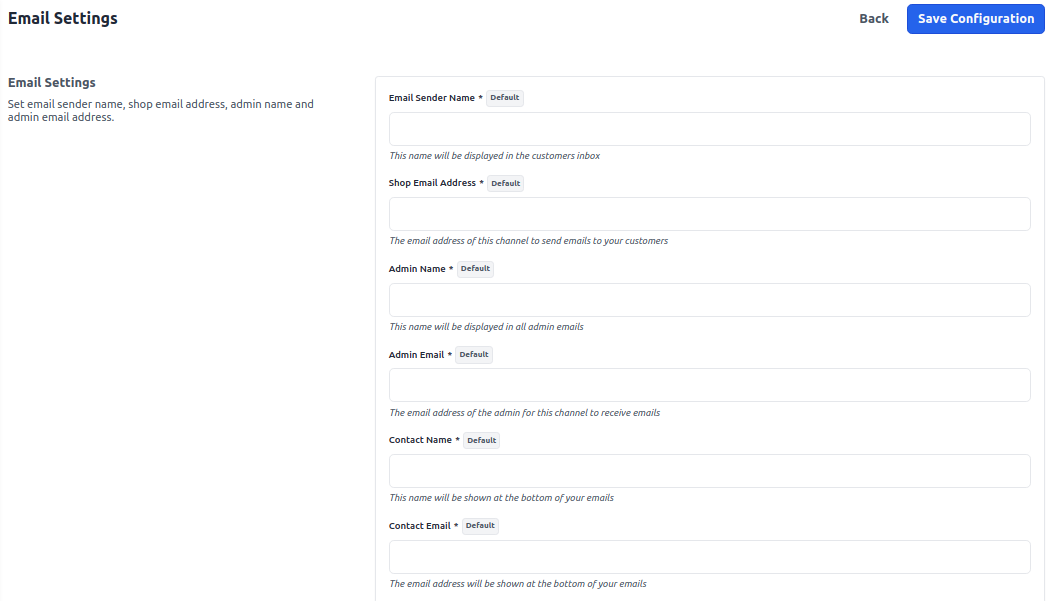
After clicking on the Save Configuration button.
# Taxes
A) Tax Categories - Tax categories are classifications for different types of taxes, such as sales tax, value-added tax, or excise tax, used to categorize and apply tax rates to products or services that will be visible over here.
B) Calculation Settings - Information about how much things cost, including the starting price, any discounts, taxes, and extra fees.
1) Calculation Based On- By default, there are 3 options for calculations i.e. Shipping Address, Billing Address, Shipping Origin.
A) Shipping Address- A shipping address is the location where goods or products are sent for delivery. It includes details like the recipient’s name, street address, city, state or province, postal or ZIP code, and sometimes additional information like a company name or suite number.
B) Billing Address- A billing address is the address associated with a payment method, such as a credit or debit card. It’s used to verify the identity of the cardholder and to process transactions.
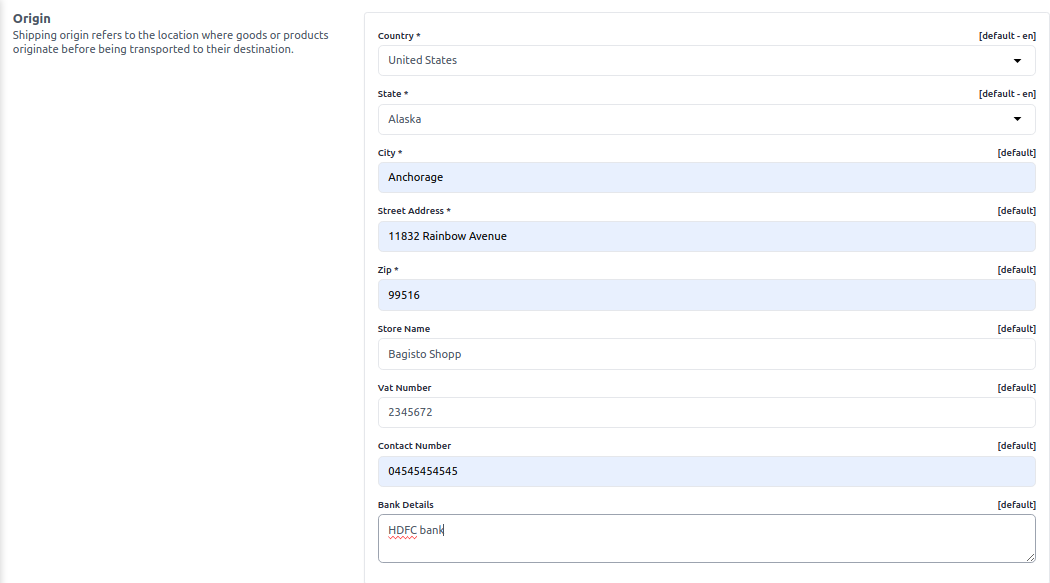
C) Shipping Origin- Shipping origin refers to the location from which goods or products are dispatched or sent out. It is the starting point of the shipment journey before it is transported to the destination address. The shipping origin typically includes details such as the address of the warehouse, store, or supplier where the shipment begins. This information is important for tracking the shipment, calculating shipping costs, and estimating delivery times.
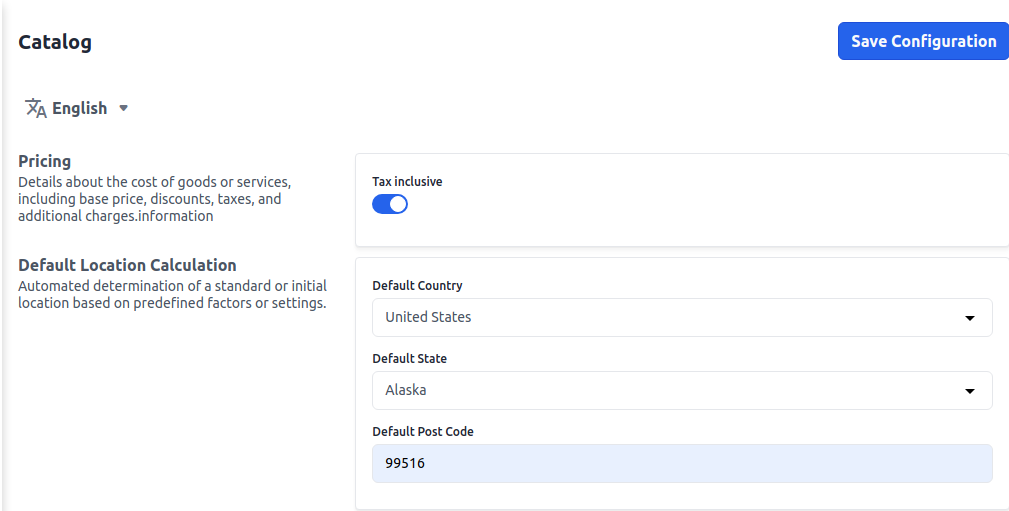
2) Product Pricing- There are two options available. Include Tax and Exclude Tax
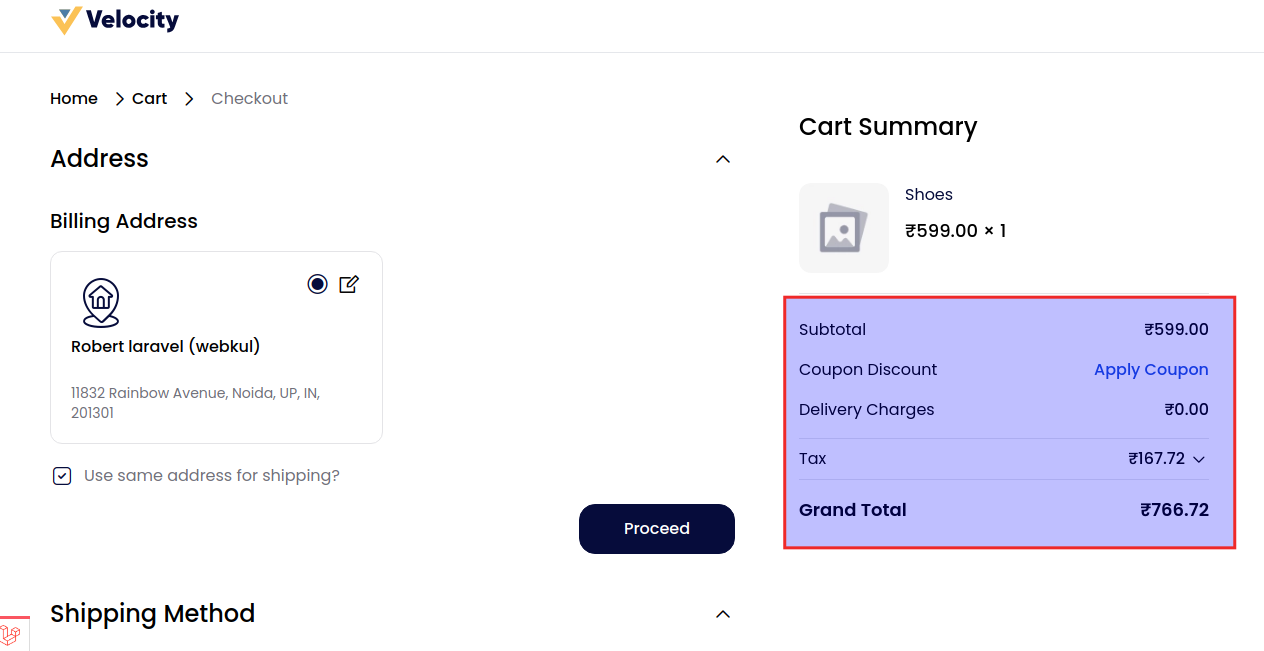
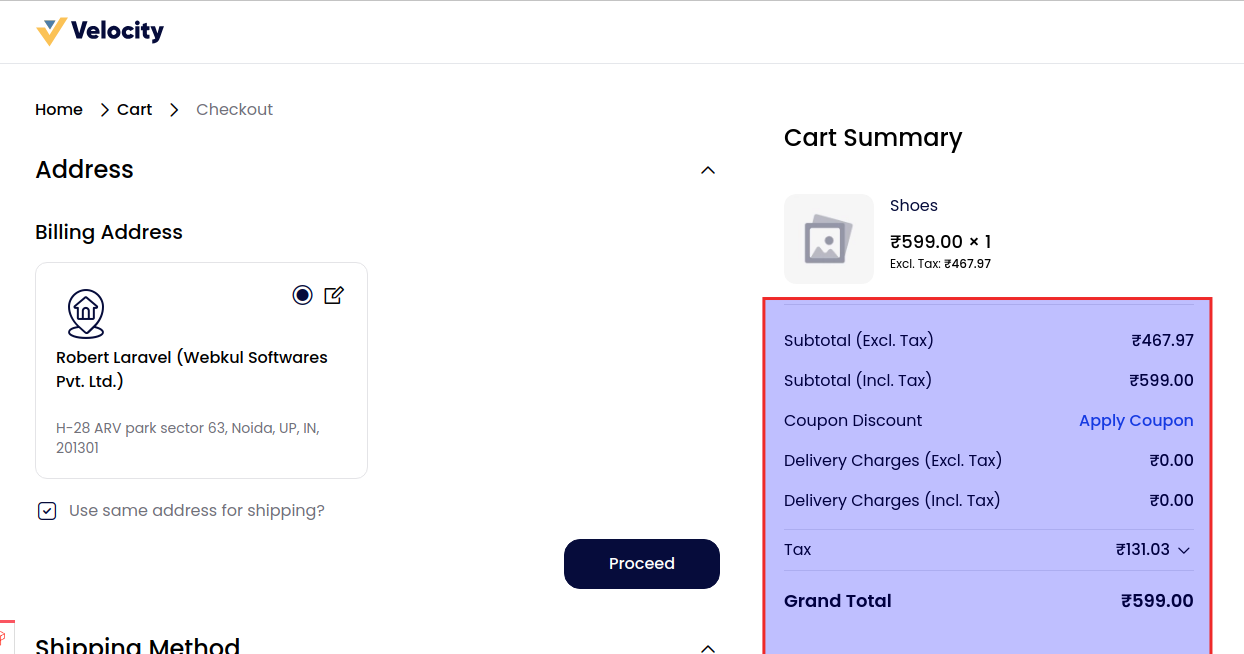
A) Excluding Tax- It simply means that no taxes have been included in the product pricing. For example in the below image product price is 599 and the tax amount is 167.72 and it is separately calculated.
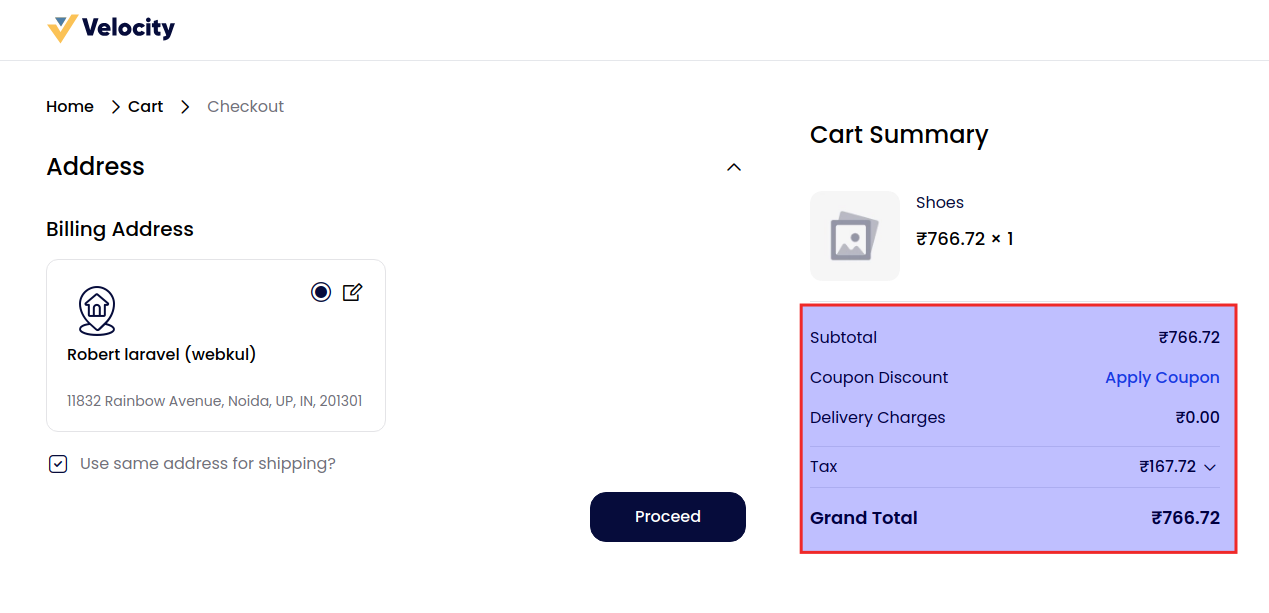
B) Including Tax- It means tax are already factored into the price you have received for a good or service. For example in the below image product price is 599 and the tax amount is 167.72 and the calculation is showing all the amount altogether.
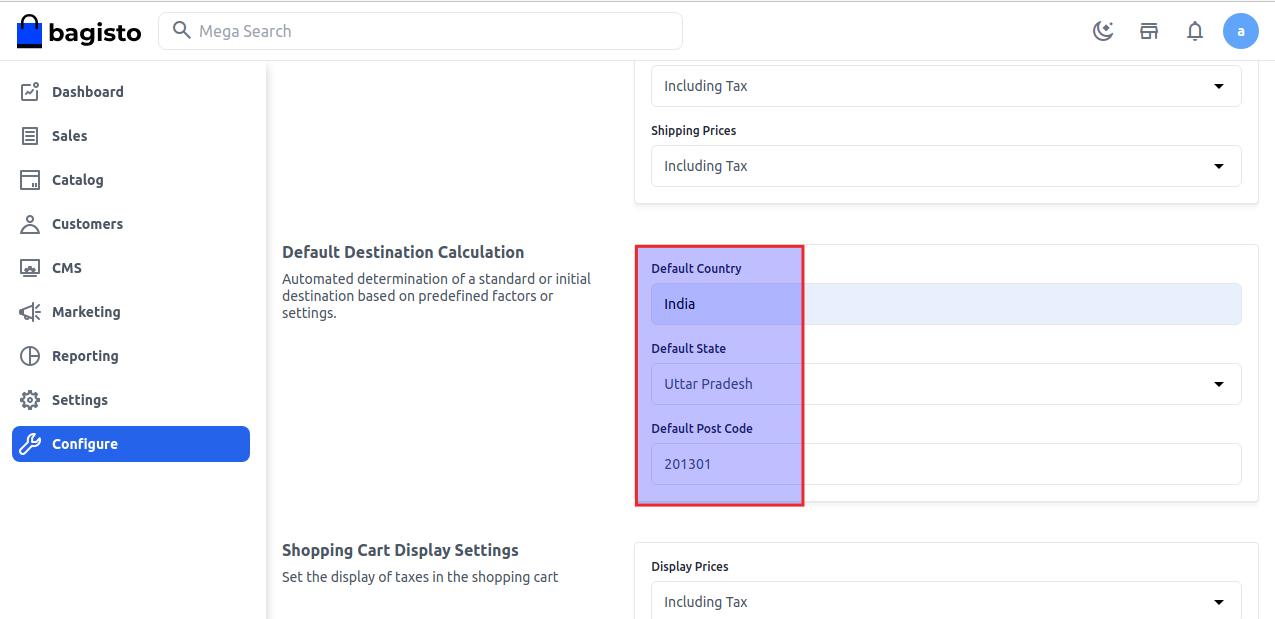
C) Default Destination Calculation - Select Country, State & Pin Code it typically refers to the automatic determination of a shipping or delivery address based on preset criteria or system.
D) Shopping Cart Display Settings - Set the display of taxes in the shopping cart by Display Prices, Display Subtotal, and Display Shipping Amount.
By default, we provide Three options:
A) Excluding Tax- It simply means that no taxes have been included in the product pricing. For example in the below image product price is 599 and the tax amount is 167.72 and it is separately calculated.
B) Including Tax- It means tax are already factored into the price you have received for a good or service. For example in the below image product price is 599 and the tax amount is 167.72 and the calculation shows the amount is altogether.
C) Excluding and Including Both- Excluding tax simply means that no taxes have been included in the product pricing and Include Tax are already factored into the price you have received for a good or service.
# Checkout
Checkout configurations are listed below.
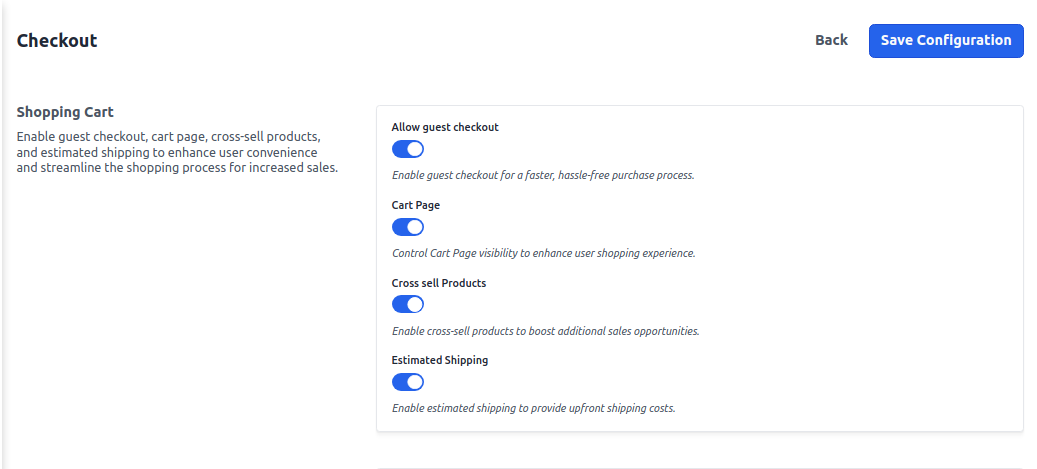
# Shopping Cart
Enable guest checkout, cart page, cross-sell products, and estimated shipping to enhance user convenience and streamline the shopping process for increased sales.
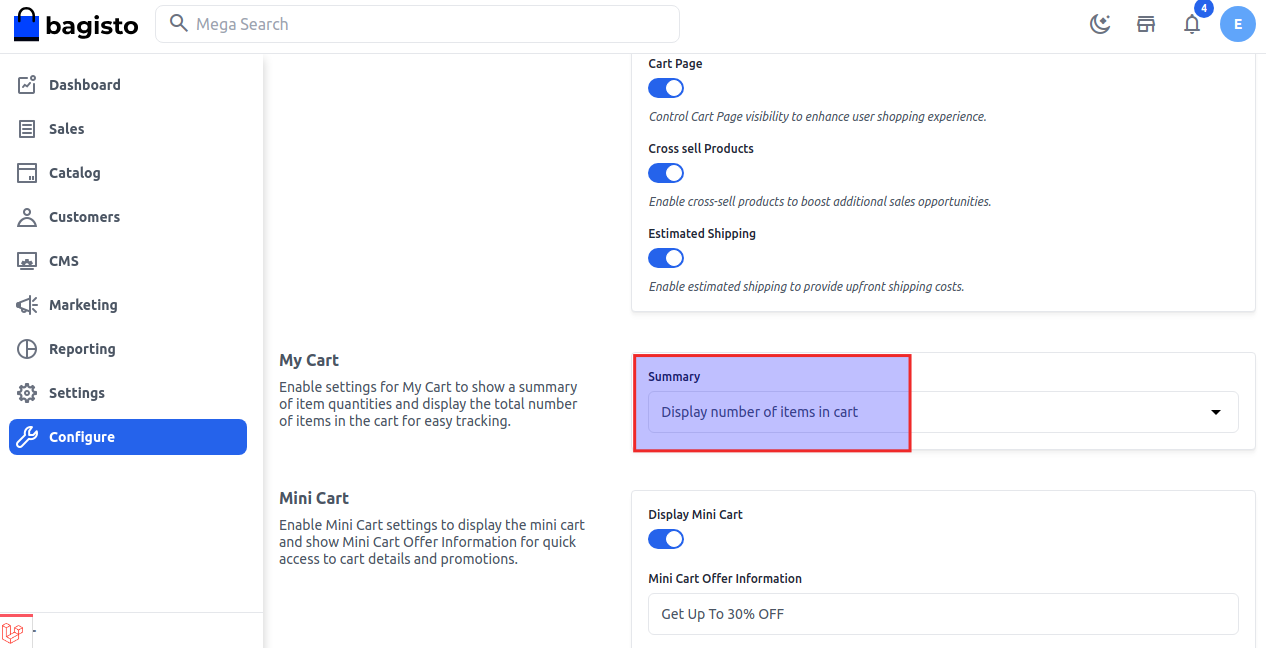
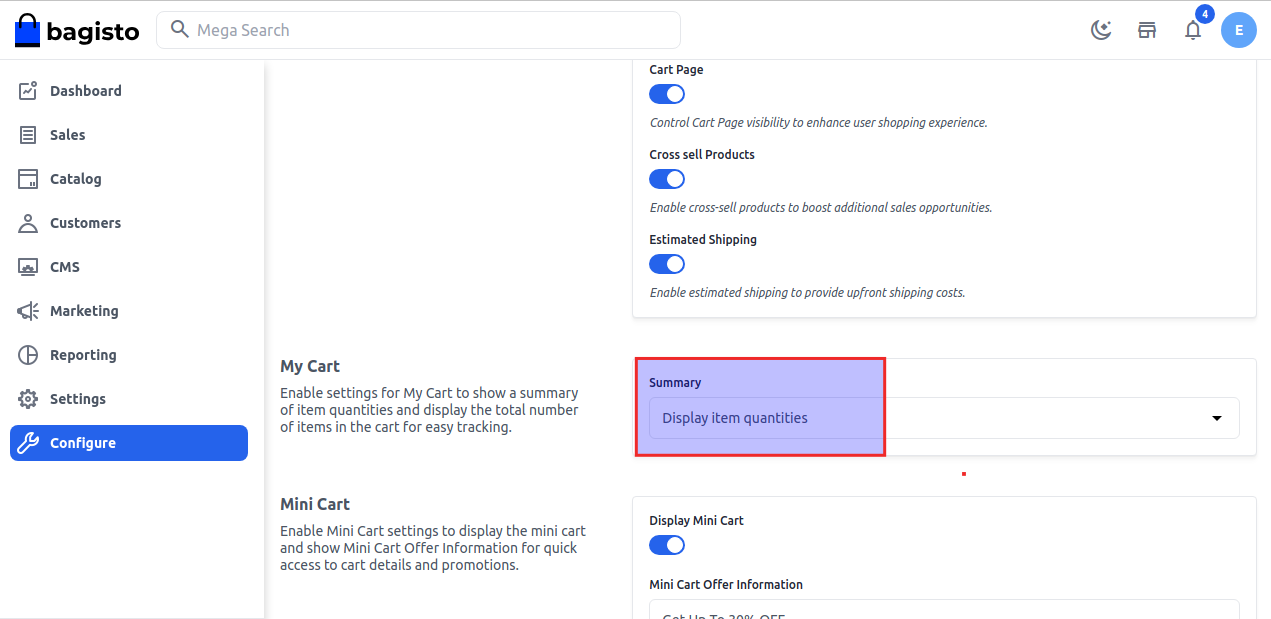
# My Cart
Enable settings for My Cart to show a summary of item quantities and display the total number of items in the cart for easy tracking.
In this, we provide two options:
A) Display numbers of items in cart - Select Display number of items in cart option and then click on Save Configuration button.
After clicking the Add to Cart button this option shows you the total number of quantities. For example, we add 5 products inside the cart. 5 products will be visible on the front end as shown in the image below.
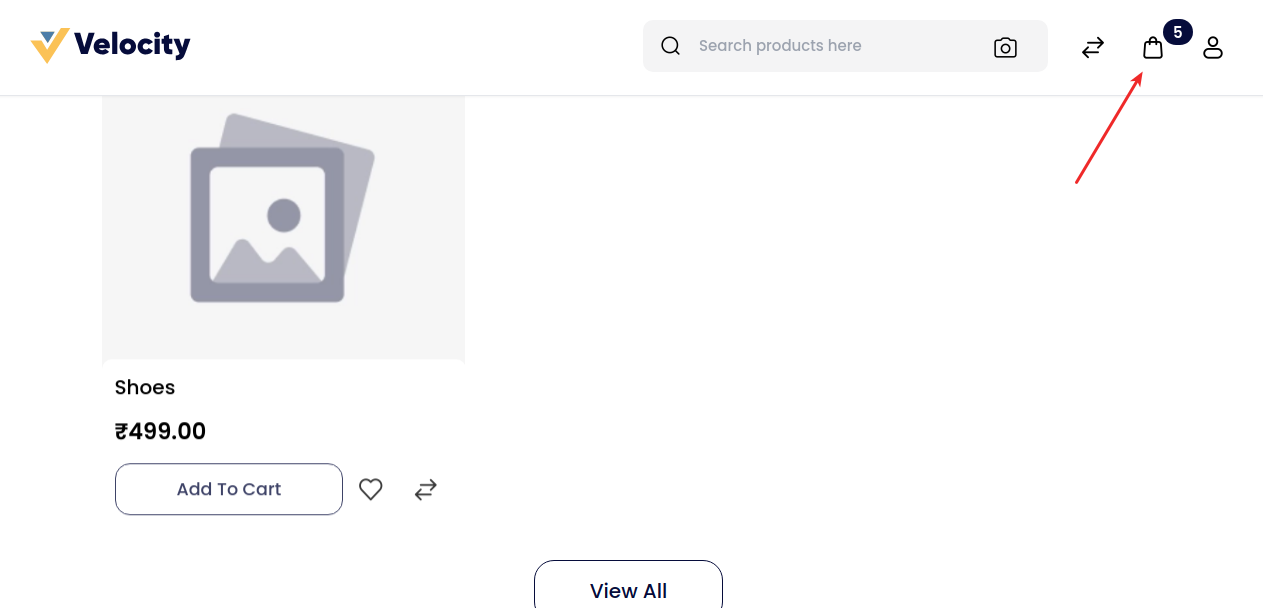
B) Display Items Quantities - Select Display items quantities option and then click on Save Configuration button.
After clicking the Add to Cart button for eg. 7 products you have added inside the cart only 1 quantity will be visible on frontend
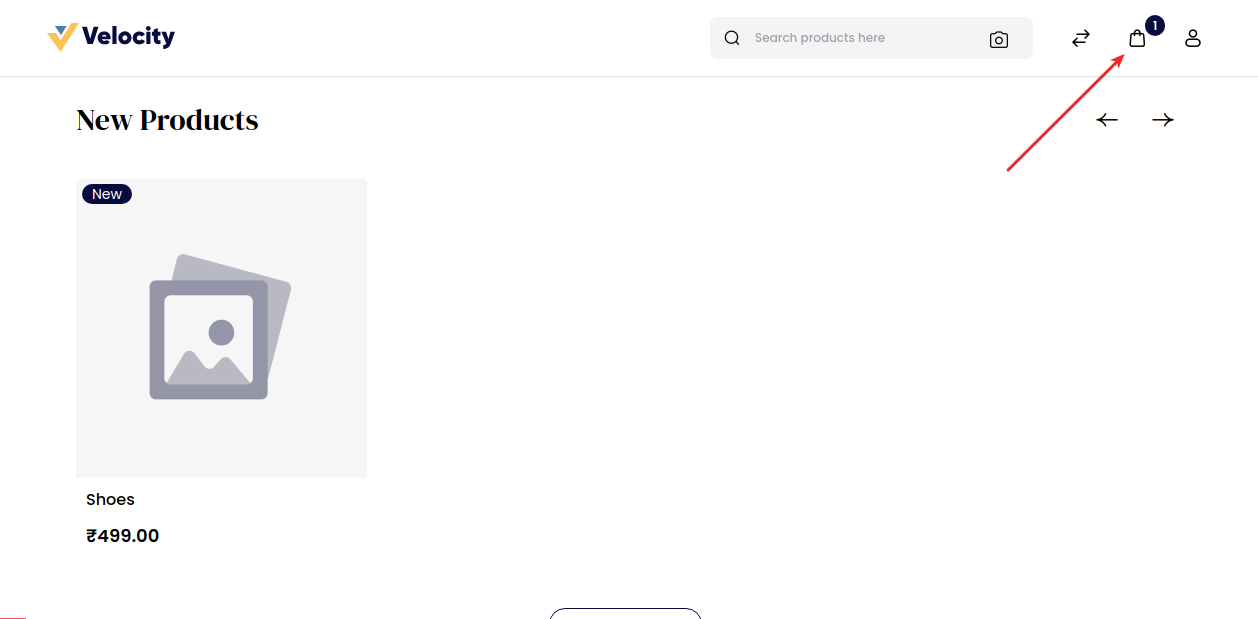
To check the total number of items then you have to go inside the mini-cart.

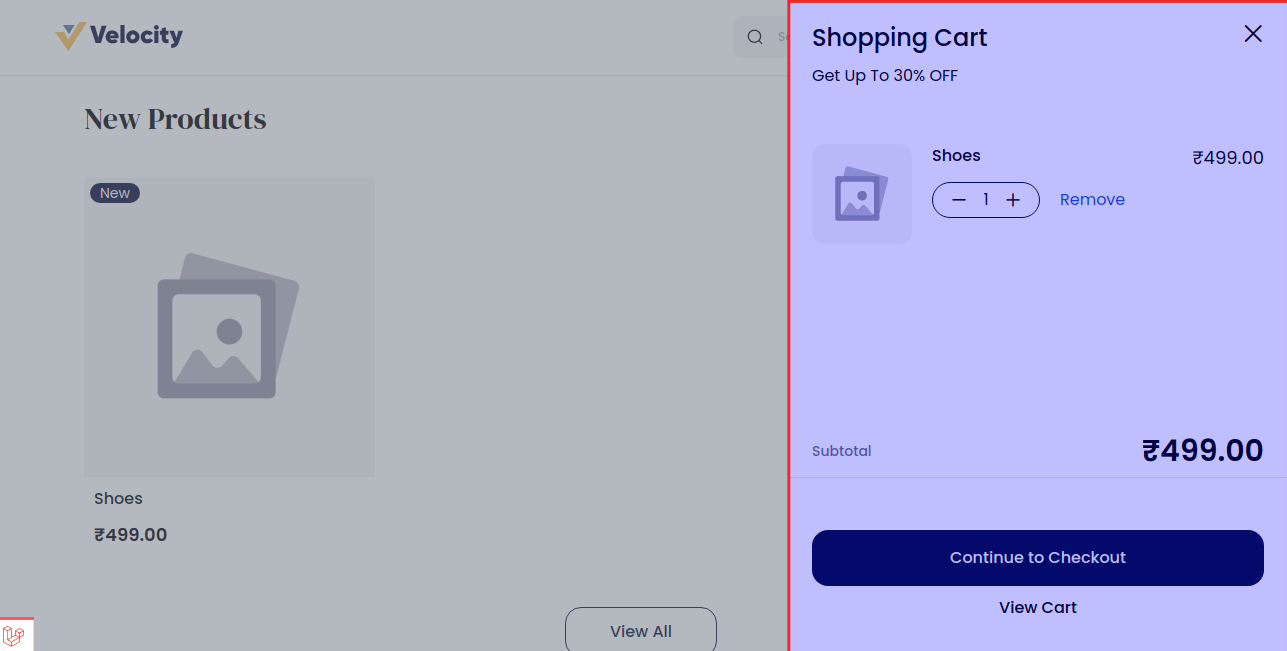
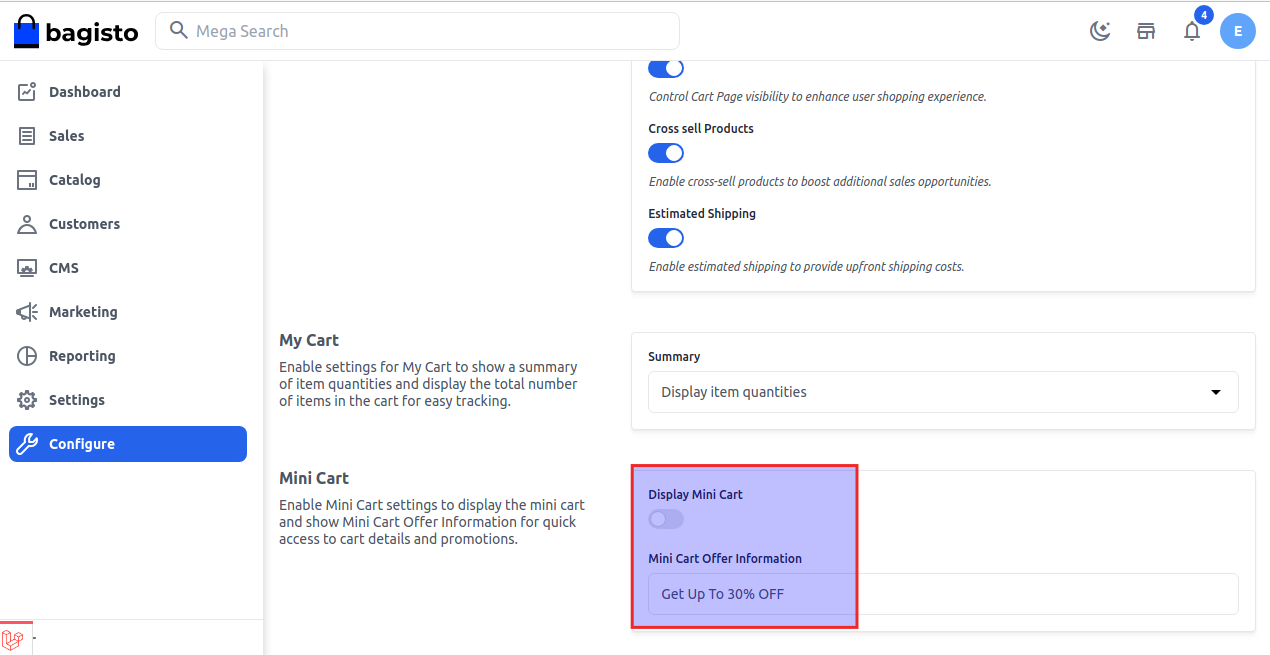
# Mini Cart
Mini Cart is the option where you can able to see the information after adding the product to the cart.
To enable mini cart settings go to Configure >> Checkout >> Mini Cart you can also add a mini cart offer information message as shown in the image below.
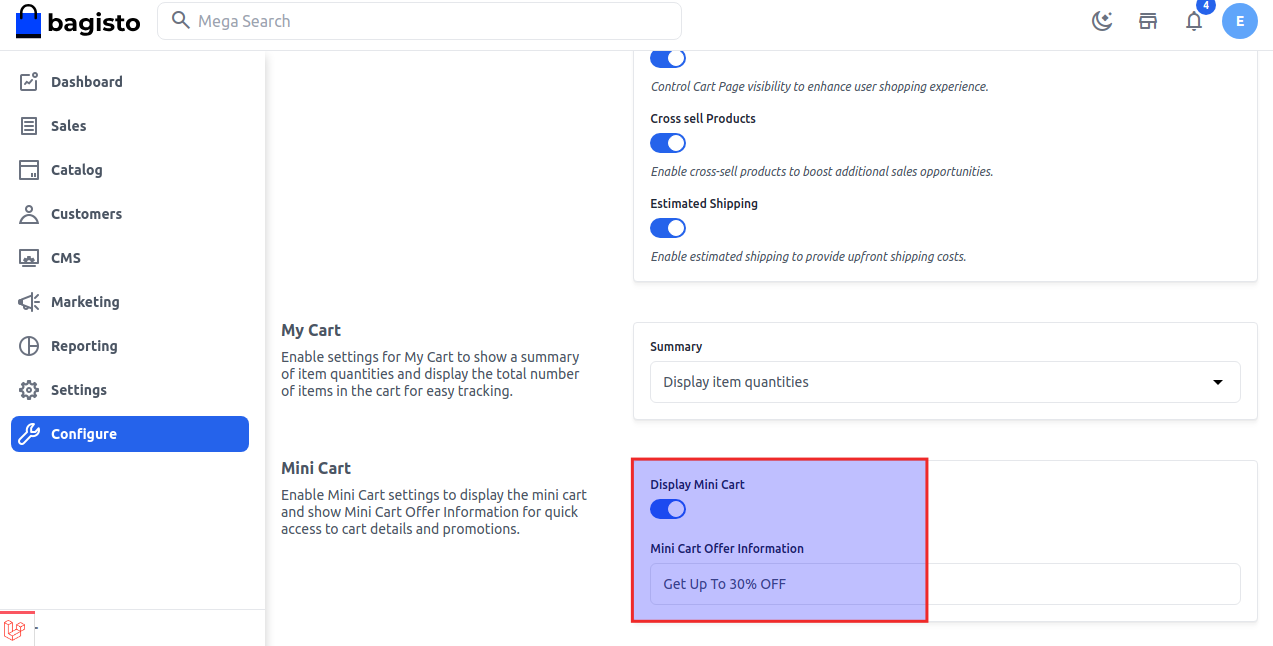
The mini cart is able to open with an offer message as shown in the image below.
Now, if we disable this Mini-Cart user is not able to open the mini-cart, and the user directly gets redirected to the checkout page.
# Notifications
A notification is a message or alert that provides information or prompts an action to users, usually within software applications, websites, or devices.
To add go to the Admin Panel and click on Configure >> Notifications
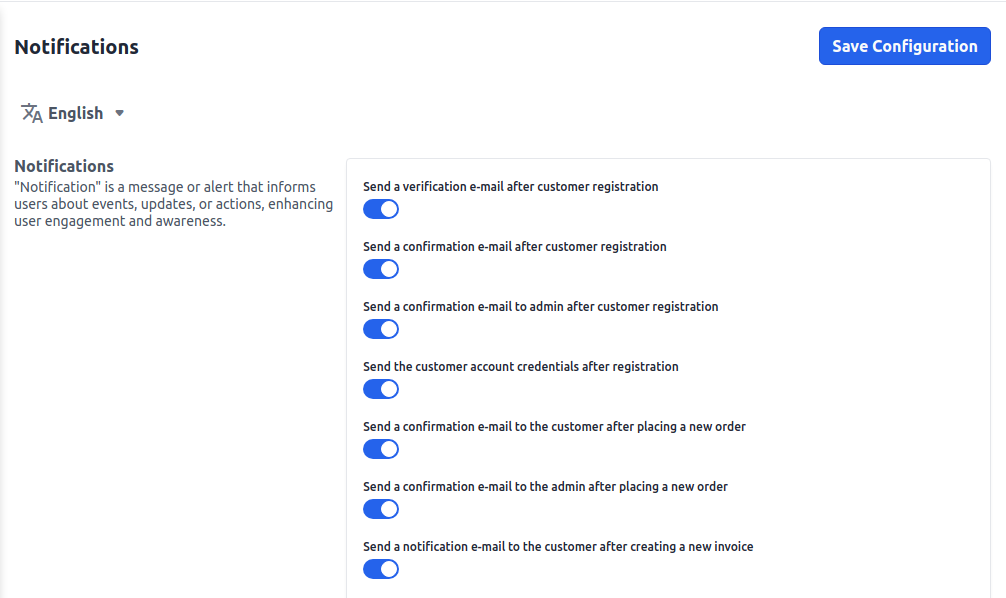
After then click on the Save Configuration button.
# Shipping
Shipping Origin refers to the location from which goods or products are dispatched or shipped. It is the starting point of the shipping process before the items are transported to their destination.
To add go to the Admin Panel and click on Configure >> Shipping
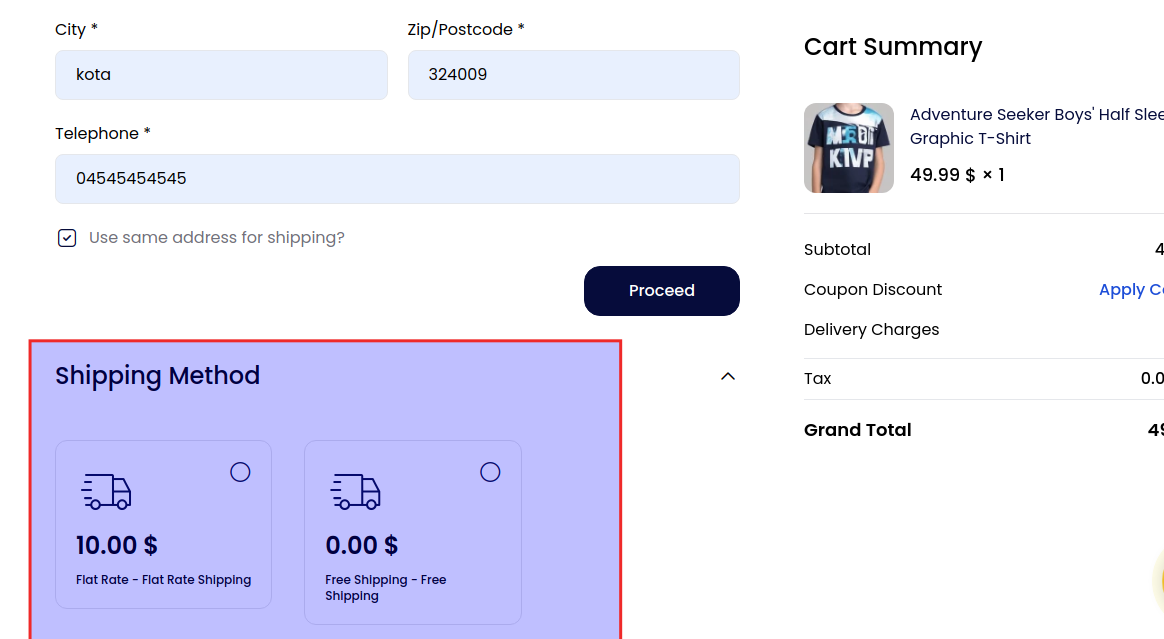
# Shipping Methods
To deliver the products there are two types of shipping methods.
To add go to the Admin Panel and click on Configure >> Shipping Methods
1) Free Shipping "Free shipping" refers to a shipping method where the cost of shipping is waived, and the seller covers the shipping expenses for delivering goods to the buyer.
2)Flat Rate Shipping Flat rate shipping is a shipping method where a fixed fee is charged for shipping, regardless of the weight, size, or distance of the package. This simplifies shipping costs and can be advantageous for both buyers and sellers.

After then click on the Save Configuration button.
# Shipping Mentod Frontend
# Payment Methods
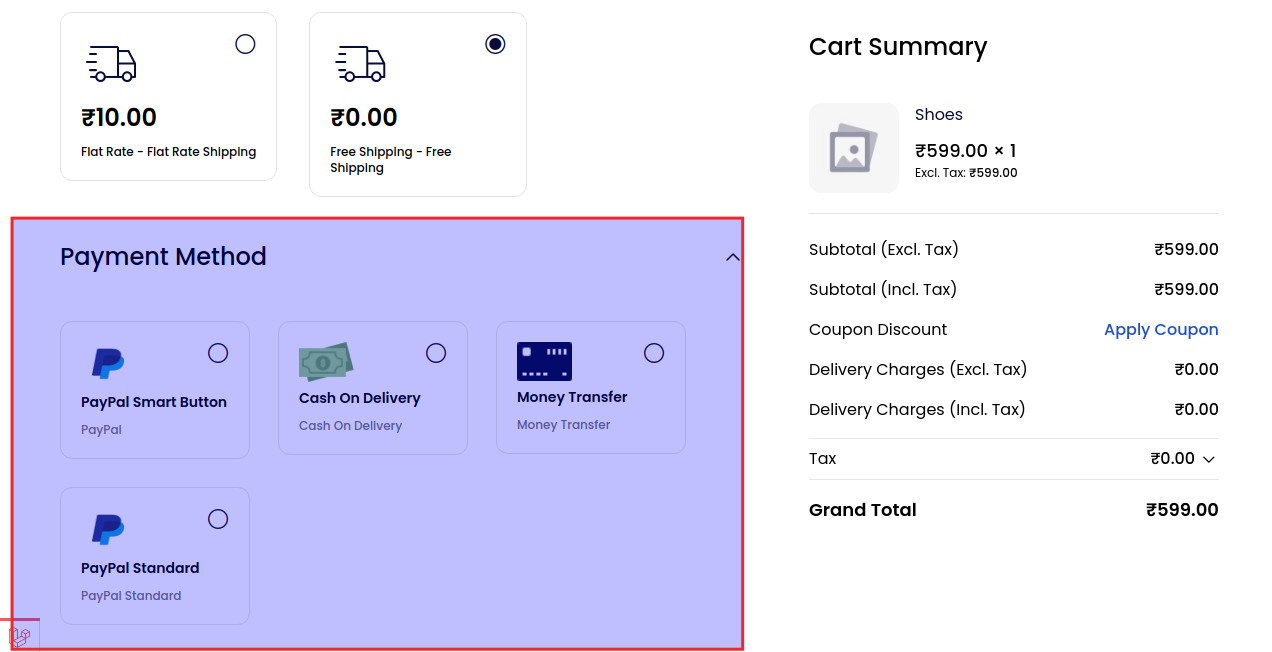
A payment method refers to the various options available for customers to make payments when purchasing a product or service. Whether in a physical or online store, payment methods cover a range of choices. Commonly accepted payment methods include cash, credit cards, debit cards, gift cards, and mobile payments.
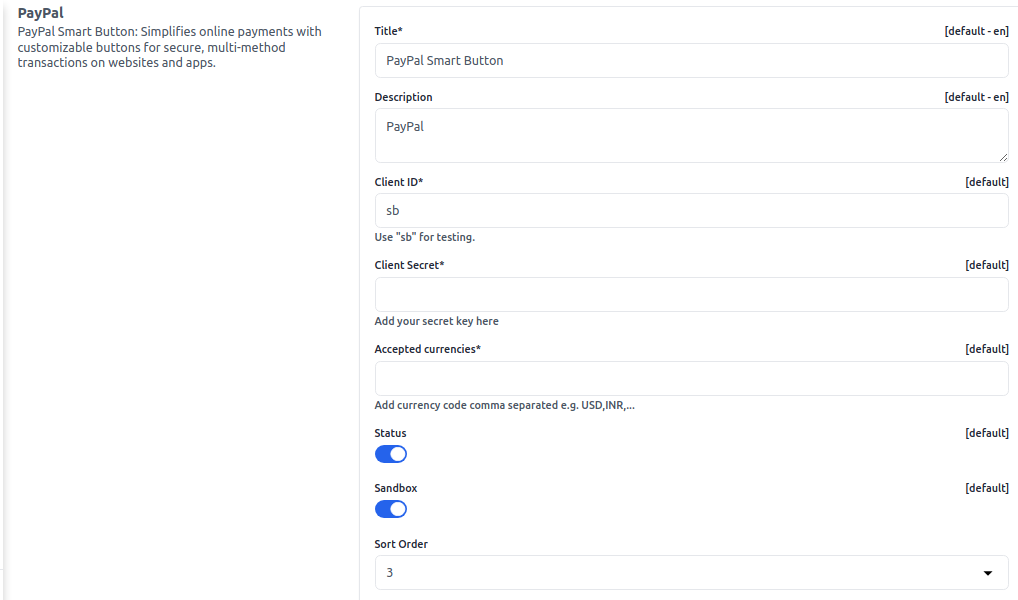
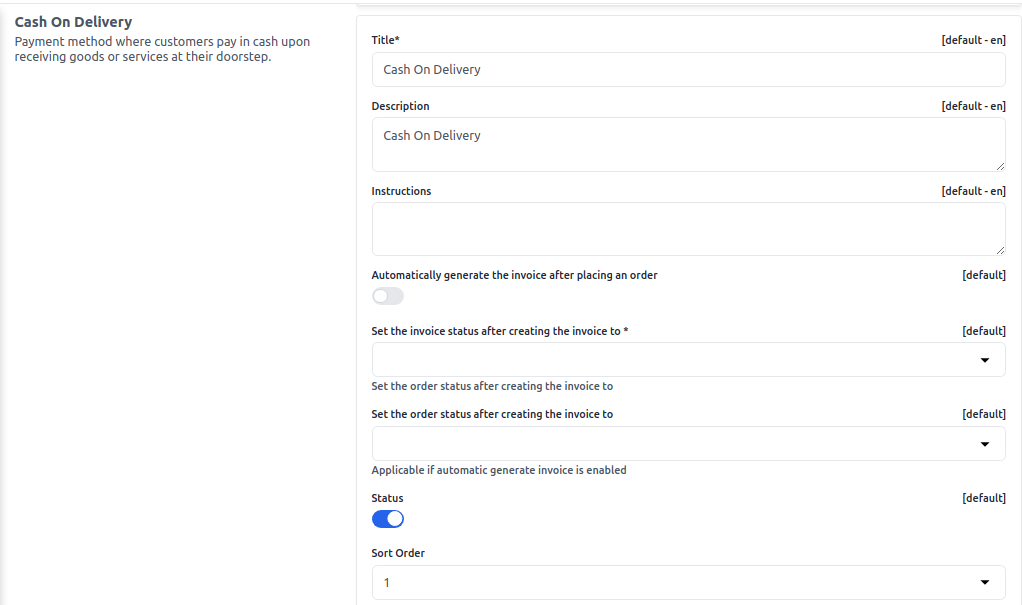
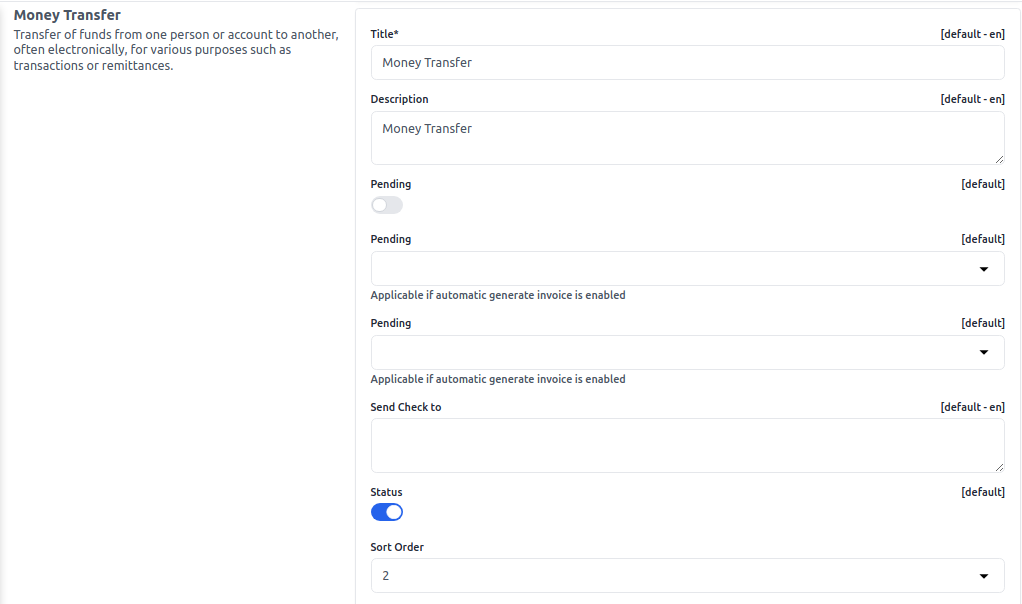
To add go to the Admin Panel and click on Configure >> Payment Method
# Paypal
PayPal Smart Button: Simplifies online payments with customizable buttons for secure, multi-method transactions on websites and apps.
# Cash On Delivery
Payment method where customers pay in cash upon receiving goods or services at their doorstep.
# Money Transfer
Transfer of funds from one person or account to another, often electronically, for various purposes such as transactions or remittances.
# PayPal Standard
PayPal Standard is a basic PayPal payment option for online businesses, enabling customers to pay using their PayPal accounts or credit/debit cards.
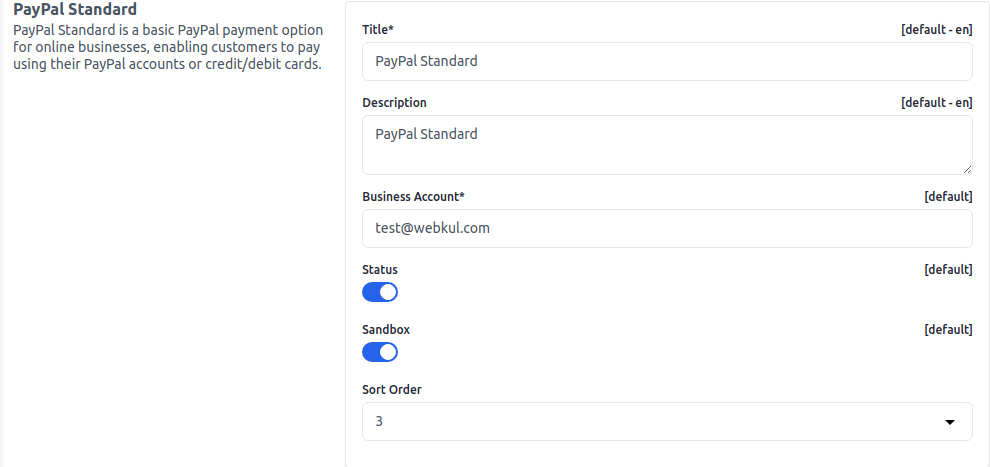
After clicking on the Save Configuration button.
# Payment Methods Forntend
# Order Settings
To add go to the Admin Panel and click on Configure >> Order Settings
Order Number Settings:- Order Number Settings refer to the configuration parameters that determine how order numbers are generated, formatted, and managed within a system. These settings are crucial for organizing and tracking orders efficiently.
Minimum Order Settings:- Configured criteria specifying the lowest required quantity or value for an order to be processed or qualify for benefits.
In the Order section add a new configuration setting so that the order has Included Discount Amount, Include Tax to Amount, and the Description in the cart page.
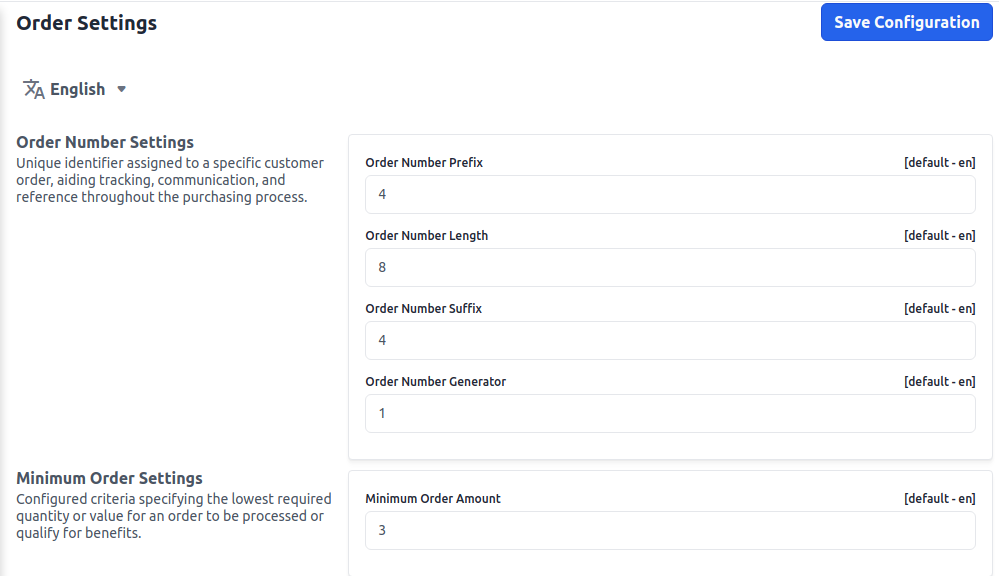
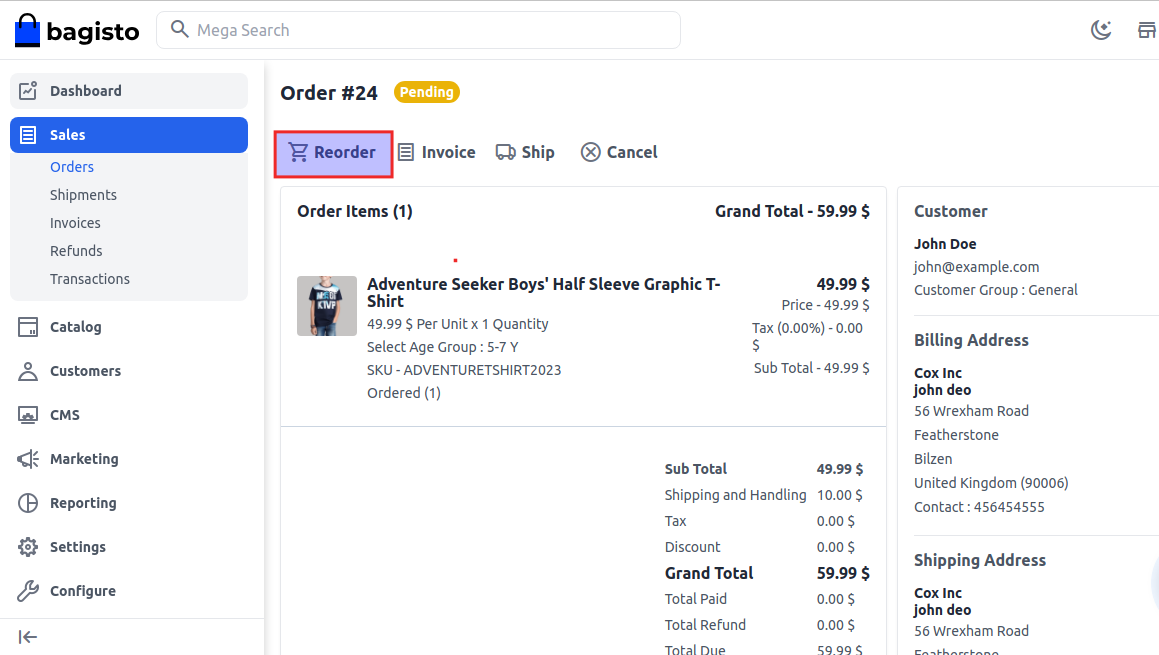
Allow Reorder:- Enable or disable the reordering feature for admin users.

After then click on the Save Configuration button. Admin Reorder
To check Admin Reorder go to Sales >> Orders and go inside the order which is showing the pending status. Here you will able to see the option of Reorder on the admin side.
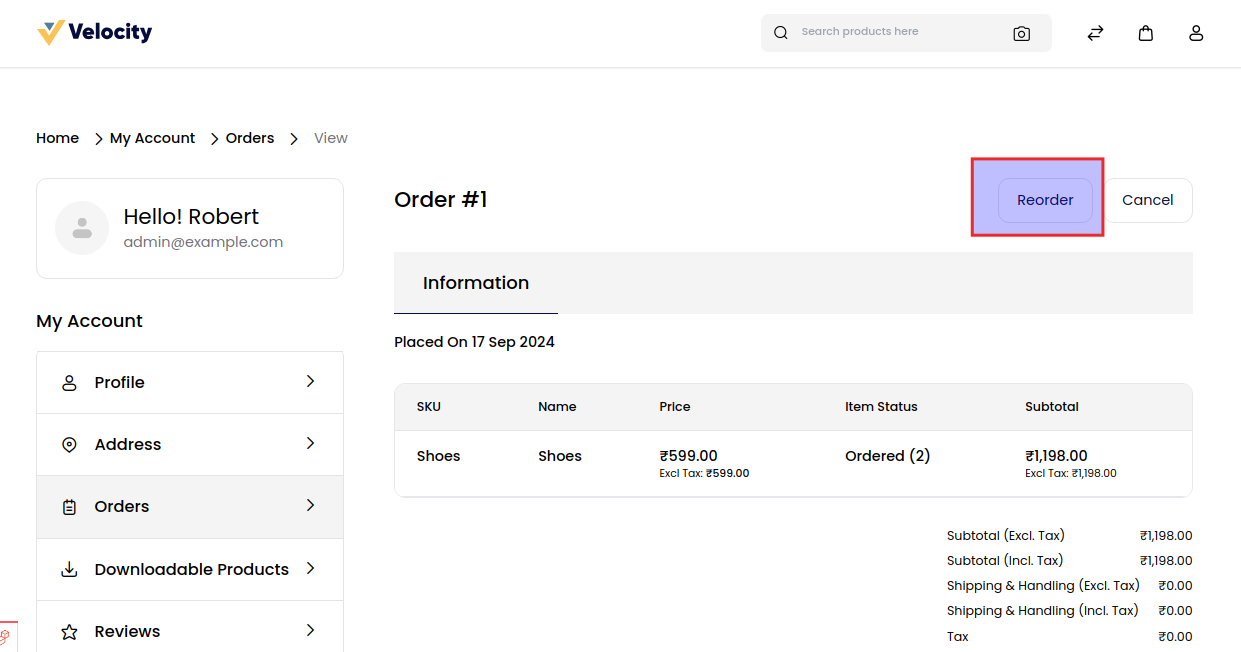
Frontend Reorder
After completing your order go inside My Accounts >> Orders here you will able to see the Reorder button at the top right corner as shown in the below image.
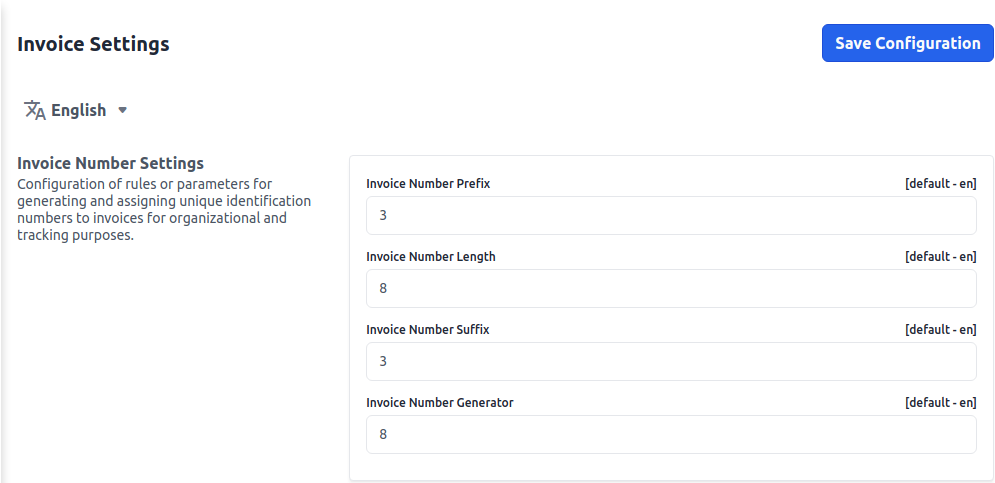
# Invoice Settings
To add go to the Admin Panel and click on Configure >> Invoice Settings
1.Invoice Number Settings Configuration of rules or parameters for generating and assigning unique identification numbers to invoices for organizational and tracking purposes.
2. Payment Terms Agreed-upon conditions dictating when and how payment for goods or services should be made by the buyer to the seller.

3.Invoice Slip Design Visual layout and formatting of an invoice slip, including company branding, itemization, pricing, and payment details for professional presentation.

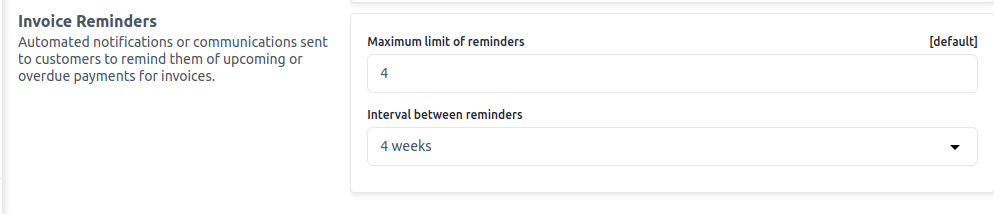
4.Invoice Reminders Automated notifications or communications sent to customers to remind them of upcoming or overdue invoice payments.
After then click on the Save Configuration button.
# Pricing
Details about the cost of goods or services, including base price, discounts, taxes, and additional charges information.
To add go to the Admin Panel and click on Configure >> Pricing
After clicking on the Save Configuration button.
← Taxes Weight Unit →